
Create Your First Webinar
Use this guide when you are creating a webinar from scratch and want to understand every option in the creation flow and editor. Creating the webinar starts a draft. You can then configure its schedule, registration flow, pages, replay, chat, interactions, automations, and publishing state.
What Happens When You Create a Webinar
Section titled “What Happens When You Create a Webinar”When you submit the new webinar form, WebinarStack:
- Creates a draft webinar.
- Generates a public slug from the internal title.
- Saves the initial title, public title, description, video source, and thank-you redirect URL.
- Seeds default attendee-facing pages for registration, thank you, pre-webinar, and widget experiences.
- Opens the webinar editor so you can finish setup before publishing.
A draft is not the same as a finished launch. Review the setup, save changes, preview the experience, test the live room, and publish only when the registration flow and attendee experience are ready.
Before You Start
Section titled “Before You Start”Gather these items before creating the webinar:
- A short internal name for your team.
- The public webinar title attendees should see.
- A concise description of what the webinar teaches or offers.
- A video source, either a WebinarStack-hosted video or a YouTube/Vimeo URL.
- A destination URL for attendees after they register.
- At least one schedule option, such as fixed session times, weekly recurring times, or just-in-time sessions.
- Any brand assets you want to use, such as logo, header image, host avatar, or offer images.
You can create a draft before every item is final, but the more of this you have ready, the faster the setup flow will be.
Open The New Webinar Form
Section titled “Open The New Webinar Form”From the dashboard, open the Webinars area and choose to create a new webinar. The first form captures the minimum information required to create the draft.
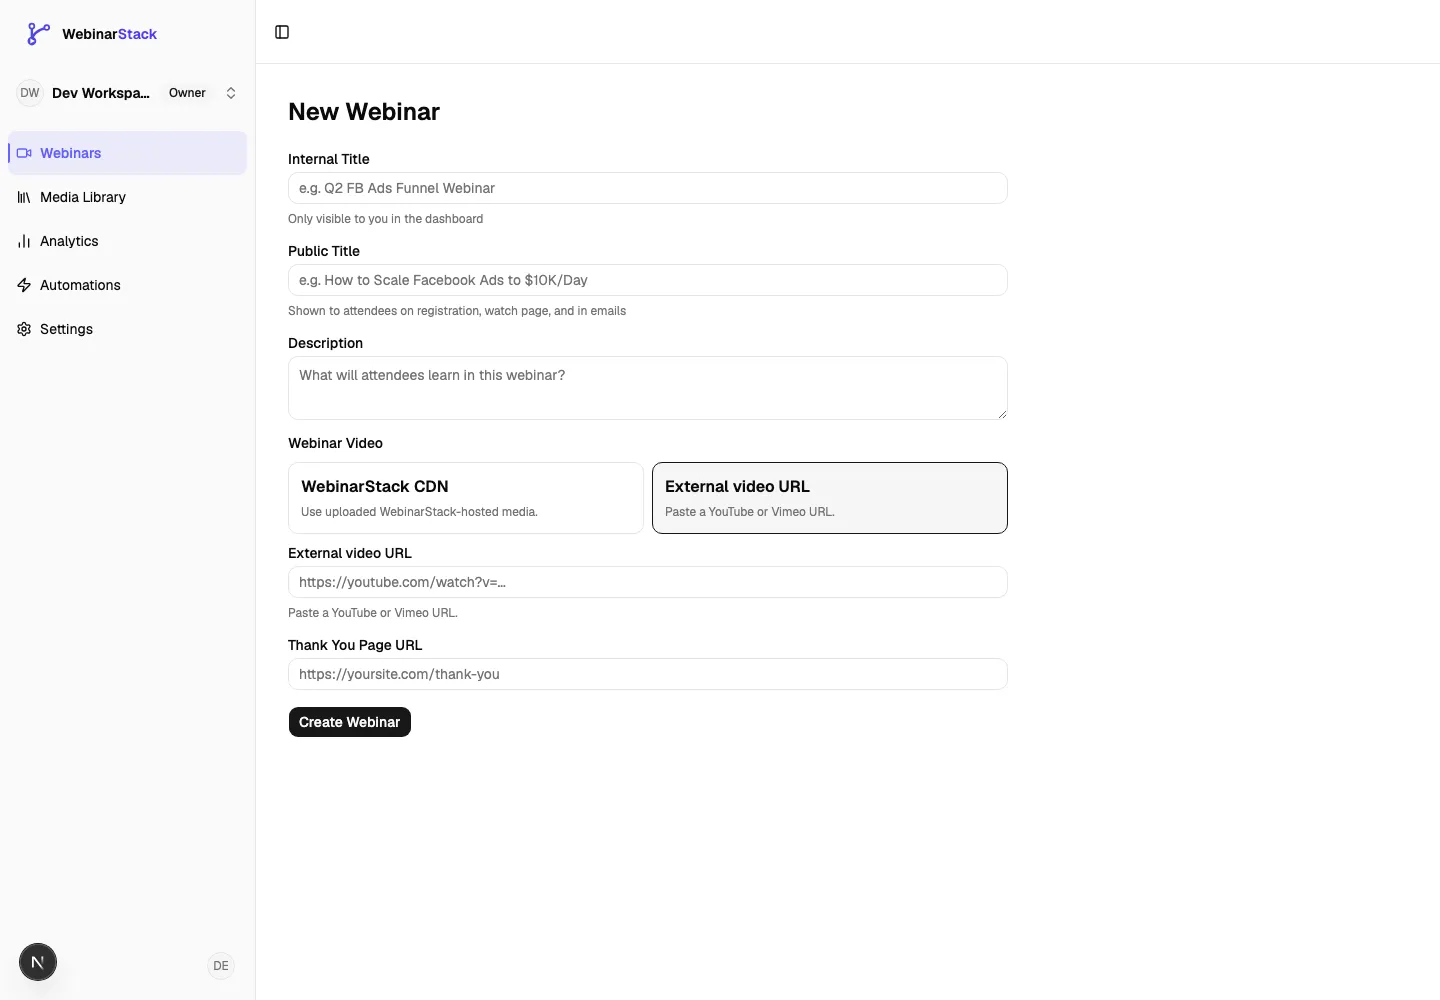
Initial Creation Fields
Section titled “Initial Creation Fields”These are the fields you see before the draft is created.
Internal Title
Section titled “Internal Title”The internal title is required and can be up to 200 characters.
Use it for a clear dashboard name, campaign name, or operational label. It is only visible to your team in the dashboard. WebinarStack also uses it as the basis for the generated URL slug.
Good examples:
Q2 Partner DemoFacebook Ads Evergreen WebinarAugust Product Training
Use a title that helps your team find the webinar later. The public title can be more polished and attendee-facing.
Public Title
Section titled “Public Title”The public title is required and can be up to 200 characters.
This is the attendee-facing title. It appears on registration, watch, and email surfaces. Write it the way you want registrants to see it.
Good examples:
How to Scale Facebook Ads Without Increasing Your Daily BudgetBuild Your First Automated Webinar FunnelProduct Training: Getting Started With Advanced Reporting
Keep this title specific. Attendees should immediately understand what the session is about.
Description
Section titled “Description”The description is optional and can be up to 5,000 characters.
Use it to explain what attendees will learn, who the webinar is for, or why they should register. The description is most useful when it reinforces the promise of the public title.
Include:
- The problem the webinar solves.
- What attendees will learn.
- Who should attend.
- Any time-sensitive or offer-specific context.
Avoid long internal notes here. This copy can appear in attendee-facing contexts.
Webinar Video
Section titled “Webinar Video”Choose the video source for a standard, non-adaptive webinar.
There are two source options:
| Option | Use It When | What You Need |
|---|---|---|
| WebinarStack CDN | You want WebinarStack to host and serve the webinar video. | A video already uploaded to the Media Library, or a new upload through the picker. |
| External video URL | Your video is hosted on YouTube or Vimeo. | A valid YouTube or Vimeo URL. |
If you later turn on Adaptive webinar mode, the main webinar video is replaced by segment-level videos in the Flow tab. Each segment gets its own video provider and duration.
WebinarStack CDN
Section titled “WebinarStack CDN”Use this option when you want to select media uploaded to WebinarStack. Click the video picker, choose an existing video, or upload a new one.
The selected video summary shows the video title and processing status. If the video is still processing, wait until it is ready before testing or launching the attendee experience.
External Video URL
Section titled “External Video URL”Use this option when the webinar video is hosted on YouTube or Vimeo. Paste the full video URL into the field.
WebinarStack validates this field as a supported external video URL. Bunny-hosted direct URLs are not accepted in this field; use WebinarStack CDN for WebinarStack-hosted media.
Thank You Page URL
Section titled “Thank You Page URL”The thank-you page URL is required and must be a valid URL.
Attendees are sent to this URL after registration. This can be:
- A WebinarStack thank-you page.
- A page on your marketing site.
- A custom confirmation page with next steps.
- A booking or checkout page if your flow uses one.
After registration, WebinarStack appends attendee and session details as query parameters, including name, email, token, and session_time. Use those values if your destination page personalizes the confirmation experience.
After The Draft Is Created
Section titled “After The Draft Is Created”After creation, the webinar opens in the editor. The header includes:
- Draft or Published status.
- The generated slug.
- Preview, which opens the webinar preview.
- Test Live, which creates and opens a test attendee session.
- Publish or Unpublish.
The editor is organized into tabs:
- Setup
- Registration
- Flow, shown only for adaptive webinars
- Experience
- Replay
- Automations
- Settings
- Pages
Most core webinar fields use the sticky Save changes bar. Some tools save in their own dialogs or immediately:
| Area | How Saving Works |
|---|---|
| Setup, Registration, Experience, Replay, Settings | Use the sticky Save changes bar. |
| Recurring and just-in-time schedules | Use the sticky Save changes bar. |
| Fixed sessions | Adding or removing a fixed session saves immediately. |
| Blackout dates | Clicking a blackout date saves immediately. |
| Embed widget settings | Changes are saved automatically after a short delay. |
| Interactions | Use the Add/Edit Interaction sheet save button. |
| Chat settings and messages | Chat mode, messages, scripts, Slack channel, and forwarding email have their own save behavior. |
| Automations | Use the Save Automation button in the automation panel. |
| Pages | Use the page editor for each page. |
If you make core field changes and see the Save changes bar, save before leaving the editor.
Setup Tab
Section titled “Setup Tab”The Setup tab covers the webinar foundation: details, video, late-join behavior, schedule, and webinar type.
For a deeper field-by-field reference, see the Webinar Setup Tab guide.
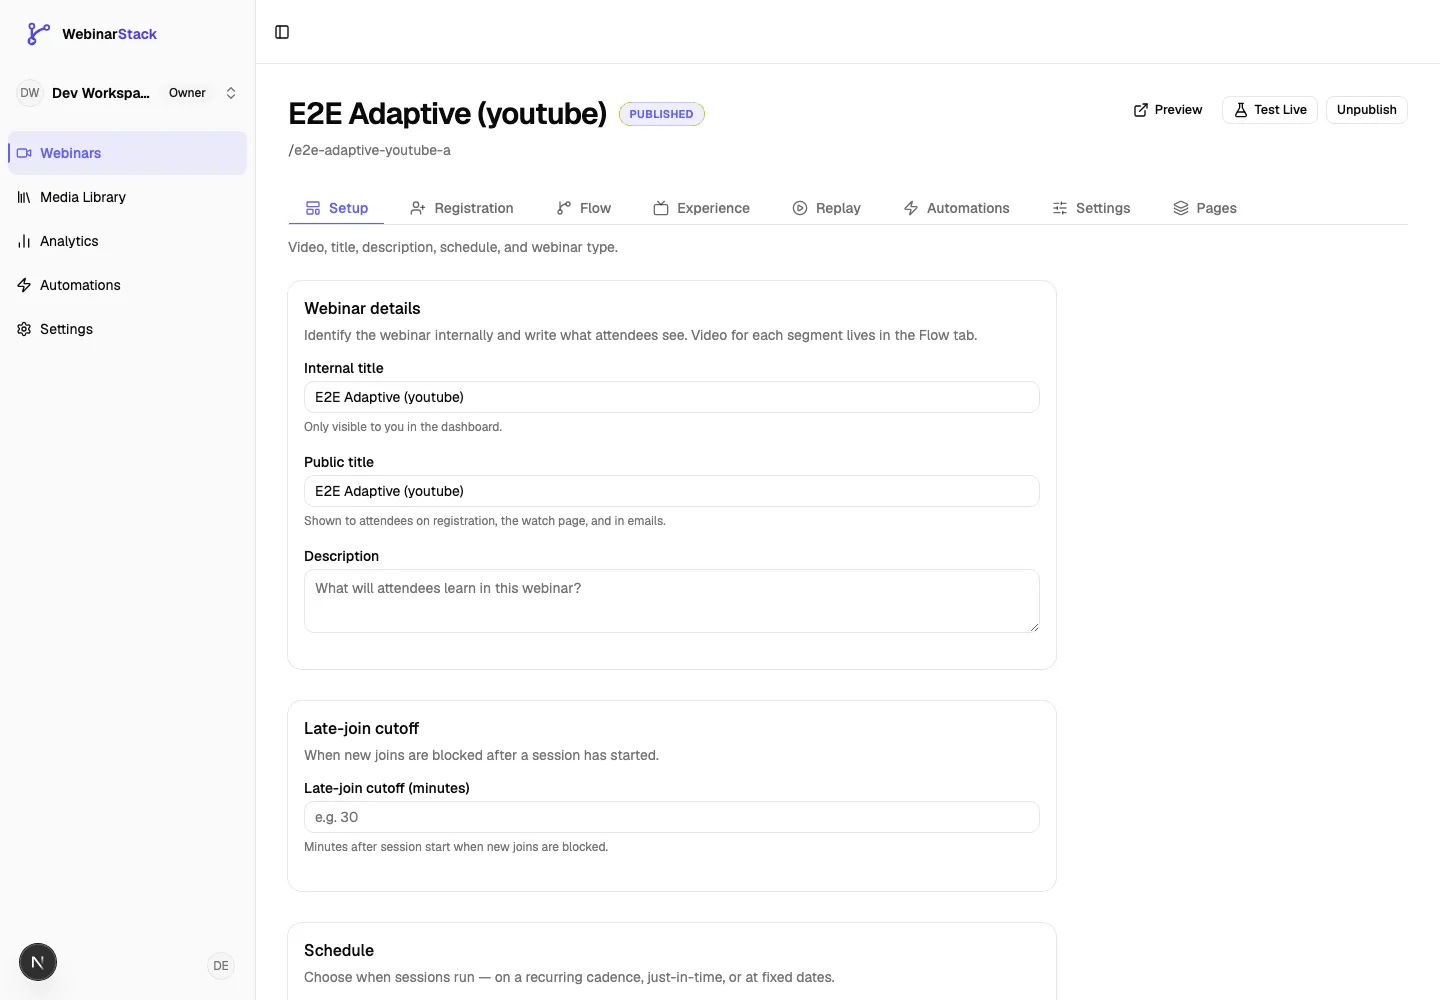
Webinar Details
Section titled “Webinar Details”The Setup tab repeats the core fields from creation so you can edit them later:
- Internal title
- Public title
- Description
- Webinar video, for non-adaptive webinars
For standard webinars, the video field stays in Setup. For adaptive webinars, the setup copy explains that segment videos live in the Flow tab.
Late-Join Cutoff
Section titled “Late-Join Cutoff”The late-join cutoff controls when new joins are blocked after a session starts.
| Field | Meaning | Limits |
|---|---|---|
| Late-join cutoff (minutes) | Number of minutes after session start when new joins should be blocked. | 1 to 180 minutes. |
Use this if the webinar should feel live and you do not want someone entering too far into the presentation. For example, a 30-minute cutoff allows late arrivals for the first 30 minutes but blocks new joins after that.
Leave it blank if you do not want a custom cutoff.
Schedule
Section titled “Schedule”Schedules determine which session choices appear on the registration page. WebinarStack can combine fixed, recurring, and just-in-time schedules in the same webinar.
If two generated sessions overlap at the same time, WebinarStack deduplicates them. Fixed sessions take priority over recurring sessions, and recurring sessions take priority over just-in-time sessions.
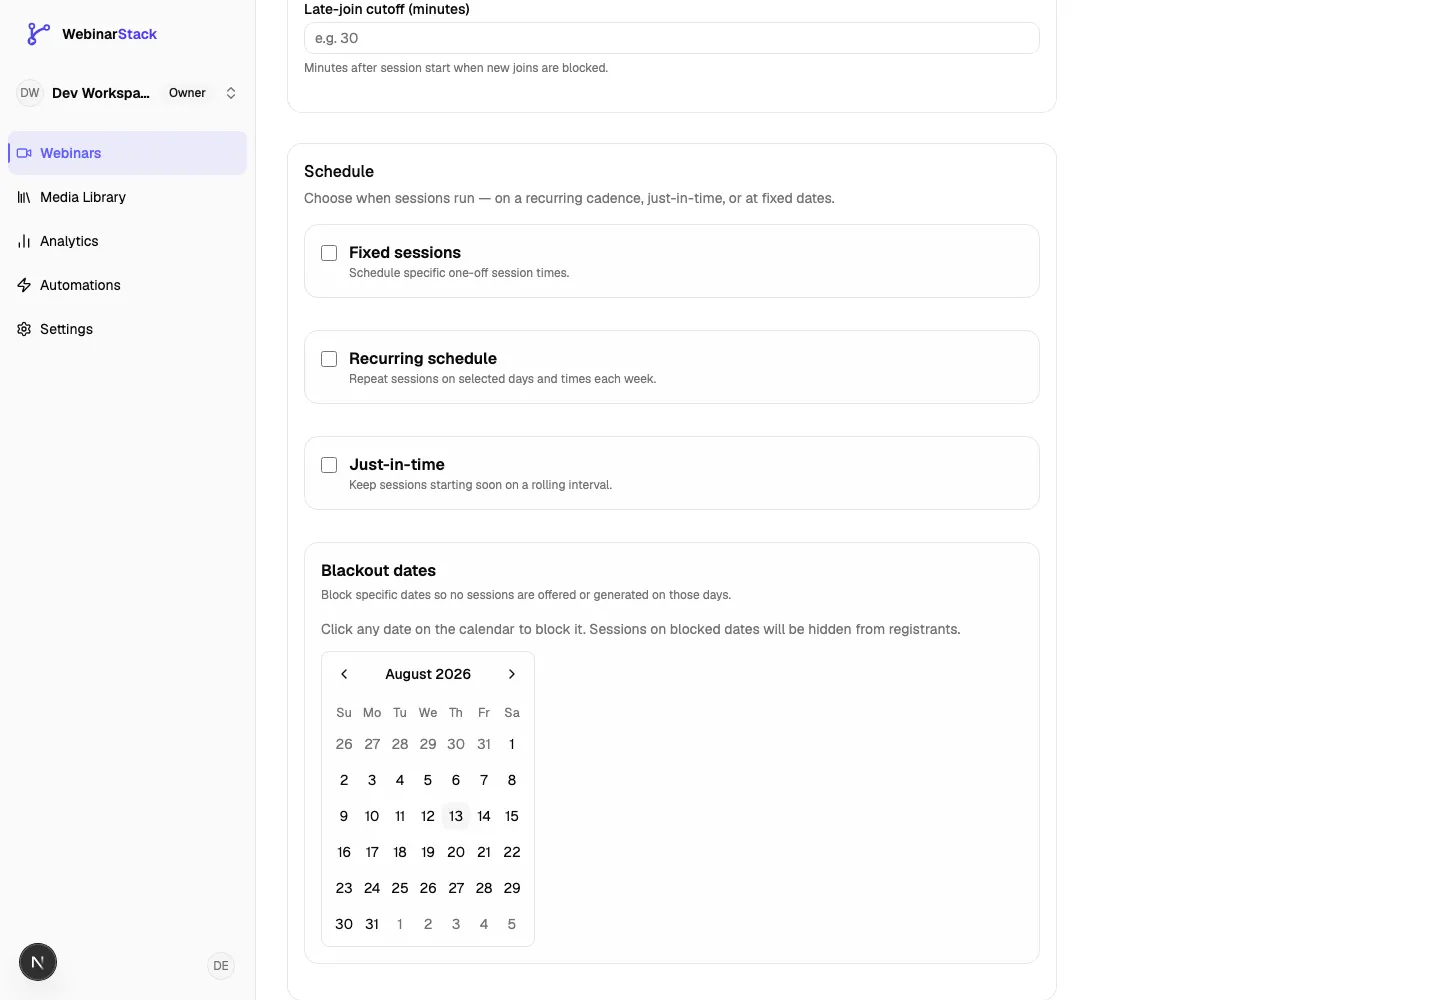
Fixed Sessions
Section titled “Fixed Sessions”Fixed sessions are one-off dates and times.
Use fixed sessions when:
- You want a specific launch date.
- You are running a limited promotion.
- You want a webinar to appear at exact event times.
Fields:
| Field | Meaning |
|---|---|
| Date | The calendar date for the session. |
| Time | The local time for the session. |
| Add session | Saves the session immediately. |
| Remove session | Deletes that fixed session immediately. |
Fixed sessions are listed below the add row. Only upcoming fixed sessions appear in the list.
Recurring Schedule
Section titled “Recurring Schedule”Recurring schedules repeat weekly on selected days and times.
Use recurring schedules when:
- The webinar should run every week.
- You want predictable weekly session slots.
- You want attendees to choose from several recurring times.
Fields:
| Field | Meaning |
|---|---|
| Select days | Days of the week when recurring sessions are generated. |
| Time rows per day | One or more times for each selected day. |
| Add time | Adds another time slot for that selected day. |
| Remove time | Removes a time slot from that day. |
| Availability Window | Restricts which generated sessions can be shown to registrants. |
The host timezone is detected from your browser when the recurring rule is saved.
Just-In-Time Sessions
Section titled “Just-In-Time Sessions”Just-in-time sessions keep sessions starting soon on a rolling interval.
Use just-in-time scheduling when:
- You want the registration page to offer a session that starts soon.
- You want an evergreen webinar to feel immediately available.
- You want frequent session availability without listing every fixed time manually.
Fields:
| Field | Meaning |
|---|---|
| Session interval | How often a JIT session is available. Options are 5, 10, 15, 30, or 60 minutes. |
| Availability Window | Restricts the days and hours when JIT sessions are offered. |
For example, a 15-minute interval with a Monday-Friday, 9 AM-6 PM availability window offers rolling sessions every 15 minutes during those hours.
Availability Window
Section titled “Availability Window”Recurring and JIT schedules both include an availability window.
Fields:
| Field | Meaning |
|---|---|
| Days available | Days when sessions can be offered. |
| Start hour | Earliest hour sessions can be offered. |
| End hour | Latest hour sessions can be offered. End of day means through the end of the day. |
The availability window is evaluated in your webinar timezone.
Blackout Dates
Section titled “Blackout Dates”Blackout dates block specific calendar dates so no sessions are offered on those days.
Use blackout dates for:
- Holidays.
- Planned outages.
- Promotion pauses.
- Days when you do not want attendees registering.
Click a date to block it. Click a blocked date again to unblock it. You can also shift-click to select a date range.
Webinar Type
Section titled “Webinar Type”The webinar type controls whether the webinar is standard or adaptive.
| Option | Meaning |
|---|---|
| Adaptive webinar off | One primary webinar video plays for all attendees. |
| Adaptive webinar on | The webinar is split into segments, and attendees can branch down different paths based on behavior. |
When Adaptive webinar is on:
- The Flow tab appears.
- The main Setup video is no longer the primary video field.
- Each segment gets its own video, duration, and interactions.
- Branch transitions can be configured in Experience and Flow.
Use adaptive mode when your webinar needs different paths for different attendees. Keep it off for a straightforward evergreen webinar.
Registration Tab
Section titled “Registration Tab”The Registration tab controls how people register, what sessions they can choose, and how you embed registration on other pages.
For a deeper field-by-field reference, see the Webinar Registration Tab guide.
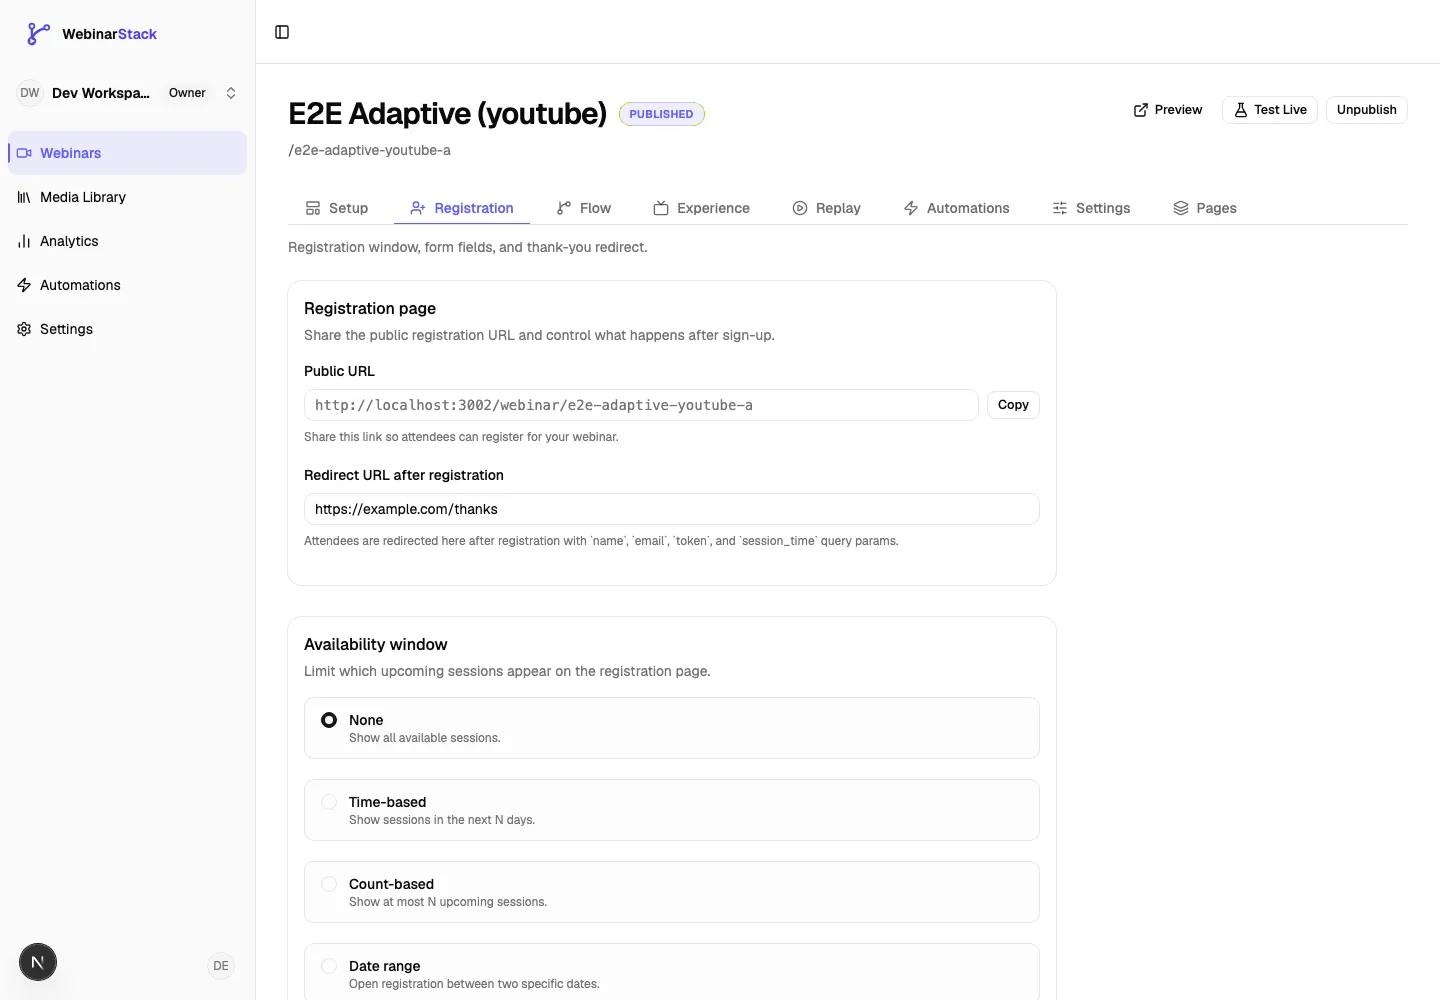
Registration Page
Section titled “Registration Page”This section shows the public registration URL and the redirect destination after registration.
Fields:
| Field | Meaning |
|---|---|
| Public URL | The attendee-facing registration link for this webinar. |
| Copy | Copies the public URL. |
| Redirect URL after registration | Where attendees go after registering. Must be a valid URL. |
The redirect URL receives name, email, token, and session_time query parameters.
Availability Window
Section titled “Availability Window”The registration availability window controls which upcoming sessions appear on the registration page.
Options:
| Option | Meaning | When To Use |
|---|---|---|
| None | Shows all available sessions. | Simple schedules with a manageable number of session choices. |
| Time-based | Shows sessions in the next N days. | You want the registration page focused on near-term availability. |
| Count-based | Shows at most N upcoming sessions. | You want a limited number of choices even when many sessions exist. |
| Date range | Opens registration between two specific calendar dates. | You want a fixed campaign window. |
Additional fields:
| Field | Appears When | Meaning |
|---|---|---|
| Days ahead | Time-based | Number of days into the future to show sessions. |
| Maximum sessions | Count-based | Maximum number of upcoming sessions to show. |
| Open from | Date range | First date registration is open. |
| Open until | Date range | Last date registration is open. |
| Show “Starting soon” badge on JIT sessions | Always | Shows a badge when just-in-time sessions are available. |
Use this section to keep the registration page easy to scan. A long list of sessions can reduce conversions.
Embed Widget
Section titled “Embed Widget”The embed widget lets you place the registration experience on another web page.
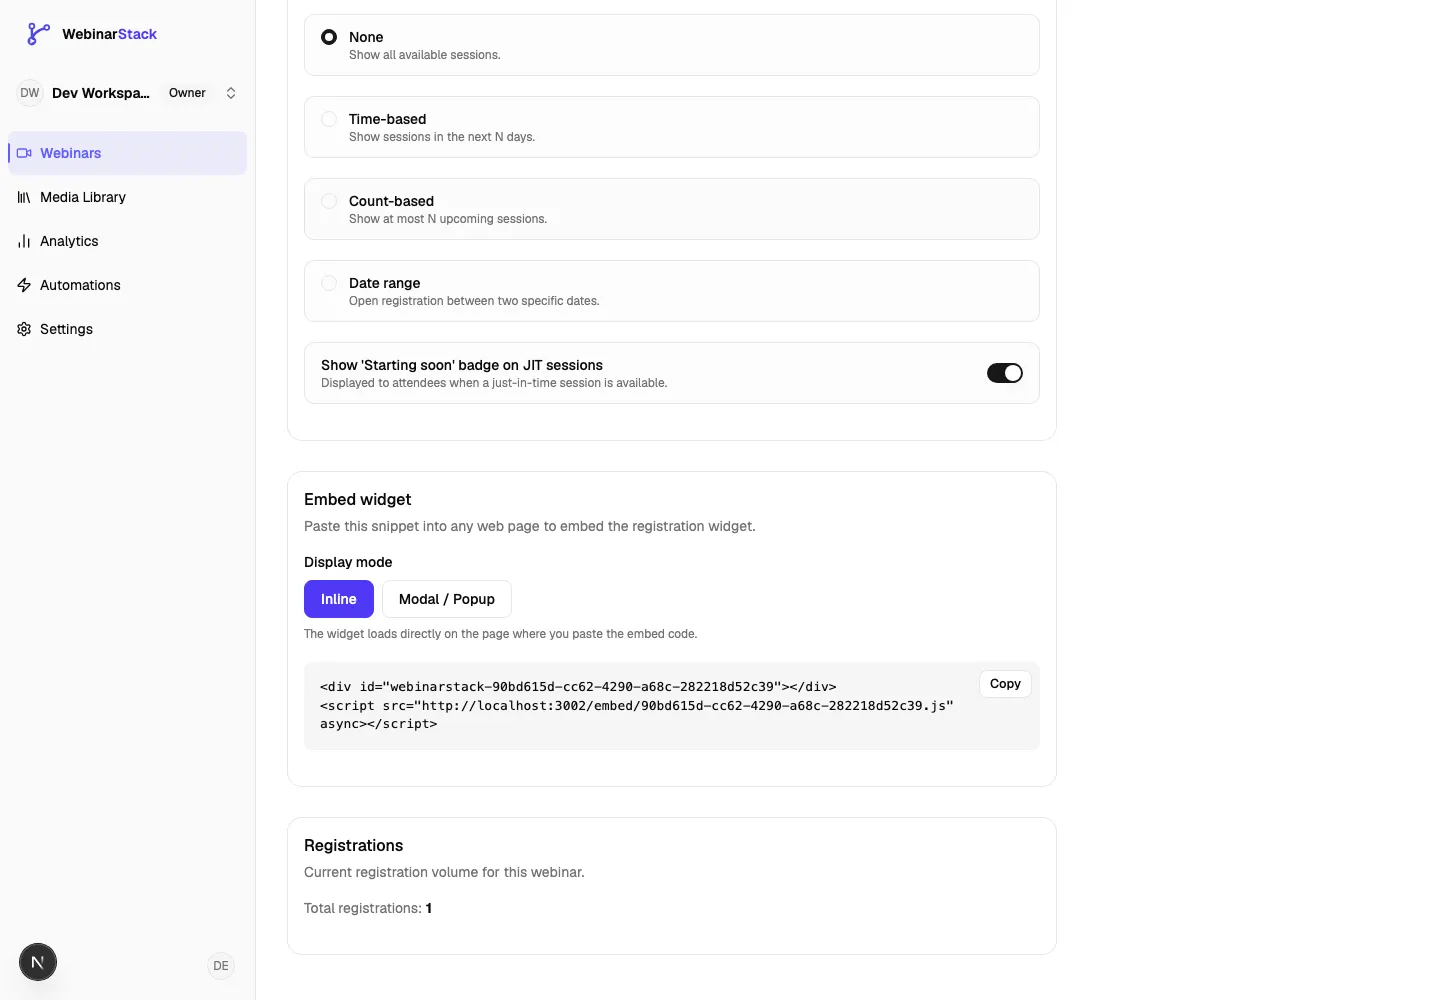
Display modes:
| Mode | Meaning |
|---|---|
| Inline | The widget loads directly where you paste the embed code. |
| Modal / Popup | A button appears on the host page. Clicking it opens the widget in an overlay. |
Modal fields:
| Field | Meaning | Limits |
|---|---|---|
| Button text | Text displayed on the popup trigger button. | Use short action copy such as Watch the Webinar. |
| Button color | Hex color for the trigger button. | Use a valid hex color such as #4F46E5. |
| Modal width (px) | Width of the popup overlay. | 320 to 1200 pixels. |
The embed code updates based on the selected mode and settings. Copy the snippet and paste it into the page where you want registration to appear.
Registrations
Section titled “Registrations”This section shows the current total registration count for the webinar. Use it as a quick check that the public page or embed widget is receiving registrations.
Experience Tab
Section titled “Experience Tab”The Experience tab controls brand identity, interactions, chat, and adaptive transition defaults.
For a deeper field-by-field reference, see the Webinar Experience Tab guide.
Brand Identity
Section titled “Brand Identity”Brand identity fields affect attendee-facing webinar surfaces.
Image fields support two source types:
| Source | Meaning |
|---|---|
| External URL | Paste an existing image URL. |
| WebinarStack CDN | Choose an uploaded image from the Media Library. |
Fields:
| Field | Meaning | Limits |
|---|---|---|
| Logo | Logo shown throughout the webinar experience. | Must be a valid image URL or hosted image. |
| Header image | Large image used at the top of the webinar experience. | Must be a valid image URL or hosted image. |
| Host display name | Name shown beside host messages and host-facing attendee surfaces. | Up to 100 characters. |
| Host avatar | Square image used for host identity in the chat panel. | Must be a valid image URL or hosted image. |
| Headline text | Optional attendee-facing headline across branded surfaces. | Up to 200 characters. |
Use consistent images and naming so the registration page, watch page, chat panel, and emails feel connected.
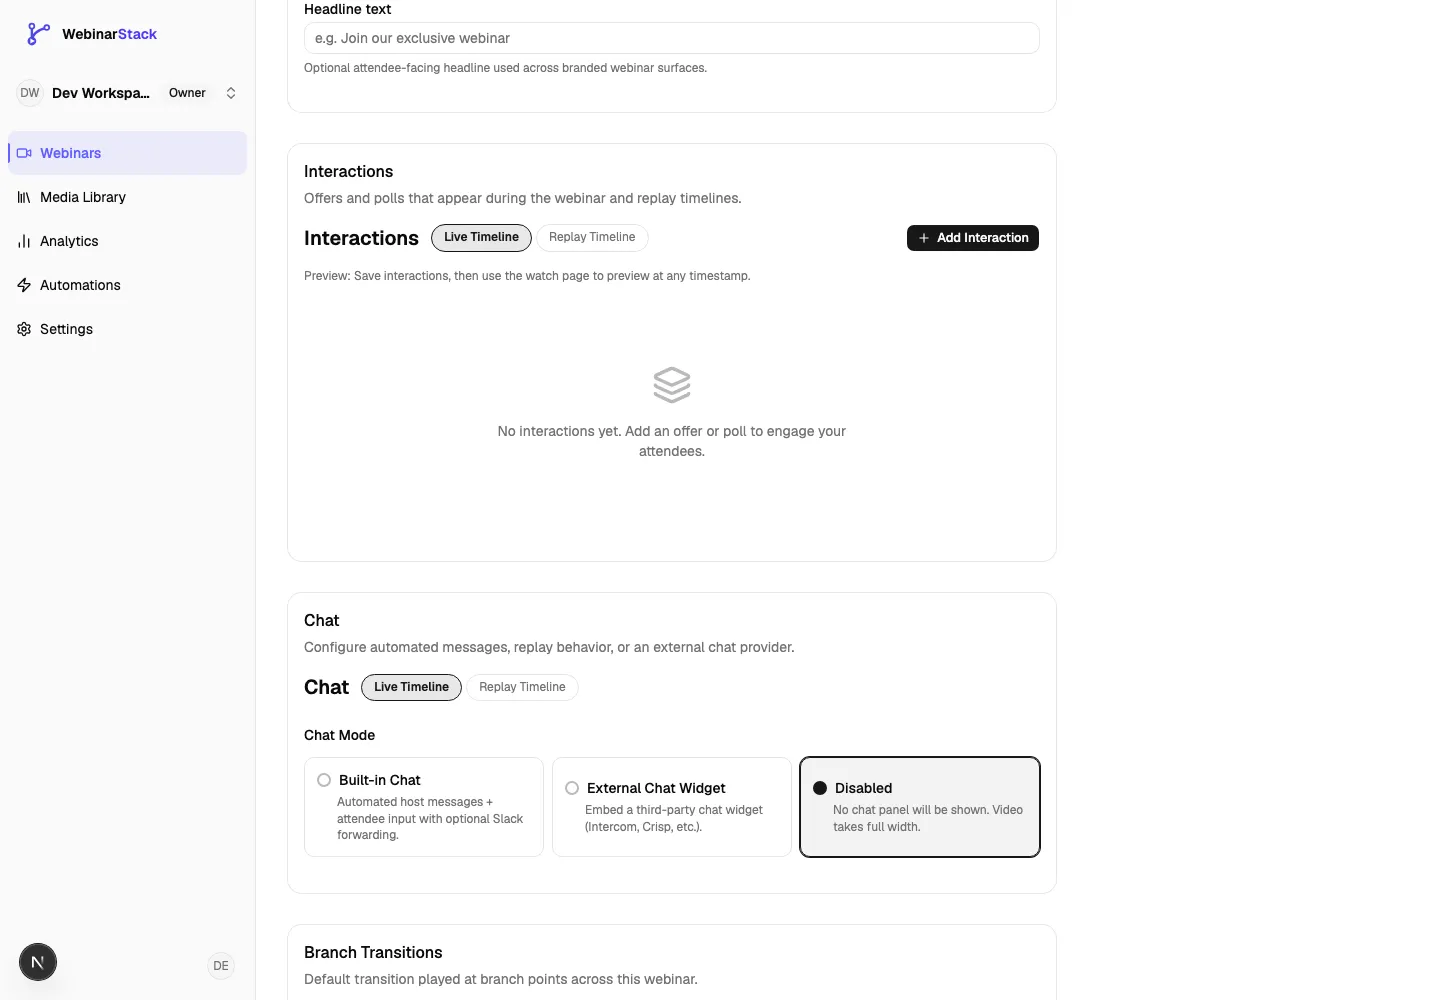
Interactions
Section titled “Interactions”Interactions are timed offers and polls that appear during the webinar or replay.
Timelines:
| Timeline | Meaning |
|---|---|
| Live Timeline | Interactions shown during the live or simulated-live webinar. |
| Replay Timeline | Interactions shown during replay. |
If replay is disabled, replay interactions can still be created, but attendees will not see them until replay is enabled.
You can add, edit, delete, and copy live interactions to the replay timeline.
Interaction Timing
Section titled “Interaction Timing”Every interaction has:
| Field | Meaning |
|---|---|
| Appears at | Timestamp when the interaction appears. Use MM:SS or HH:MM:SS. |
| Ends at | Timestamp when the interaction stops showing. Must be later than Appears at. |
| Headline | Main attendee-facing text. Required, up to 200 characters. |
| Image | Optional image from external URL or WebinarStack CDN. |
Offer Interactions
Section titled “Offer Interactions”Offer interactions are call-to-action cards.
Fields:
| Field | Meaning | Limits |
|---|---|---|
| Internal Name | Dashboard and analytics label. Attendees do not see it. | Up to 200 characters. |
| Description | Supporting text on the offer card. | Up to 500 characters. |
| Button Label | Button copy such as Get Access. |
Up to 80 characters. |
| Countdown (seconds) | Optional countdown timer on the offer. | Zero or greater. |
| Button URL | Destination URL for the offer button. | Must be a valid URL. |
| Button Color | Button color selected from the palette or entered as a hex value. | Must be a six-digit hex color. |
| Button Icon | Optional icon on the button. | None, shopping cart, zap, gift, arrow right, or star. |
Use the live preview in the sheet to check how the offer card will appear.
Poll Interactions
Section titled “Poll Interactions”Poll interactions collect attendee responses.
Fields:
| Field | Meaning | Limits |
|---|---|---|
| Choice mode | Whether attendees can choose one option or multiple options. | Single or Multiple. |
| Results display mode | Whether and how attendees see poll results. | Off, Session, Historical, or Custom. |
| Aggregate min votes | Minimum vote count before historical results display. | 0 to 1000. |
| Poll Options | The answer choices attendees can select. | 2 to 8 options; each option is required. |
| Custom percentages | Creator-entered result percentages for Custom mode. | Each percentage is 0 to 100. |
Results display modes:
| Mode | Meaning |
|---|---|
| Off | Do not show results to attendees. |
| Session | Show current session percentages and vote tally. |
| Historical | Show aggregated results across past sessions after the minimum vote threshold is met. |
| Custom | Show creator-entered percentages per option. |
If you edit a poll with existing responses and change the choice mode, WebinarStack warns you because analytics may become harder to interpret.
Chat controls live and replay chat behavior.
Timelines:
| Timeline | Meaning |
|---|---|
| Live Timeline | Chat behavior and automated messages for the live webinar. |
| Replay Timeline | Automated chat messages for replay when replay chat is built in. |
Live chat modes:
| Mode | Meaning |
|---|---|
| Built-in Chat | Uses WebinarStack chat with automated host messages and attendee input. |
| External Chat Widget | Embeds a third-party chat widget script, such as Intercom or Crisp. |
| Disabled | Hides the chat panel so the video takes full width. |
Automated Messages
Section titled “Automated Messages”Automated messages appear at specific timestamps.
Fields:
| Field | Meaning | Limits |
|---|---|---|
| Timestamp | When the message appears. Use MM:SS or HH:MM:SS. |
Must be zero or greater. |
| Message Content | Message text. | Required, up to 1,000 characters. |
For replay chat, you can create replay-specific messages or copy messages from the live timeline.
Slack Integration
Section titled “Slack Integration”When built-in live chat is enabled and Slack is connected, choose a Slack channel to forward attendee messages. If Slack is not connected, connect it from Settings > Integrations.
Slack is the host-side live response console for built-in chat: attendee messages are forwarded to the selected Slack channel, and replies in the Slack thread can appear back in the attendee chat panel. For the full setup and operating workflow, see the Slack Chat Integration guide.
Chat Forwarding Email
Section titled “Chat Forwarding Email”When built-in live chat is enabled, you can enter a forwarding email for this webinar.
Leave it blank to use the account email. Enter a valid email address to send chat notifications for this webinar to a different inbox.
External Chat Script
Section titled “External Chat Script”When External Chat Widget is selected, paste the third-party script into the script field.
The script field supports up to 5,000 characters. Save the script before switching chat modes.
Branch Transitions
Section titled “Branch Transitions”Branch transitions appear only when Adaptive webinar is enabled.
The webinar default transition controls what viewers see when moving between adaptive branches unless a branch overrides it.
Transition options:
| Transition | Meaning |
|---|---|
| Jump cut | Switches immediately. |
| Buffering | Uses a buffering-style transition. |
| Fade to black | Fades out and back in between segments. |
Some transitions include timing options such as minimum hold, slow connection threshold, fade duration, or maximum wait time. Leave advanced fields blank to use the default behavior.
Flow Tab
Section titled “Flow Tab”The Flow tab appears only after Adaptive webinar is enabled.
Use Flow to build a branching webinar made of video segments. Each segment can have its own video, duration, interactions, and outgoing routing rules.
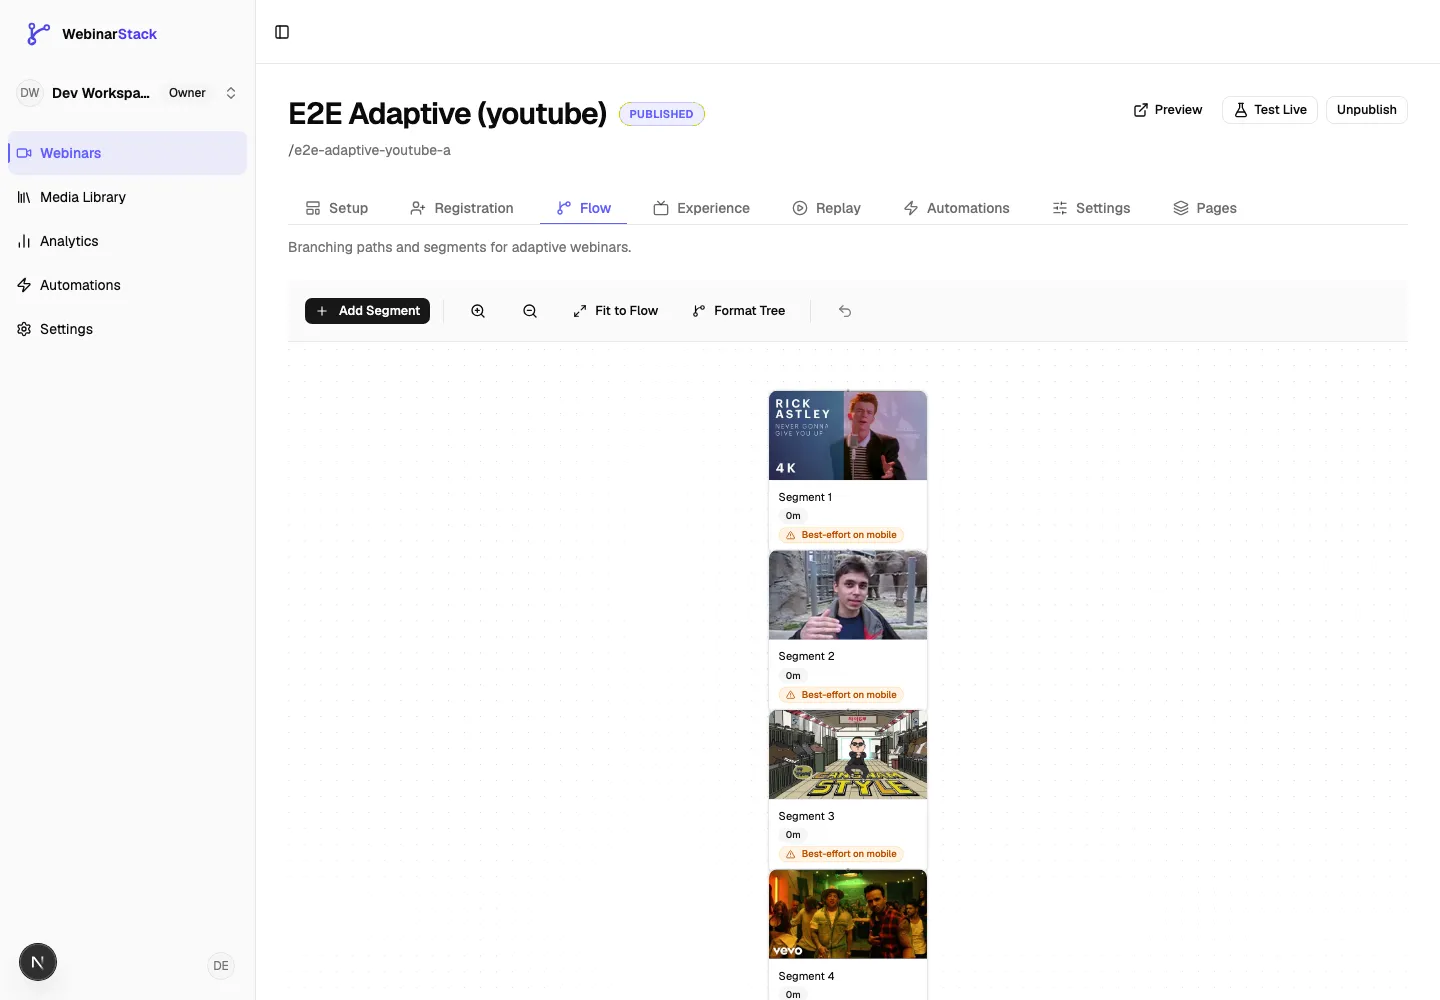
Flow Toolbar
Section titled “Flow Toolbar”Toolbar actions:
| Action | Meaning |
|---|---|
| Add Segment | Creates a new draft segment on the canvas. |
| Zoom In / Zoom Out | Changes the canvas zoom. |
| Fit to Flow | Fits the current graph into the visible canvas. |
| Format Tree | Arranges the graph as a tree when the structure supports it. |
| Undo | Reverts recent canvas changes. |
The flow prevents loops. A segment cannot route back to an earlier point in a way that creates a cycle.
Segments
Section titled “Segments”Click a segment to edit it.
Fields:
| Field | Meaning | Limits |
|---|---|---|
| Label | Internal segment name shown on the canvas. | Required, up to 100 characters. |
| Video Provider | YouTube, Vimeo, or WebinarStack CDN. | Required for segment playback. |
| External video URL | YouTube or Vimeo URL for the segment. | Required unless using WebinarStack CDN. |
| WebinarStack CDN video | Hosted video selected from the Media Library. | Required when provider is WebinarStack CDN. |
| Duration (seconds) | Segment duration used for timing and flow playback. | Positive integer. |
Segments also contain their own interactions. Segment-level interactions use the same offer and poll fields documented in the Experience tab.
Branches
Section titled “Branches”Connect segments to create branches. Click a branch to edit the routing rule.
Routing types:
| Routing Type | Meaning | Extra Fields |
|---|---|---|
| Poll Response | Routes based on an answer to a poll. | Poll and answer. |
| Offer Click | Routes when an attendee clicks a specific offer. | Offer. |
| Watch Behavior | Routes based on how much of the segment was watched. | Threshold percentage and condition. |
| Chat Keyword | Routes based on attendee chat text. | Keywords and match mode. |
| Default | Routes when no other rule matches. | No routing config required. |
Watch behavior conditions:
| Condition | Meaning |
|---|---|
| Watched at least | Attendee watched at least the selected percentage. |
| Watched less than | Attendee watched less than the selected percentage. |
Chat keyword match modes:
| Mode | Meaning |
|---|---|
| Contains | Message contains one of the keywords. |
| Exact match | Message exactly matches a keyword. |
Branch priority and default:
| Field | Meaning |
|---|---|
| Priority | Lower numbers are evaluated first. Use 0 for highest priority. |
| Default Branch | Marks this branch as the fallback when no other rule matches. |
Branch transition:
| Option | Meaning |
|---|---|
| Use webinar default | Inherits the default transition from the Experience tab. |
| Override transition | Uses a branch-specific transition. |
| Reset to webinar default | Clears the branch override. |
Use one clear default route from each decision point. Use priority when multiple rules could match the same attendee.
Replay Tab
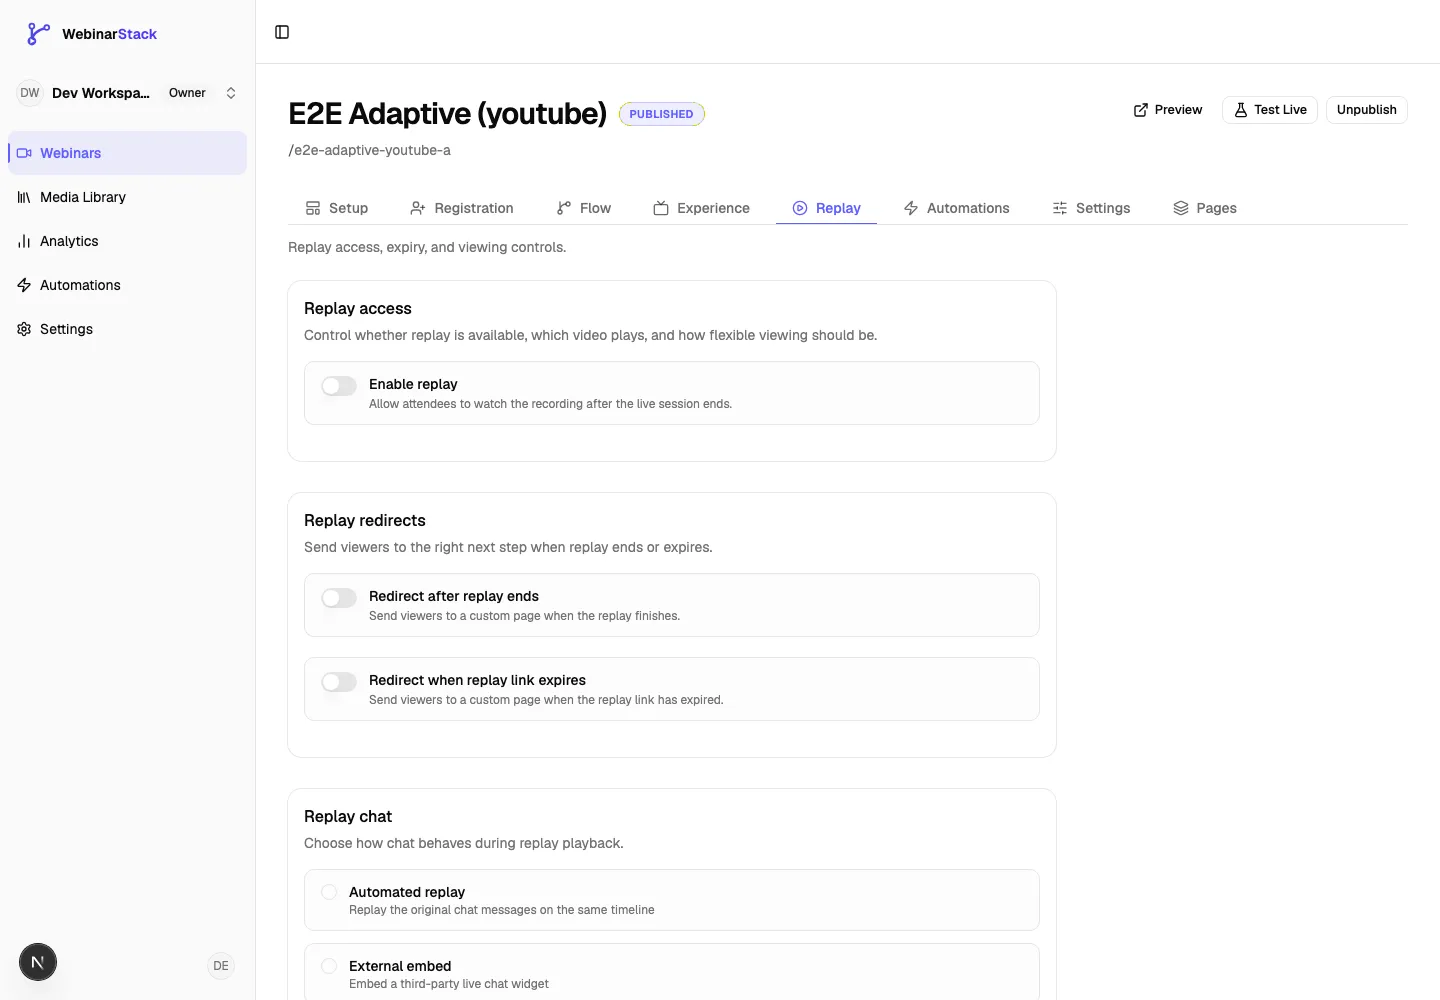
Section titled “Replay Tab”The Replay tab controls whether attendees can watch after the live session and what happens during replay playback.
For a deeper field-by-field reference, see the Webinar Replay Tab guide.
Replay Access
Section titled “Replay Access”Fields:
| Field | Meaning | Limits |
|---|---|---|
| Enable replay | Allows attendees to watch after the session ends. | On or off. |
| Replay availability (days) | Number of days the replay remains available. | 1 to 365; leave blank for no expiry. |
| Replay video | Video source for replay. | WebinarStack CDN or external URL. |
| Allow viewers to skip ahead during replay | Allows replay viewers to scrub forward. | On or off. |
Replay video options:
| Option | Meaning |
|---|---|
| WebinarStack CDN | Select a hosted video from WebinarStack. |
| External video URL | Paste a YouTube or Vimeo URL. |
| Blank external URL | Reuses the live webinar video. |
Replay Redirects
Section titled “Replay Redirects”Fields:
| Field | Meaning |
|---|---|
| Redirect after replay ends | Sends viewers to a custom page when the replay finishes. |
| Redirect URL | Destination URL after replay completion. |
| Redirect when replay link expires | Sends viewers to a custom page when their replay link has expired. |
| Expired redirect URL | Destination URL for expired replay access. |
Use replay redirects for offer pages, booking pages, replay-expired pages, or next-step content.
Replay Chat
Section titled “Replay Chat”Replay chat controls how chat behaves during replay playback.
Options:
| Option | Meaning |
|---|---|
| Automated replay | Replays built-in chat messages on the same timeline. |
| External embed | Embeds a third-party live chat widget during replay. |
| Disabled | Shows no replay chat. |
Additional fields:
| Field | Appears When | Meaning | Limits |
|---|---|---|---|
| Embed code | External embed | Third-party chat widget script. | No explicit UI counter in this field. |
| Replay chat heading | Automated replay | Heading shown in the replay chat panel. Defaults to Ask a question. |
Up to 60 characters. |
Replay chat is separate from live chat. Configure the replay behavior intentionally instead of assuming live chat settings carry over.
Automations Tab
Section titled “Automations Tab”Automations run emails, SMS, webhooks, or integration actions based on attendee behavior and timing.
For a deeper field-by-field reference, see the Webinar Automations Tab guide.
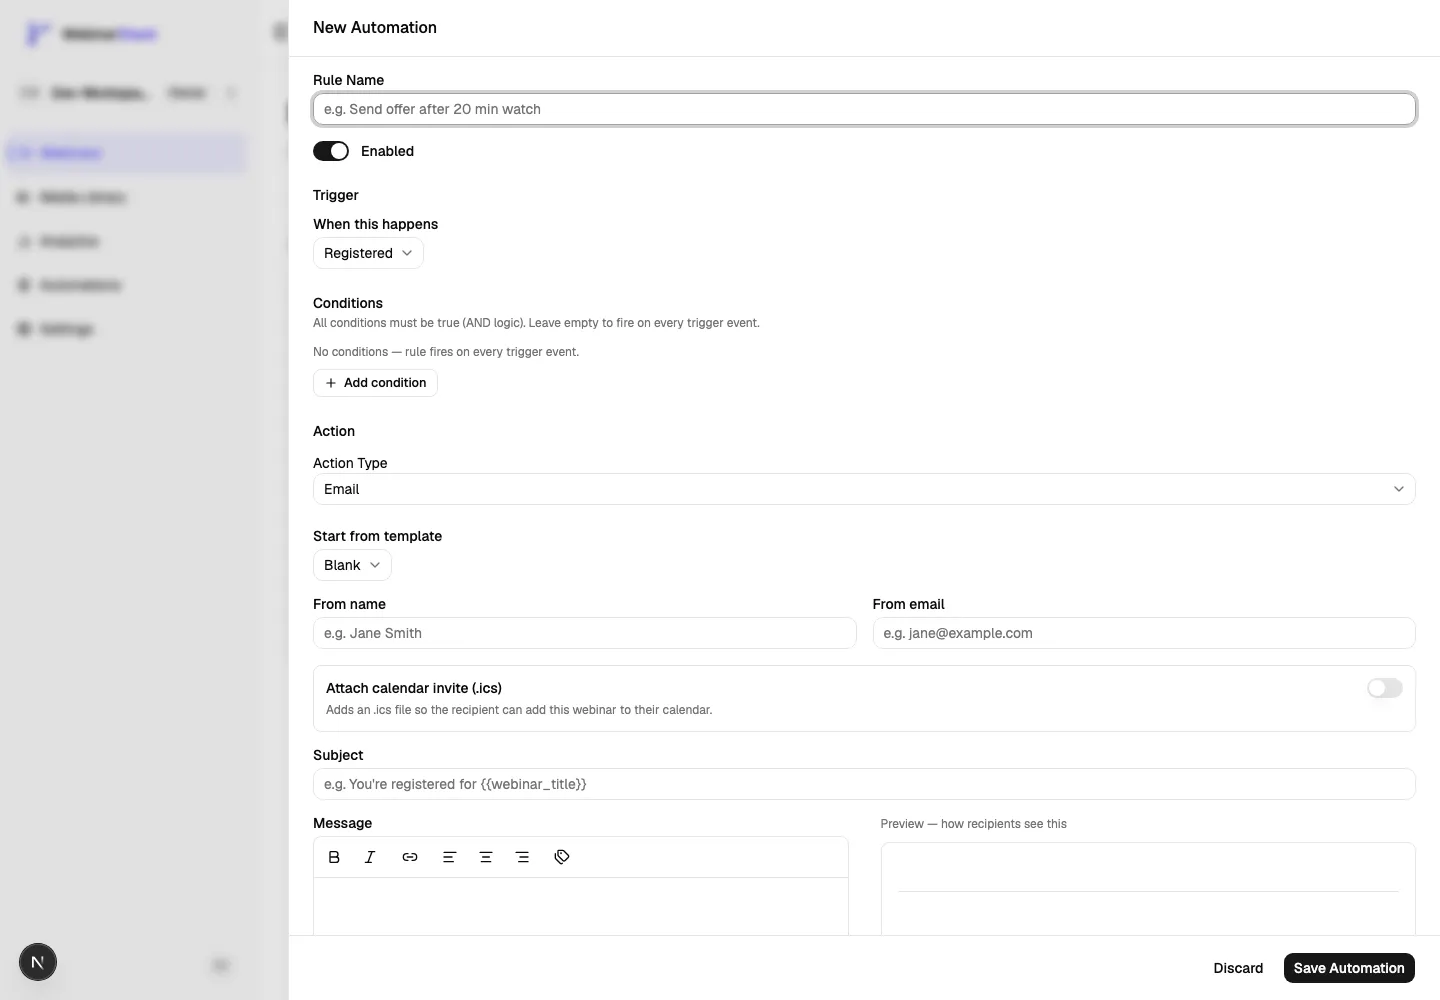
Automation Rule Basics
Section titled “Automation Rule Basics”Fields:
| Field | Meaning | Limits |
|---|---|---|
| Rule Name | Internal name for the automation. | Required, up to 200 characters. |
| Enabled | Whether the rule can run. | On or off. |
| Trigger | The event or condition that starts the rule. | Required. |
| Conditions | Additional AND-only filters. | Optional. |
| Action Type | What the automation does. | Email, Webhook, Integration, or SMS. |
Create rules with specific names such as Send 24-hour reminder, Tag offer clickers, or No-show follow-up.
Triggers
Section titled “Triggers”Attendee behavior triggers:
| Trigger | Meaning | Extra Fields |
|---|---|---|
| Registered | Fires when an attendee registers. | None. |
| Joined webinar | Fires when an attendee joins. | None. |
| Left webinar | Fires when an attendee leaves. | None. |
| Didn’t show up | Fires when a registrant does not attend. | None. |
| Watched at least X minutes | Fires after a watch-time threshold. | Minimum minutes watched. |
| Watched at least X% | Fires after a completion percentage threshold. | Minimum percentage watched. |
| Completed the video | Fires when the attendee completes the video. | None. |
| Clicked an offer | Fires when an offer is clicked. | Any offer or a specific offer. |
| Responded to a poll | Fires when a poll is answered. | Any poll or a specific poll. |
| Sent a chat message | Fires when an attendee sends chat. | Optional keyword and fire mode. |
Time-based triggers:
| Trigger | Meaning | Extra Fields |
|---|---|---|
| Before session | Fires before a scheduled session starts. | Offset amount and unit. |
| After session | Fires after webinar content ends. | Offset amount and unit. |
| Time elapsed after event | Fires after a delay. | Delay minutes and an event anchor selector. |
Adaptive triggers, shown for adaptive webinars:
| Trigger | Meaning | Extra Fields |
|---|---|---|
| Branch taken | Fires when an attendee follows a selected branch. | Branch selector. |
| Segment completed | Fires when an attendee completes a selected segment. | Segment selector. |
If a webinar only uses just-in-time scheduling, before-session automations may not fire because they require scheduled sessions.
Chat Response Trigger Fields
Section titled “Chat Response Trigger Fields”When the trigger is Sent a chat message:
| Field | Meaning |
|---|---|
| Only when message contains | Optional keyword filter. Leave blank to match any chat message. |
| Fire on every matching message | When off, fires once per session per attendee. When on, fires for every matching message. |
Use the {{chat_message}} token in chat-triggered emails when you want the email to include the attendee’s message.
Conditions
Section titled “Conditions”Conditions are optional filters that must all be true for the rule to run.
Available condition fields:
| Field | Type | Use It To Check |
|---|---|---|
| Watch time (minutes) | Number | How many minutes the attendee watched. |
| Watch percentage | Number | What percentage the attendee watched. |
| Clicked Offer (ID) | Text | Whether a specific offer was clicked. |
| Answered poll (ID) | Text | Whether a specific poll was answered. |
| Poll answer value | Text | A specific poll answer. |
| Joined | Boolean | Whether the attendee joined. |
| Left | Boolean | Whether the attendee left. |
| No show | Boolean | Whether the attendee was marked as a no-show. |
| Completed video | Boolean | Whether the video was completed. |
Number and text conditions support comparison operators such as equals, not equals, greater than, less than, greater than or equal, and less than or equal. Boolean conditions support is and is not.
Conditions use AND logic. If you add three conditions, all three must pass.
Email Actions
Section titled “Email Actions”Email actions send an automation email.
Fields:
| Field | Meaning | Limits |
|---|---|---|
| Start from template | Optional starter content for common email types. | Selecting a template fills the subject and body. |
| From name | Sender display name for this rule. | Up to 100 characters. |
| From email | Sender email for this rule. | Must be a valid email address. |
| Attach calendar invite (.ics) | Adds a calendar file to the email. | On or off. |
| Subject | Email subject line. | Up to 200 characters. |
| Message | Rich email body with preview. | Rich text editor content. |
| Delay after trigger (minutes) | Delay before sending for event-driven triggers. | Zero sends immediately. |
Personalization tokens available in automation emails:
| Token | Meaning |
|---|---|
{{attendee_name}} |
Attendee name from registration. |
{{attendee_email}} |
Attendee email from registration. |
{{webinar_title}} |
Webinar title. |
{{session_date}} |
Localized session date. |
{{session_time}} |
Localized session time. |
{{session_timezone}} |
Session timezone abbreviation. |
{{host_name}} |
Host or presenter name. |
{{replay_link}} |
Unique replay link for the attendee. |
{{watch_link}} |
Unique live or JIT watch link for the attendee. |
{{unsubscribe_link}} |
Unique unsubscribe link. |
{{chat_message}} |
Chat message that triggered the rule. Only populated for chat-response triggers. |
Use the preview panel to check token placement, formatting, and links before saving.
Webhook Actions
Section titled “Webhook Actions”Webhook actions send a payload to an external endpoint.
Fields:
| Field | Meaning |
|---|---|
| Destination URL | URL that receives the webhook payload. Must be a valid URL. |
| Webhook Secret | Auto-generated after the rule is saved. Use it to verify webhook payloads. |
For existing webhook rules, the secret can be copied from the editor. WebinarStack uses it to sign the X-WebinarStack-Signature header.
Webhook rules also show delivery history after they are saved. For no-code Zapier workflows, see the Zapier Integration guide.
Integration Actions
Section titled “Integration Actions”Integration actions send data to a connected provider.
Fields:
| Field | Meaning |
|---|---|
| Provider | Connected integration provider. |
| Action | Provider-specific action. |
| Parameters | Fields required by that provider action. |
If no providers are connected, connect one from Settings > Integrations first. Supported provider options in the automation schema include Kit, ActiveCampaign, Mailchimp, and MailerLite.
SMS Actions
Section titled “SMS Actions”SMS actions send text messages through Twilio.
For full SMS setup, including Twilio connection and attendee opt-in requirements, see Twilio SMS Integration.
Fields:
| Field | Meaning | Limits |
|---|---|---|
| SMS body | Message body. Supports personalization tokens. | Up to 1,600 characters. |
| Segment counter | Shows how the message will be split into SMS segments. | Based on current message text. |
| Send test SMS | Opens a test-send dialog. | Requires Twilio to be connected. |
If Twilio is not connected, the rule can be saved but will be skipped until credentials are added.
Saved SMS rules show delivery history.
Settings Tab
Section titled “Settings Tab”The Settings tab controls display preferences, timezone behavior, general redirects, and email delivery status.
For a deeper field-by-field reference, see the Webinar Settings Tab guide.
Display Preferences
Section titled “Display Preferences”Fields:
| Field | Options | Meaning |
|---|---|---|
| Date format | March 26, 2026, 26/03/2026, 2026-03-26 |
How dates appear to attendees. |
| Time format | 12h or 24h |
How times appear to attendees. |
| Language | English, Spanish, Portuguese, French, German, Italian, Dutch, Polish, Russian, Arabic, Hindi, Japanese, Korean, Chinese, Indonesian, Turkish, Swedish, Danish | Language setting for this webinar. |
The editor shows a date and time preview based on your selected formats.
Timezone
Section titled “Timezone”Fields:
| Field | Meaning |
|---|---|
| Webinar timezone | The timezone used for webinar scheduling and display rules. |
| Convert to viewer | Attendees see times converted into their local timezone. |
| Same time | All attendees see the same clock time regardless of location. |
Use Convert to viewer for most evergreen webinars. Use Same time when the event must be understood as a fixed local clock time everywhere.
Redirects
Section titled “Redirects”These redirects are separate from the registration thank-you redirect and replay redirects.
Fields:
| Field | Meaning |
|---|---|
| Enable post-webinar redirect | Sends attendees to a custom page after the webinar ends. |
| Post-webinar redirect URL | Destination URL after the webinar. |
| Enable session-expired redirect | Sends attendees to a custom page when their session link has expired. |
| Session-expired redirect URL | Destination URL for expired session links. |
Use post-webinar redirects for next-step offers or booking pages. Use session-expired redirects to send late visitors to a replay, support page, or fresh registration page.
Email Delivery
Section titled “Email Delivery”The Email delivery card shows the current sending provider and verification status for webinar emails. Check this before relying on automation emails for launch.
For a full setup walkthrough for SendGrid, Postmark, From emails, and domain verification, see the Email Delivery guide.
Pages Tab
Section titled “Pages Tab”The Pages tab links to the attendee-facing page editor.
For a deeper walkthrough of each page type, the editor controls, templates, drafts, previews, publishing, and page-builder blocks, see the Webinar Pages Tab And Page Editor guide.
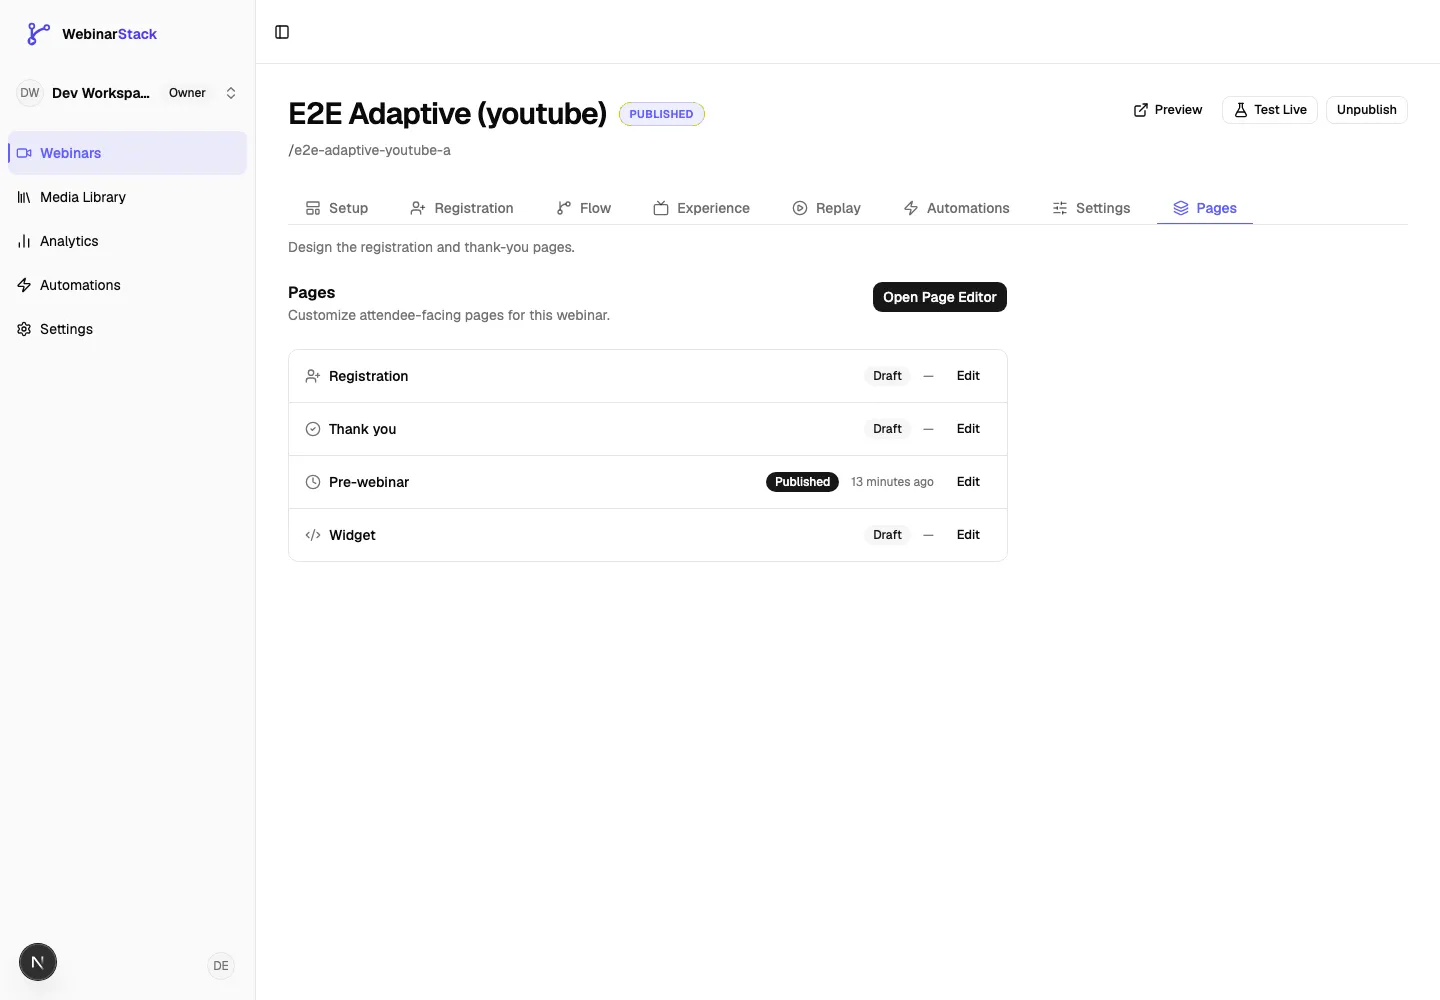
Pages created for every webinar:
| Page | Meaning |
|---|---|
| Registration | Public page where visitors register. |
| Thank you | Confirmation page after registration. |
| Pre-webinar | Waiting or countdown page before a session starts. |
| Widget | Embedded registration widget experience. |
Each row shows:
- Page type.
- Published or Draft status.
- Last edited timestamp.
- Edit link.
Use Open Page Editor or an individual Edit link to customize page content and layout.
Preview, Test, And Publish
Section titled “Preview, Test, And Publish”Before publishing:
- Save all unsaved changes.
- Open Preview and check the attendee flow.
- Use Test Live to create a test attendee session.
- Register through the public URL or embed widget.
- Confirm the thank-you redirect works.
- Confirm the selected schedule options appear.
- Check the watch experience, interactions, chat, and redirects.
- Review automation rules and email delivery status.
- Publish when ready.
Publishing changes the webinar status from Draft to Published. You can unpublish later to move it back to Draft.
Recommended Setup Order
Section titled “Recommended Setup Order”For a standard webinar:
- Create the draft with title, public title, description, video, and thank-you URL.
- Configure the schedule in Setup.
- Set the registration availability window.
- Customize pages.
- Configure brand identity.
- Add interactions and chat messages.
- Configure replay.
- Add automations.
- Review settings and redirects.
- Preview, test live, then publish.
For an adaptive webinar:
- Create the draft.
- Turn on Adaptive webinar in Setup.
- Build segments in Flow.
- Add segment videos and durations.
- Add interactions to segments.
- Connect segments with branch rules.
- Configure default and branch-specific transitions.
- Complete registration, pages, replay, automations, and settings.
- Preview the full flow, test live, then publish.
Common Mistakes To Avoid
Section titled “Common Mistakes To Avoid”- Publishing before adding a valid schedule.
- Forgetting to save core editor changes after editing multiple tabs.
- Using an internal title as the public title.
- Adding replay interactions without enabling replay.
- Creating before-session automations for a webinar that only uses just-in-time sessions.
- Using too many registration session choices at once.
- Leaving old offer URLs in interactions after a campaign changes.
- Forgetting to verify email delivery before launch.
- Turning on adaptive mode without building at least one segment.
Quick Field Limits Reference
Section titled “Quick Field Limits Reference”| Field | Limit |
|---|---|
| Internal title | Required, 1 to 200 characters. |
| Public title | Required, 1 to 200 characters. |
| Description | Up to 5,000 characters. |
| Thank-you URL | Required valid URL. |
| Late-join cutoff | 1 to 180 minutes. |
| Replay expiry | 1 to 365 days. |
| Replay chat heading | Up to 60 characters. |
| Host display name | Up to 100 characters. |
| Brand headline | Up to 200 characters. |
| Segment label | Required, up to 100 characters. |
| Segment duration | Positive number of seconds. |
| Interaction headline | Required, up to 200 characters. |
| Offer description | Up to 500 characters. |
| Offer button label | Up to 80 characters. |
| Poll options | 2 to 8 options; each option up to 200 characters. |
| Historical poll min votes | 0 to 1,000. |
| Automated chat message | Required, up to 1,000 characters. |
| External chat script | Up to 5,000 characters. |
| Automation rule name | Required, up to 200 characters. |
| Email from name | Up to 100 characters. |
| Email subject | Up to 200 characters. |
| SMS body | Up to 1,600 characters. |
| Modal widget width | 320 to 1,200 pixels. |