
Webinar Setup Tab
The Setup tab is the foundation of an existing webinar. Use it when you need to change the webinar’s internal name, attendee-facing title, description, main video source, late-join behavior, schedule, or webinar type.
Open it from Dashboard -> Webinars -> select a webinar -> Setup.
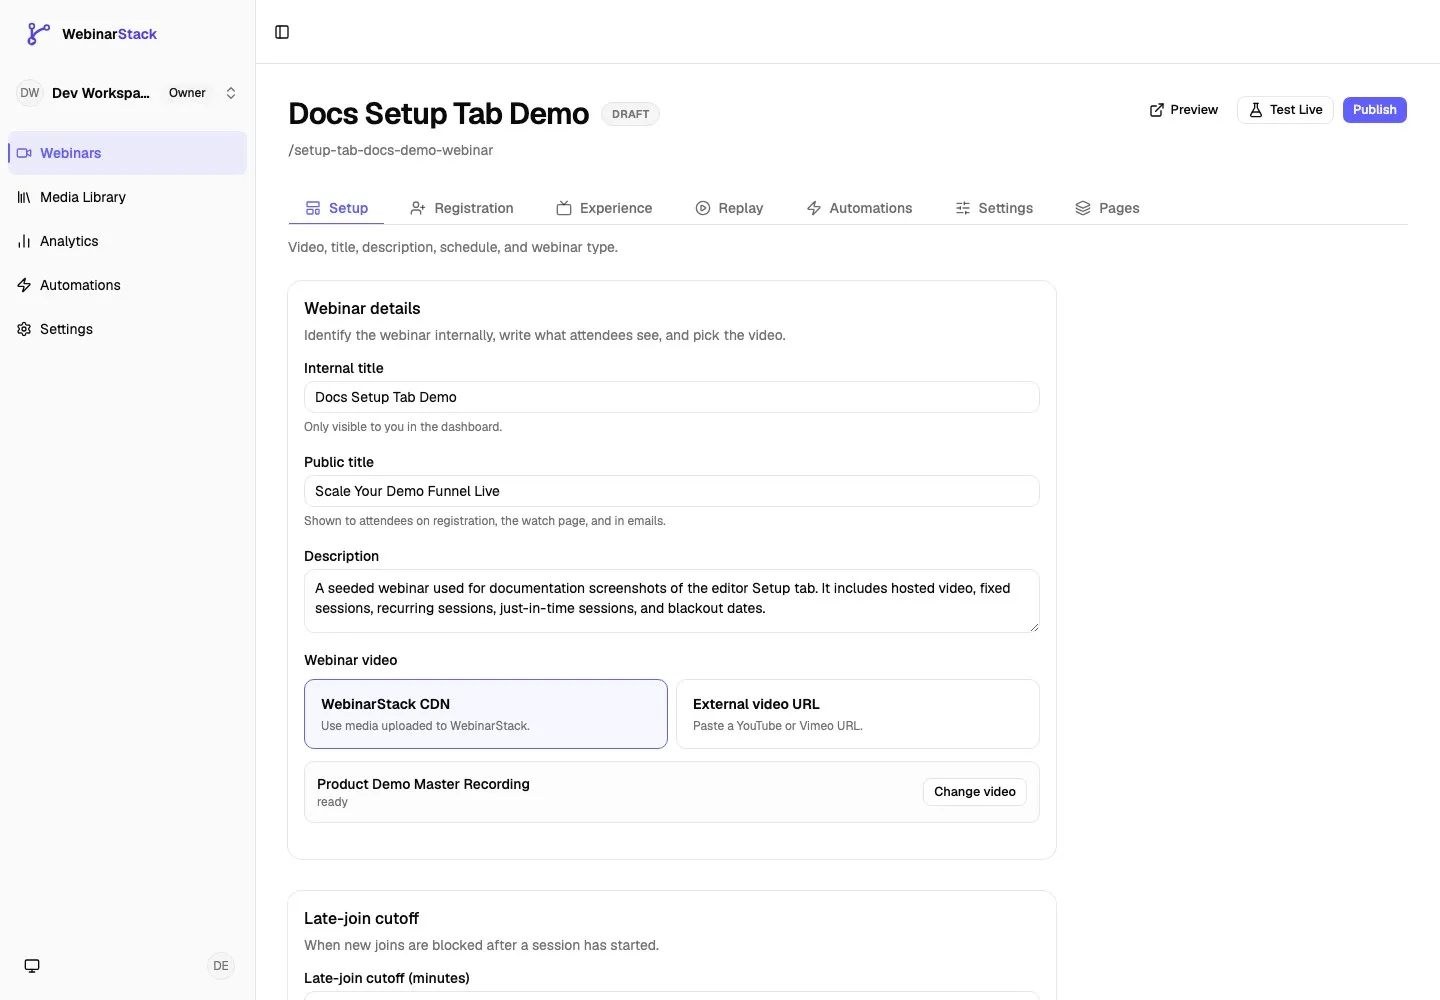
What The Setup Tab Controls
Section titled “What The Setup Tab Controls”The Setup tab is organized into four main cards that match the editor UI.
| Setup Section | What You Edit | When To Use It |
|---|---|---|
| Webinar details | Internal title, public title, description, and the main webinar video for standard webinars. | Use this when the webinar name, public copy, or video source needs to change. |
| Late-join cutoff | How long after the session starts new attendees may still join. | Use this to keep the webinar feeling live and prevent very late joins. |
| Schedule | Fixed sessions, recurring weekly sessions, just-in-time sessions, and blackout dates. | Use this to control which session times registrants can choose. |
| Webinar type | Standard webinar or adaptive webinar mode. | Use this when the webinar should branch by attendee behavior. |
The Setup tab does not control every setting in the editor. Registration windows, form fields, page design, replay behavior, automations, date/time display, language, and chat behavior live in other tabs.
Save Behavior
Section titled “Save Behavior”Most Setup tab fields use the sticky Save changes bar at the bottom of the editor. When you change a saved field, WebinarStack shows the number of unsaved changes, plus Discard and Save changes actions.
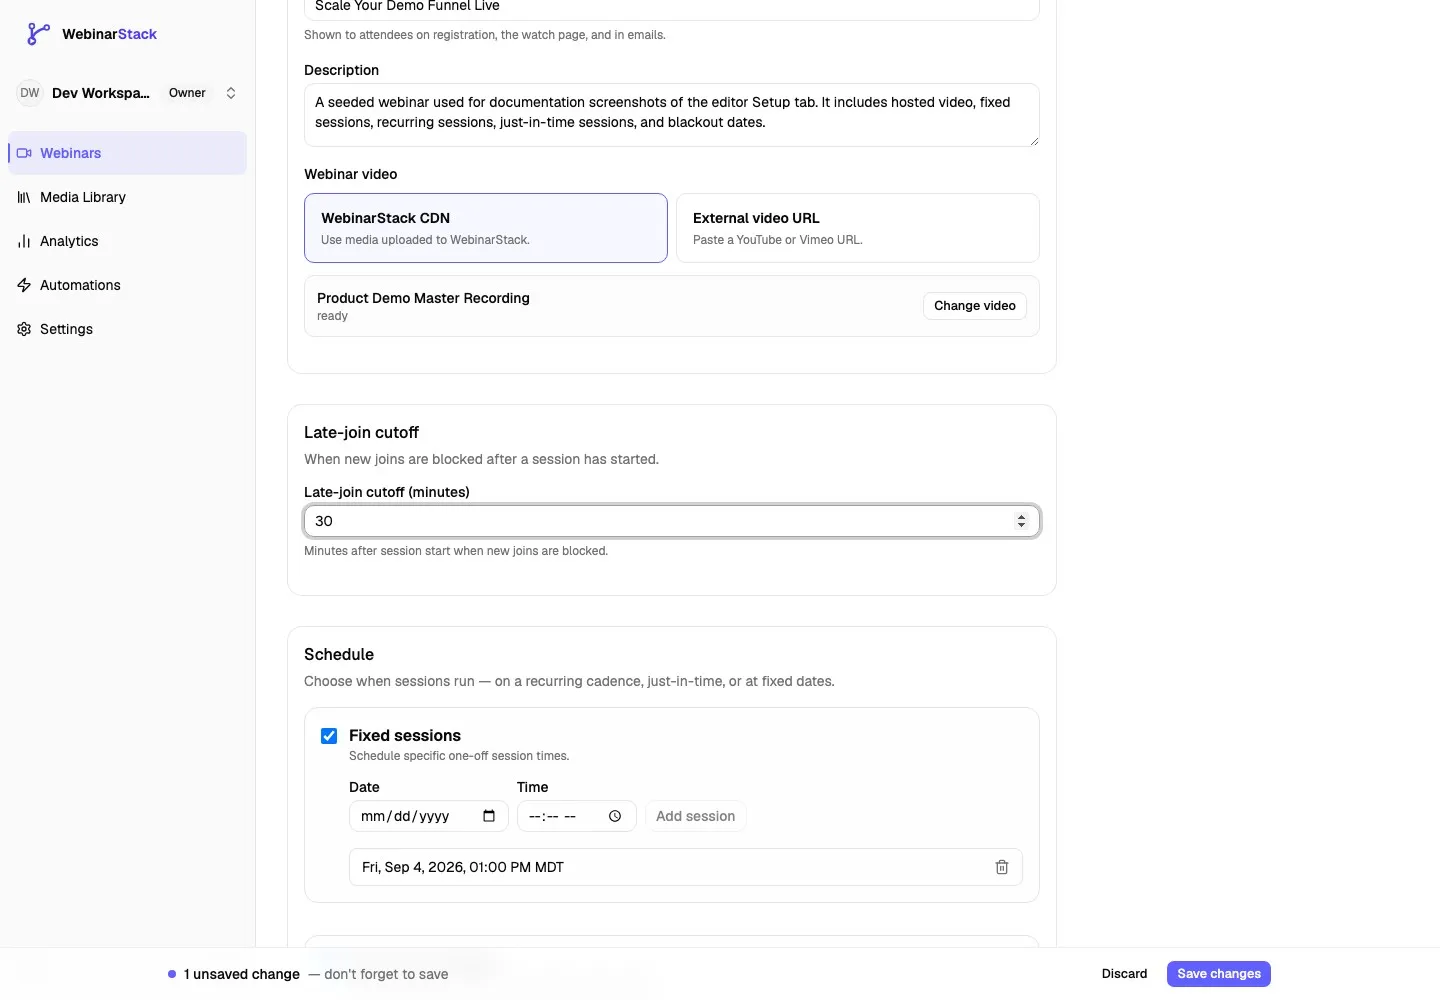
| Change Type | How It Saves |
|---|---|
| Internal title, public title, description, video source, late-join cutoff, and webinar type | Use Save changes. |
| Recurring schedule and just-in-time schedule settings | Use Save changes. |
| Fixed session add/remove actions | Save immediately when you add or remove the session. |
| Blackout date clicks | Save immediately when you click a date. |
If you see the sticky save bar, save before leaving the editor. If you try to leave with unsaved Setup changes, the browser may warn you.
Click Discard to return the form to the last saved values. For schedule edits that are held locally, Discard reloads the saved schedule state.
Webinar Details
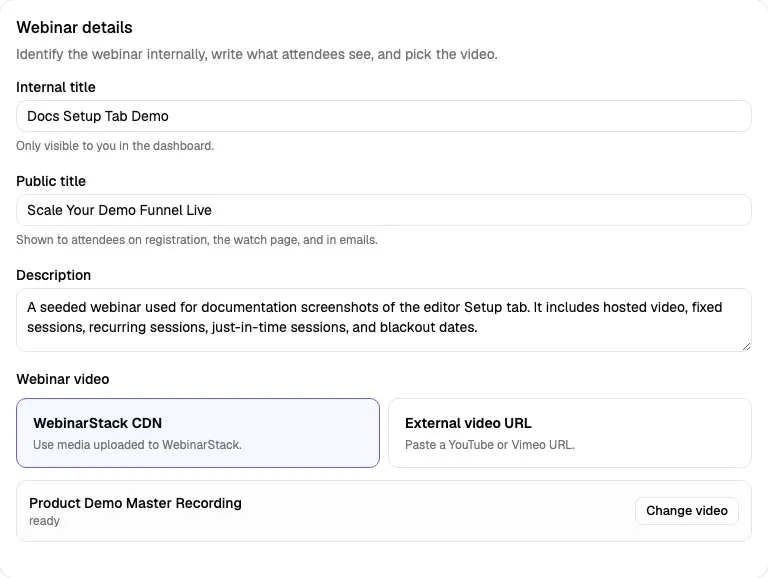
Section titled “Webinar Details”The Webinar details card identifies the webinar and controls what attendees see at the top level.
Internal Title
Section titled “Internal Title”The Internal title is the working name shown inside the WebinarStack dashboard.
Use it for team-friendly naming, reporting, and finding the webinar later. It can include internal context such as campaign, funnel, quarter, or audience segment.
Examples:
Q3 Partner Demo - Paid TrafficEvergreen Trial Conversion WebinarAgency Funnel Training - V2
Field behavior:
| Detail | Behavior |
|---|---|
| Visibility | Dashboard only. |
| Required | Yes. |
| Maximum length | 200 characters. |
| Good use | Internal naming, campaign organization, and team context. |
| Avoid | Copy that only makes sense to attendees. Put attendee-facing copy in Public title instead. |
Changing the internal title also changes the title shown at the top of the editor and in webinar lists after the update is saved and the data refreshes.
Public Title
Section titled “Public Title”The Public title is the attendee-facing webinar name.
It appears on registration experiences, the watch page, and webinar emails. Use polished copy that tells the attendee what the webinar is about.
Examples:
How to Scale Demo Bookings Without Adding More Sales RepsThe 5-Part Framework for Running High-Converting WebinarsBuild a Better Trial-to-Paid Funnel in 30 Minutes
Field behavior:
| Detail | Behavior |
|---|---|
| Visibility | Attendee-facing. |
| Required | Yes. |
| Maximum length | 200 characters. |
| Used by | Registration pages, watch page, emails, and calendar-style attendee surfaces. |
| Good use | Clear webinar promise, topic, or offer. |
Keep the Public title specific. If your webinar is attached to an ad, email campaign, partner event, or launch, the public title should match the promise that brought the attendee to the page.
Description
Section titled “Description”The Description field explains what attendees will learn.
Use it for a short summary, agenda, outcome statement, or supporting copy. The registration page design controls exactly where and how this text appears, but the Setup tab is where the core description is stored.
Field behavior:
| Detail | Behavior |
|---|---|
| Required | No. |
| Maximum length | 5,000 characters. |
| Good use | Public webinar summary, learning outcomes, agenda, or offer context. |
| Avoid | Operational notes, private setup instructions, or copy that belongs only in internal docs. |
Good descriptions usually answer three questions:
- Who is this webinar for?
- What will they understand or be able to do after attending?
- Why should they attend now?
Webinar Video
Section titled “Webinar Video”For a standard webinar, the Setup tab controls the main webinar video.
For an adaptive webinar, the Setup tab does not show a main webinar video field. Adaptive webinars use segment videos in the Flow tab because each path can use different video segments.
WebinarStack CDN
Section titled “WebinarStack CDN”Choose WebinarStack CDN when the video has been uploaded to WebinarStack’s hosted media system.
This is the best option when you want WebinarStack to host and stream the video instead of embedding a video from another platform. The selected video is a Media Library asset, and the Setup tab shows the asset title and processing status.
Use Change video to open the video picker and choose a different hosted video.
WebinarStack CDN behavior:
| Detail | Behavior |
|---|---|
| Source | A hosted video from the WebinarStack Media Library. |
| Required when selected | You must choose a hosted video before saving. |
| Status shown | The selected asset’s status, such as ready. |
| Best for | Production evergreen webinars where you want WebinarStack to host and stream the recording. |
| Related docs | Media Library |
If you select WebinarStack CDN and do not choose a video, saving fails with a validation message asking you to choose a WebinarStack CDN video.
External Video URL
Section titled “External Video URL”Choose External video URL when the webinar should play a video hosted on YouTube or Vimeo.
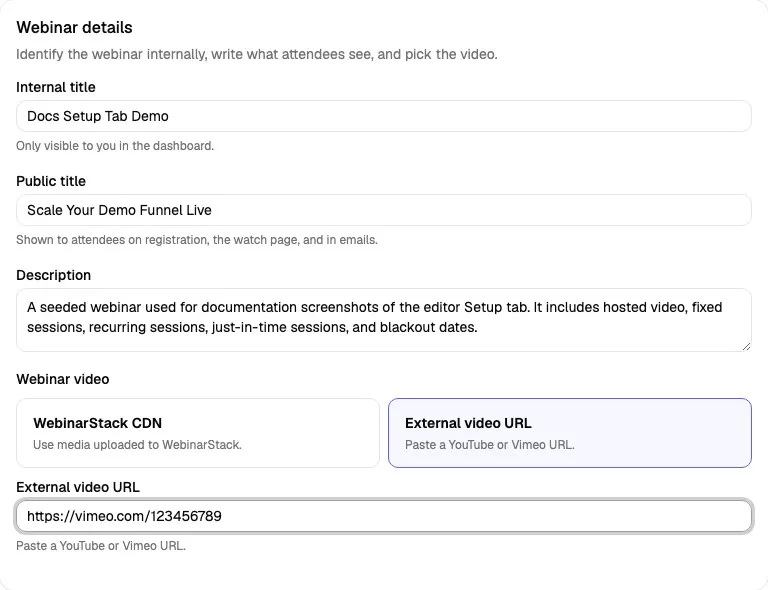
External video behavior:
| Detail | Behavior |
|---|---|
| Supported sources | YouTube and Vimeo URLs. |
| Field type | URL. |
| Best for | Teams that already host webinar recordings on YouTube or Vimeo. |
| Validation | Non-YouTube and non-Vimeo video URLs are rejected. |
When you switch from WebinarStack CDN to External video URL and save, WebinarStack stores the external URL and clears the hosted-video selection for the main webinar video. When you switch back to WebinarStack CDN and save, WebinarStack stores the selected hosted video and clears the external URL for the main webinar video.
Late-Join Cutoff
Section titled “Late-Join Cutoff”The Late-join cutoff controls when new joins are blocked after a session has started.
For example, if a session starts at 1:00 PM and the cutoff is 30, new attendees can still join until 1:30 PM. After that, new joins are blocked for that session.
Field behavior:
| Detail | Behavior |
|---|---|
| Field | Late-join cutoff (minutes). |
| Allowed range | 1 to 180 minutes. |
| Value type | Whole number. |
| Applies to | New joins after a session starts. |
| Good default | 15 to 30 minutes for most live-feeling webinars. |
Use a shorter cutoff when the opening minutes are essential and attendees should not join after the webinar is already underway. Use a longer cutoff when the content is forgiving or when attendees often arrive late from email or SMS reminders.
The cutoff also helps downstream attendance logic decide when someone should be treated as a no-show for cutoff-based sessions.
Schedule
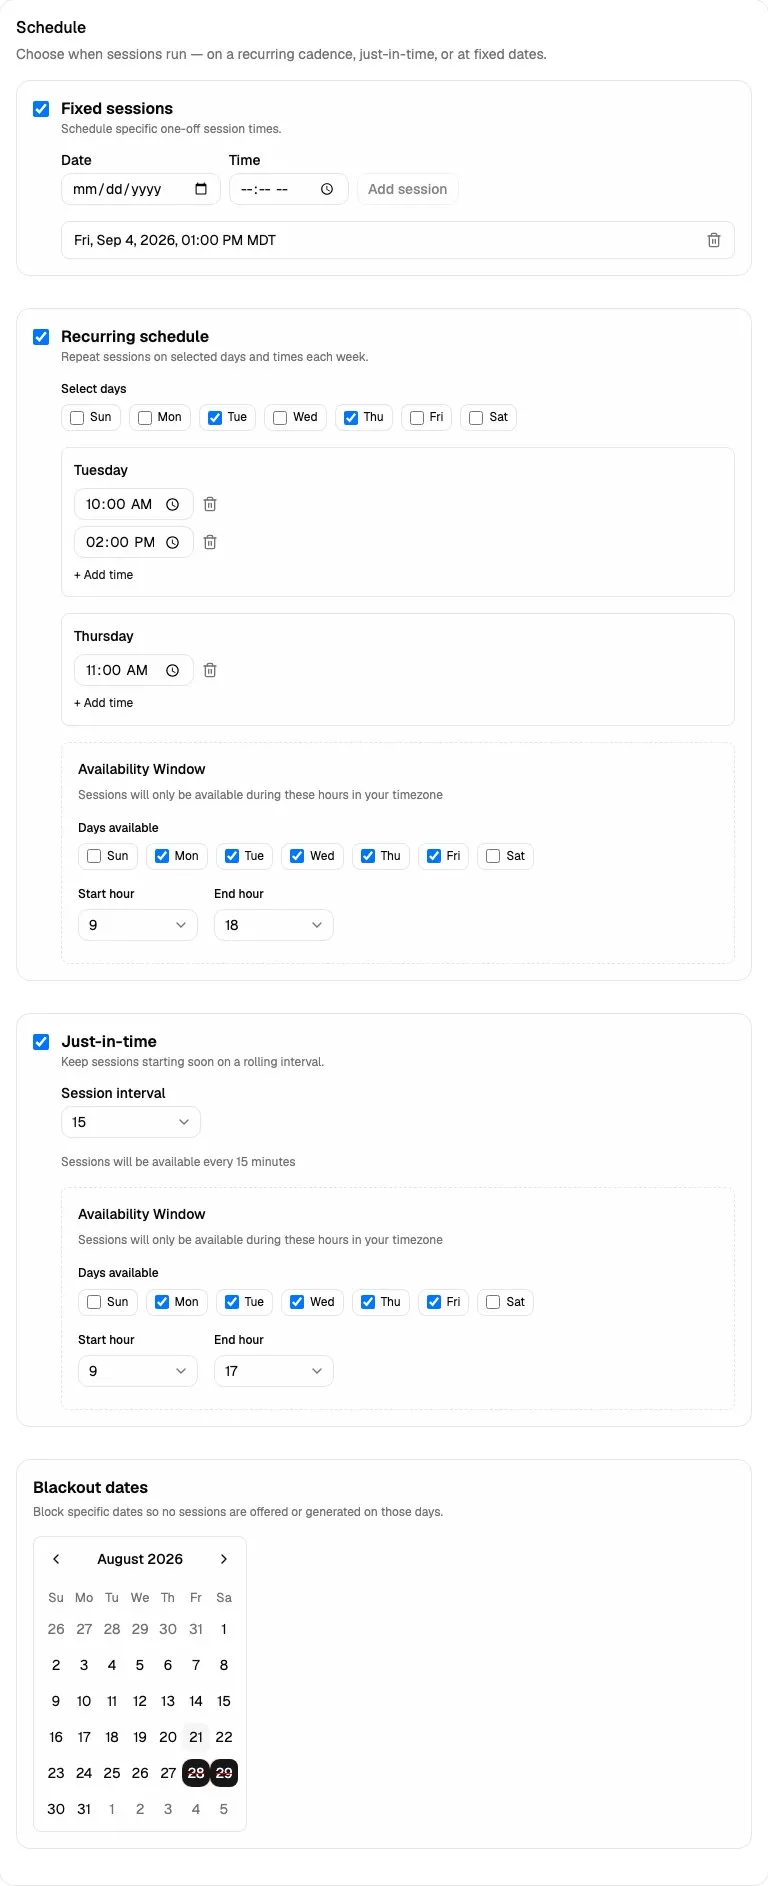
Section titled “Schedule”The Schedule card controls which session times are available to registrants.
WebinarStack can combine fixed sessions, recurring sessions, and just-in-time sessions on the same webinar. It merges the available session slots, removes blacked-out dates, removes duplicate times within a short window, and returns the next available sessions.
How Schedule Modes Work Together
Section titled “How Schedule Modes Work Together”| Mode | What It Creates | Good Use Case |
|---|---|---|
| Fixed sessions | Specific one-off dates and times. | Launch events, limited promotions, partner events, and exact event times. |
| Recurring schedule | Weekly sessions on selected days and times. | Evergreen weekly schedules, predictable weekday slots, and recurring demo times. |
| Just-in-time | A rolling session that starts soon based on an interval. | “Watch soon” or “starting soon” registration experiences. |
| Blackout dates | Dates when generated or fixed sessions should not be offered. | Holidays, launch pauses, team off-sites, or days when support is unavailable. |
When multiple session sources produce the same or nearly the same time, WebinarStack prioritizes them in this order:
- Fixed sessions.
- Recurring sessions.
- Just-in-time sessions.
Just-in-time sessions are capped to one visible slot in the registration experience: the next available interval.
The Registration tab can further limit which sessions are shown through registration windows and registration horizon settings. If a session exists in Setup but is not visible to registrants, check both Setup scheduling and Registration availability rules.
Fixed Sessions
Section titled “Fixed Sessions”Enable Fixed sessions to offer specific dates and times.
Fixed sessions are saved immediately. Adding a fixed session does not wait for the sticky Save changes bar.
Fields and controls:
| Control | Meaning |
|---|---|
| Fixed sessions checkbox | Enables or disables fixed sessions for the webinar. |
| Date | Calendar date for the one-off session. |
| Time | Local time for the one-off session. |
| Add session | Creates the fixed session immediately when both Date and Time are filled. |
| Trash icon | Removes that fixed session immediately. |
Only upcoming fixed sessions are listed. If a fixed session time has already passed, it no longer appears in the upcoming session list.
Use fixed sessions when you need exact control over a launch event or a limited campaign. Fixed sessions are also useful when you want to temporarily add a special event time on top of a normal recurring schedule.
Recurring Schedule
Section titled “Recurring Schedule”Enable Recurring schedule to repeat sessions every week.
Recurring schedule edits are saved with the sticky Save changes bar.
Fields and controls:
| Control | Meaning |
|---|---|
| Recurring schedule checkbox | Enables or disables weekly recurring sessions. |
| Select days | Chooses which weekdays can generate recurring sessions. |
| Per-day time fields | Adds one or more session times for each selected day. |
+ Add time |
Adds another time to the selected weekday. |
| Trash icon | Removes a time from that weekday. |
| Availability Window | Limits when recurring sessions are allowed to appear. |
Use recurring schedules when your webinar should be offered at predictable weekly times, such as every Tuesday at 10:00 AM and Thursday at 11:00 AM.
Recurring Availability Window
Section titled “Recurring Availability Window”The recurring Availability Window is a second filter applied to recurring sessions.
It controls which days and hours recurring sessions are allowed to appear. This is useful when the recurring rule has multiple days or times but you still want a broader business-hours boundary.
Fields:
| Field | Meaning |
|---|---|
| Days available | Days of the week when recurring sessions may be available. |
| Start hour | Earliest allowed local hour. |
| End hour | Latest allowed local hour. |
Example:
If Tuesday is selected in the recurring schedule, but Tuesday is not selected in the availability window, Tuesday sessions are filtered out. If a recurring time is 7:00 PM but the end hour is 6:00 PM, that time is filtered out.
The schedule engine evaluates these hours in the host timezone stored with the schedule rule.
Just-In-Time
Section titled “Just-In-Time”Enable Just-in-time to keep a session available soon, based on a rolling interval.
Just-in-time edits are saved with the sticky Save changes bar.
Fields and controls:
| Control | Meaning |
|---|---|
| Just-in-time checkbox | Enables or disables rolling just-in-time availability. |
| Session interval | How often a new soon-starting session can be offered. |
| Availability Window | Limits the days and hours when just-in-time sessions may appear. |
Available intervals:
| Interval | Meaning |
|---|---|
| 5 min | Offer the next eligible 5-minute boundary. |
| 10 min | Offer the next eligible 10-minute boundary. |
| 15 min | Offer the next eligible 15-minute boundary. |
| 30 min | Offer the next eligible 30-minute boundary. |
| 60 min | Offer the next eligible hourly boundary. |
For example, with a 15-minute interval, someone who opens registration at 10:07 may see the next eligible slot around 10:15, subject to the availability window and blackout dates.
Just-in-time is best when you want the webinar to feel immediately available without showing a long list of future dates.
Just-In-Time Availability Window
Section titled “Just-In-Time Availability Window”The just-in-time Availability Window works like the recurring availability window, but it filters rolling just-in-time sessions.
Use it to prevent just-in-time sessions from appearing overnight, on weekends, or outside business hours.
Example:
If just-in-time is set to every 15 minutes, but the availability window is Monday-Friday from 9 to 17, registrants only see a just-in-time slot during those eligible weekdays and hours.
Blackout Dates
Section titled “Blackout Dates”Use Blackout dates to block specific calendar dates.
Blackout date clicks save immediately. You do not need to use the sticky Save changes bar for a blackout date click.
Controls:
| Control | Meaning |
|---|---|
| Calendar date click | Toggles that date on or off as a blackout date. |
| Highlighted/struck date | The date is currently blocked. |
| Shift-click range | Adds or removes a range based on the previous clicked date. |
| Calendar arrows | Move between months. |
Blackout dates apply to the schedule output. A blacked-out date is removed from generated session availability, and sessions on blocked dates are hidden from registrants.
Use blackout dates for:
- Holidays.
- Days when no host or support team is available.
- Product launch freezes.
- Maintenance windows.
- Periods when paid traffic is paused.
Webinar Type
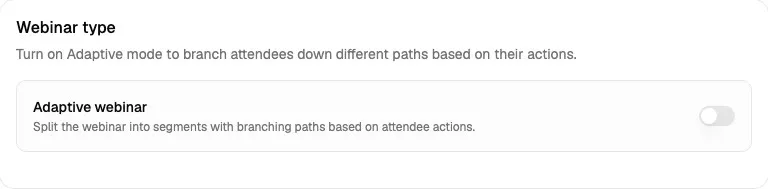
Section titled “Webinar Type”The Webinar type card controls whether the webinar is a standard webinar or an adaptive webinar.
Standard Webinar
Section titled “Standard Webinar”A standard webinar uses one main webinar video from the Setup tab.
Choose a standard webinar when every attendee should experience the same primary presentation, with the same timeline and the same main video.
Standard webinars still support registration settings, page design, replay, automations, chat, analytics, media, and integrations.
Adaptive Webinar
Section titled “Adaptive Webinar”Turn on Adaptive webinar when the webinar should branch attendees through different paths based on their actions.
When Adaptive webinar is enabled:
| Change | Meaning |
|---|---|
| Flow tab appears | Use the Flow tab to build segments and paths. |
| Setup video field is hidden | Segment videos live in the Flow tab instead of one main Setup video. |
| Branching behavior becomes available | Attendee actions can determine which path they see. |
Use adaptive mode when you need different attendee journeys, such as separating high-intent viewers, routing offer clickers to a different segment, or tailoring follow-up based on behavior.
Before enabling adaptive mode, make sure your team is ready to build and test the Flow tab. Adaptive webinars are more powerful, but they also require more planning than a single-video webinar.
Editor Header Actions
Section titled “Editor Header Actions”The Setup tab appears inside the webinar editor, so you will also see editor-level actions in the page header.
| Header Action | Meaning |
|---|---|
| Preview | Opens a preview of the webinar experience. |
| Test Live | Creates a test session and opens the live watch experience in a new tab. |
| Publish | Publishes a draft webinar. |
| Unpublish | Returns a published webinar to an unpublished state. |
Save Setup changes before relying on Preview, Test Live, or Publish. Unsaved changes may not be reflected in the preview or attendee experience until you save them.
Setup Tab Checklist
Section titled “Setup Tab Checklist”Before publishing or republishing a webinar, review this checklist:
- The Internal title is easy for your team to recognize.
- The Public title matches the promise in ads, emails, and landing-page copy.
- The Description explains who the webinar is for and what attendees will learn.
- A valid video source is selected for standard webinars.
- The late-join cutoff matches how live the session should feel.
- Fixed, recurring, or just-in-time schedule modes are enabled intentionally.
- Blackout dates are set for holidays or dates when sessions should not run.
- Adaptive webinar mode is only enabled if you plan to configure the Flow tab.
- The sticky Save changes bar is cleared.
- Preview and Test Live reflect the saved setup.
Troubleshooting
Section titled “Troubleshooting”| Issue | Likely Cause | What To Do |
|---|---|---|
| Save fails after selecting WebinarStack CDN | No hosted video is selected. | Click Choose WebinarStack CDN video or Change video, select a ready video, then save again. |
| External video URL is rejected | The URL is not a supported YouTube or Vimeo URL. | Paste a valid YouTube or Vimeo link. |
| A fixed session is missing from the list | The session is in the past or is blocked by a blackout date. | Add a future fixed session and check blackout dates. |
| Recurring sessions do not appear | The selected day/time is outside the availability window, blocked by blackout dates, or filtered by Registration tab settings. | Check selected days, time fields, availability window, blackout dates, and registration horizon settings. |
| Just-in-time does not show outside business hours | The availability window blocks it. | Expand the just-in-time days or hours if sessions should appear then. |
| Only one just-in-time slot appears | WebinarStack intentionally shows the next eligible just-in-time slot. | Use recurring or fixed sessions if you want registrants to choose from multiple future times. |
| Main video disappears after enabling Adaptive webinar | Adaptive webinars use segment videos in the Flow tab. | Open the Flow tab and assign videos to the webinar segments. |
| Save bar remains visible | There are unsaved Setup changes. | Click Save changes or Discard before leaving the page. |
Next tab: Webinar Registration Tab.