
Mailchimp Integration
The Mailchimp integration lets WebinarStack update your Mailchimp audience when webinar automation rules fire. Use it to add registrants to Mailchimp, apply engagement tags, remove tags, add contacts to an audience, and write selected merge-field data after attendee behavior happens in WebinarStack.
This guide explains what the integration can do, how setup works, what every setup field means, how to use Mailchimp inside webinar automations, what data is sent, what is not sent, and how to troubleshoot common connection and delivery issues.
The Short Version
Section titled “The Short Version”| Concept | What It Means |
|---|---|
| Integration type | Native email service provider integration. |
| Direction | WebinarStack updates Mailchimp. |
| Where to connect it | Settings > Integrations > Email Service Providers > MailChimp. |
| Credential | Mailchimp API key. |
| API key format requirement | The key must include a data center suffix, such as abc123-us6. |
| Audience setup | WebinarStack stores a default Mailchimp audience during connection. |
| Main workflow | Create a webinar automation with Action Type set to Integration and Provider set to MailChimp. |
| Supported actions | Add/update member, apply tag, remove tag, add to audience, set merge field. |
| Default member data | Attendee email and attendee name. Member upserts set FNAME from the WebinarStack registration name. |
| Delivery model | Mailchimp actions run asynchronously in the background after automation rules pass. |
| Credential storage | WebinarStack stores the API key encrypted and does not show it back in the UI. |
| Disconnect behavior | Disconnecting Mailchimp deletes the credential and disables Mailchimp automation rules. |
The most important setup decision is the default audience. WebinarStack uses that audience for connected-account lookups and for normal dashboard-created Mailchimp automation actions.
What You Can Do With Mailchimp
Section titled “What You Can Do With Mailchimp”Mailchimp is useful when you want webinar activity to become marketing segmentation data.
| Capability | Available In WebinarStack? | How To Use It |
|---|---|---|
| Connect a Mailchimp account | Yes. | Connect an account-level Mailchimp API key in Settings > Integrations. |
| Choose a default audience | Yes. | Select the audience during connection. If the account only has one audience, WebinarStack selects it automatically. |
| Add or update a member | Yes. | Use a webinar automation with Action Type Integration, Provider MailChimp, and Action Add/update member. |
| Apply tags | Yes. | Use Apply tag and select one or more Mailchimp tags from the default audience. |
| Remove tags | Yes. | Use Remove tag and select one or more Mailchimp tags from the default audience. |
| Add to an audience | Yes. | Dashboard-created rules use the connected default audience. API-created rules can target a specific Mailchimp audience ID. |
| Set merge fields | Yes. | Use the merge-field action for focused member field updates. For API-created rules, pass a mergeFields object keyed by Mailchimp merge tags such as LEADTYPE or MMERGE5. |
| Trigger from webinar behavior | Yes. | Pair Mailchimp actions with registration, attendance, watch, offer, poll, chat, segment, or time-based automation triggers. |
| Use conditions | Yes. | Add automation conditions so only matching attendees update Mailchimp. |
| Retry temporary failures | Yes. | WebinarStack runs Mailchimp actions asynchronously and retries transient provider failures. |
| Track whether a delivery worked | Yes. | WebinarStack records integration delivery outcomes internally so failed provider calls can be diagnosed. |
You can create more than one automation rule for the same trigger. For example, if you want a registrant to be added to Mailchimp and also receive a tag, you can either use Apply tag by itself because it upserts the member before tagging, or create separate rules if you want the behaviors to be managed independently.
What Mailchimp Does In WebinarStack
Section titled “What Mailchimp Does In WebinarStack”Mailchimp is part of WebinarStack’s Email Service Providers integration section. It is not the same thing as Email Delivery.
| System | What It Does |
|---|---|
| Mailchimp integration | Updates contacts, tags, audiences, and merge fields in Mailchimp. |
| Email Delivery | Sends WebinarStack automation emails through SendGrid or Postmark. |
| Webhooks | Sends signed JSON to your own URL, Zapier, Make, or another external system. |
| API keys | Let your own systems call WebinarStack. |
Use Mailchimp when you want attendee behavior in WebinarStack to update Mailchimp.
Examples:
- Add every registrant to your main webinar audience.
- Apply a
webinar-registeredtag after someone registers. - Apply a
high-intenttag when someone watches at least 75 percent. - Remove a generic nurture tag when someone becomes sales-qualified.
- Add no-shows to a re-engagement segment.
- Set a merge field for a static campaign value or internal segmentation flag.
Connecting Mailchimp does not make Mailchimp the sender for WebinarStack emails. If you want WebinarStack emails to send through your own email provider, use Email Delivery.
What Mailchimp Does Not Do
Section titled “What Mailchimp Does Not Do”The integration is intentionally focused. It updates Mailchimp from WebinarStack automation events; it does not turn Mailchimp into a full bidirectional sync engine.
| Not Included | What To Use Instead |
|---|---|
| Sending WebinarStack emails through Mailchimp | Use Email Delivery with SendGrid or Postmark. |
| Importing Mailchimp contacts into WebinarStack | Import or register attendees through WebinarStack workflows, the API, or your own registration process. |
| Syncing every webinar field to Mailchimp automatically | Use Webhooks or Zapier for richer payloads. |
| Creating Mailchimp audiences from WebinarStack | Create audiences in Mailchimp first, then connect or select them in WebinarStack. |
| Managing Mailchimp campaigns or newsletters | Build and send campaigns in Mailchimp. WebinarStack only updates contacts and segmentation data. |
| Bypassing Mailchimp unsubscribe, bounce, or privacy states | Resolve compliance states in Mailchimp according to your consent process. |
| Showing the stored API key after setup | Create a new key in Mailchimp and reconnect if you lose it. |
How The Pieces Fit Together
Section titled “How The Pieces Fit Together”The Mailchimp integration has three layers.
| Layer | What You Configure | Why It Matters |
|---|---|---|
| Account connection | API key, data center, and default audience. | Gives WebinarStack permission to call Mailchimp for the current workspace. |
| Webinar automation rule | Trigger, conditions, Integration action type, MailChimp provider, and provider action. | Decides when WebinarStack should update Mailchimp. |
| Background delivery | The async worker decrypts the key, calls Mailchimp, logs the outcome, and retries transient failures. | Keeps the attendee experience fast and records whether delivery worked. |
The setup flow looks like this:
- You create or locate a Mailchimp API key.
- WebinarStack validates that key against Mailchimp.
- WebinarStack loads the audiences available to that Mailchimp account.
- You choose a default audience, unless there is only one audience.
- You create automation rules that use Mailchimp actions.
- When an attendee matches a rule, WebinarStack updates Mailchimp in the background.
Prerequisites
Section titled “Prerequisites”Before connecting Mailchimp, prepare these items.
| Requirement | Why It Matters |
|---|---|
| Mailchimp account | WebinarStack needs an account to update. |
| Mailchimp API key | WebinarStack authenticates to the Mailchimp Marketing API with this key. |
| Data center suffix on the API key | Mailchimp API keys include a suffix such as -us6; WebinarStack uses it to call the correct Mailchimp API host. |
| At least one Mailchimp audience | WebinarStack asks you to pick a default audience when the account has multiple audiences. |
| Tags created in Mailchimp | Tag actions search tags from the connected default audience. |
| Merge fields created in Mailchimp | Merge-field actions use Mailchimp merge fields from the connected default audience. |
| WebinarStack account access | Account members can connect providers. Owners disconnect providers. |
Treat the Mailchimp API key like a password. Do not paste it into docs, screenshots, support tickets, issue trackers, public AI chats, or browser recordings.
Step 1: Create Or Locate A Mailchimp API Key
Section titled “Step 1: Create Or Locate A Mailchimp API Key”In Mailchimp, create or copy an API key from the account settings area. Mailchimp’s own help article is linked from the WebinarStack connection dialog, and Mailchimp notes that you can only see the full key immediately after generating it.
The key must include the Mailchimp data center suffix at the end.
Good examples:
abcd1234efgh5678ijkl9012mnop3456-us6abcd1234efgh5678ijkl9012mnop3456-us19Bad examples:
abcd1234efgh5678ijkl9012mnop3456us6WebinarStack validates this before connecting. If the key does not include the suffix, the form shows an error such as:
API key must include a data center suffix (e.g., abc123-us6)The suffix tells WebinarStack which Mailchimp API host to call. For abcd-us6, WebinarStack calls the us6 Mailchimp API host.
Recommended Mailchimp key hygiene:
- Create a dedicated key for WebinarStack instead of reusing a key from another integration.
- Give the key a clear name in Mailchimp, such as
WebinarStack Production. - Store the key in a password manager if your team needs a copy.
- Revoke the key in Mailchimp if it is exposed or if WebinarStack should no longer access the account.
- Reconnect WebinarStack with a newly generated key after revocation.
Step 2: Connect Mailchimp In WebinarStack
Section titled “Step 2: Connect Mailchimp In WebinarStack”In WebinarStack:
- Open Settings.
- Select Integrations.
- Find Email Service Providers.
- Find the MailChimp card.
- Click Connect.
- Paste the Mailchimp API key.
- Click Validate key.
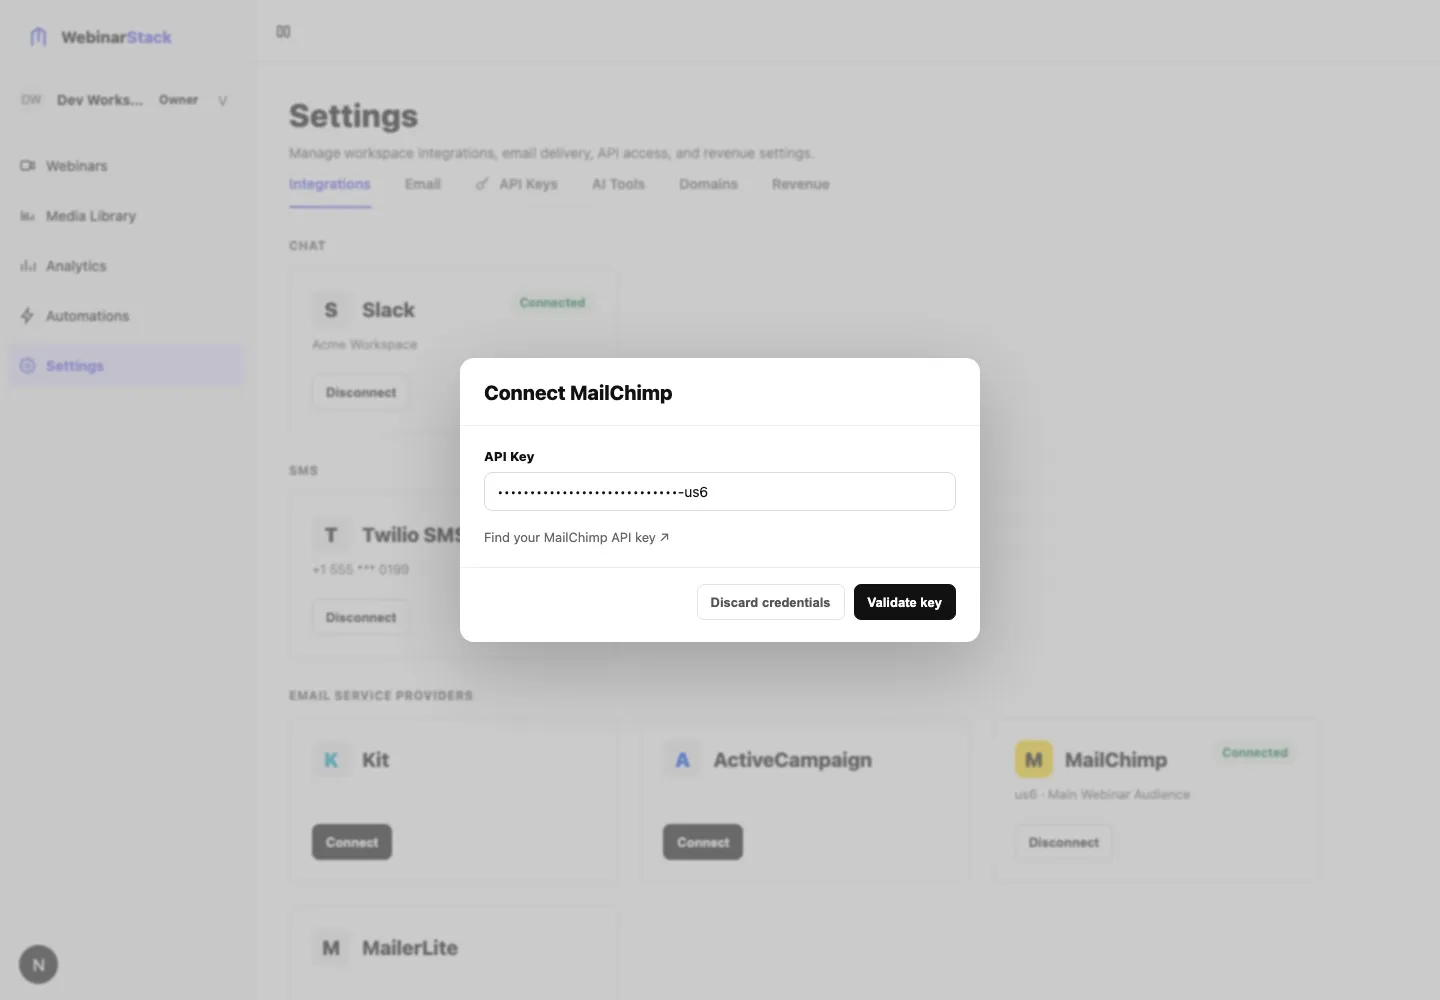
WebinarStack then calls Mailchimp and loads the audiences available to that key.
If the Mailchimp account has one audience, WebinarStack auto-selects it and completes the connection.
If the account has multiple audiences, choose the default audience and click Connect.
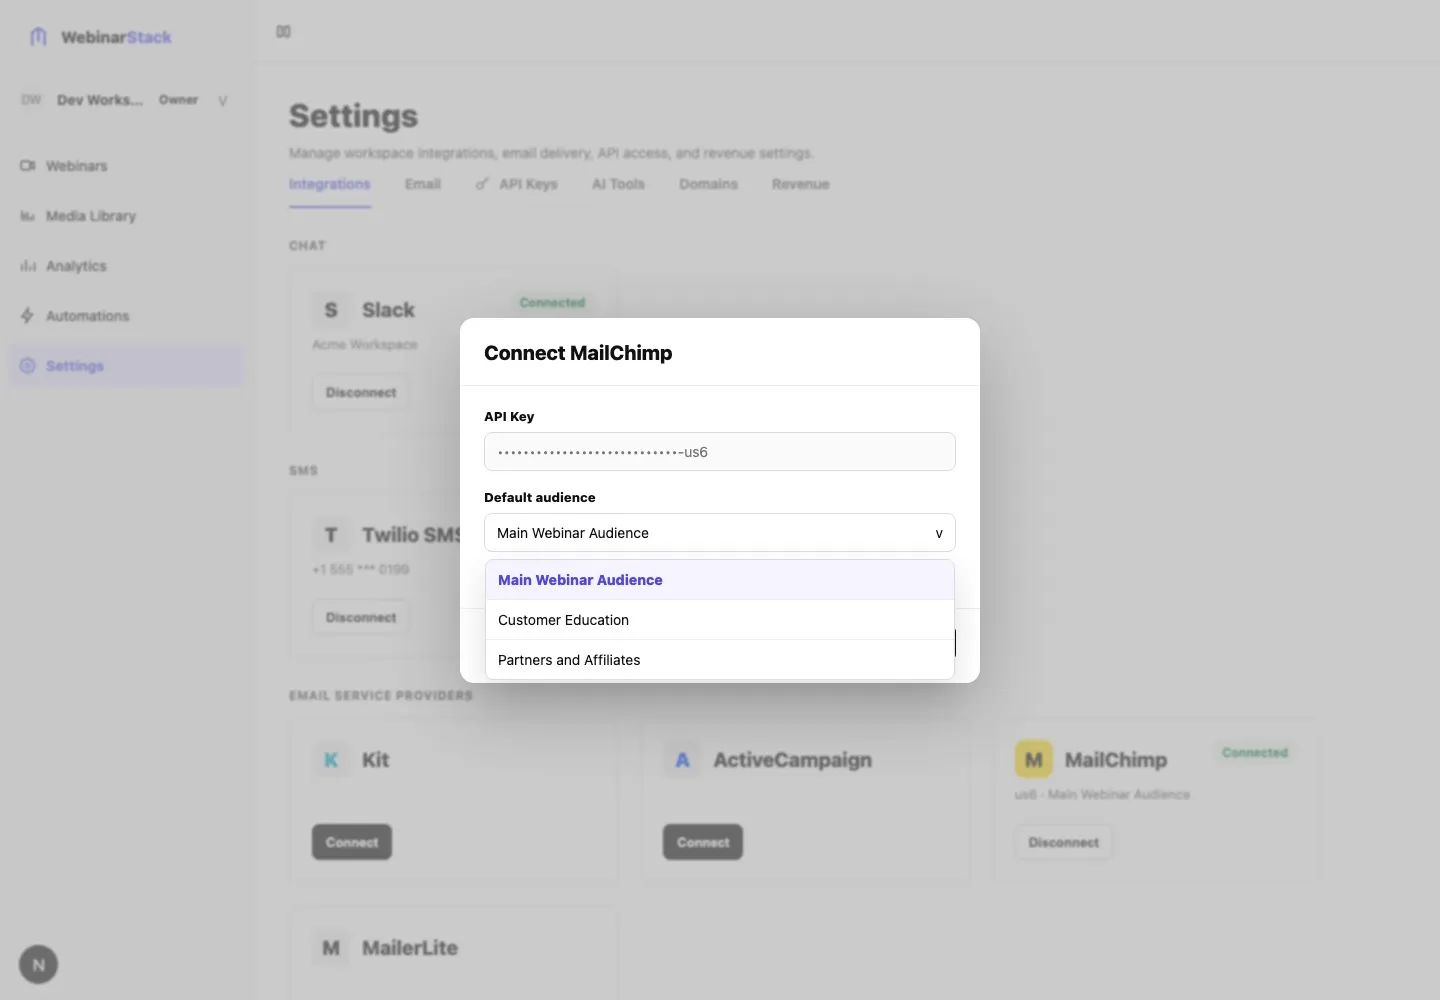
If there are no audiences, the connection cannot complete. Create an audience in Mailchimp first, then return to WebinarStack and try again.
Connection Fields And Buttons
Section titled “Connection Fields And Buttons”| Field Or Button | What It Means | How To Use It |
|---|---|---|
| API Key | The Mailchimp Marketing API key WebinarStack will use for this workspace. | Paste the full key, including the final data center suffix such as -us6. |
| Find your MailChimp API key | Opens Mailchimp’s API key help page. | Use it if you need to locate or generate a key in Mailchimp. |
| Validate key | Checks the API key and data center before storing the connection. | Click this after pasting the key. If validation fails, correct the key in Mailchimp and try again. |
| Default audience | The Mailchimp audience WebinarStack uses for normal dashboard-created Mailchimp actions. | Choose the audience where webinar registrants and tags should live. |
| Connect | Saves the encrypted credential and selected audience. | Click after the key validates and the audience is selected. |
| Discard credentials | Closes the connection dialog without saving the pasted key. | Use it if you pasted the wrong key or do not want to complete setup. |
The connection is workspace-level. Once connected, connected Mailchimp actions are available to webinar automation rules in that workspace.
Step 3: Confirm The Connected Card
Section titled “Step 3: Confirm The Connected Card”After connection, the MailChimp card shows a Connected badge.
For Mailchimp, the connected card can also show:
| Value | Meaning |
|---|---|
| Data center | The Mailchimp data center parsed from the API key, such as us6. |
| Default audience name | The audience WebinarStack saved during setup. |
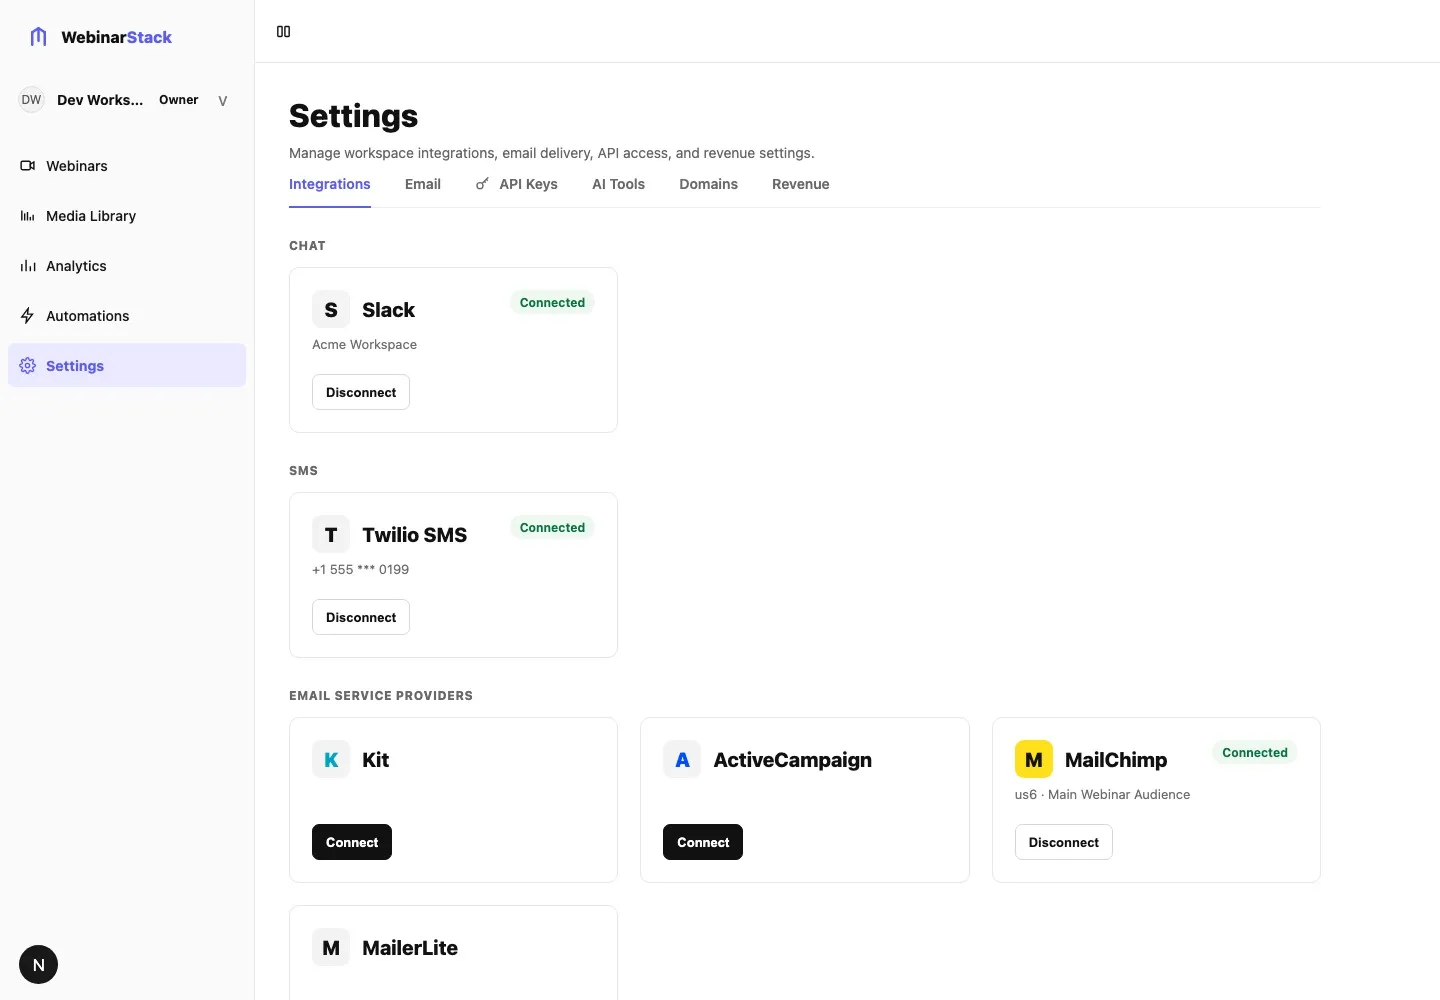
This card never shows the plaintext API key. If you lose the key, create a new key in Mailchimp, disconnect or reconnect in WebinarStack, and update the connection.
Card states:
| Card State | Meaning | What To Do |
|---|---|---|
| Not connected | No usable Mailchimp credential is stored. | Click Connect and complete setup. |
| Connected | WebinarStack has a validated key and default audience. | Create automation rules that use Mailchimp. |
| Error | A previously stored key failed validation or delivery. | Click Reconnect and provide a fresh key. |
| Disconnected | The credential is absent or unusable. | Reconnect if the workspace should continue sending Mailchimp updates. |
The Default Audience
Section titled “The Default Audience”Mailchimp accounts can have multiple audiences. WebinarStack stores one default audience on the account connection.
The default audience is used for:
- Tag lookup in the automation editor.
- Merge-field lookup in the automation editor.
- Add/update member actions created through the dashboard.
- Apply tag and remove tag actions created through the dashboard.
- Normal dashboard-created Mailchimp updates.
For most WebinarStack setups, one default audience is the cleanest model. Use tags and merge fields inside that audience to segment registrants, attendees, no-shows, and high-intent leads.
Advanced API-created automation rules can pass params.audienceId when they need to target a specific Mailchimp audience ID. The dashboard authoring flow is designed around the connected default audience.
Choose the default audience carefully. Tags, merge fields, and contact subscription state are audience-specific in Mailchimp, so a tag or field in one audience may not exist in another audience with the same account.
What WebinarStack Sends To Mailchimp
Section titled “What WebinarStack Sends To Mailchimp”For standard member upserts, WebinarStack uses the registration record.
| WebinarStack Value | Mailchimp Value |
|---|---|
| Attendee email | email_address |
| Attendee name | FNAME merge field on standard member upserts |
| Selected tags | Mailchimp member tags |
| Selected merge fields | Mailchimp merge fields, when provided in the action config |
WebinarStack does not automatically sync every webinar field to Mailchimp. UTM values, watch percentage, poll answers, offer clicks, and chat messages are used to decide whether an automation should run, but they are not all automatically written into Mailchimp member fields.
If you need a rich payload with many attendee and webinar fields, use Webhooks or Zapier. If you need a focused Mailchimp update, use the native integration.
Important data notes:
- WebinarStack identifies the Mailchimp member by the attendee email address.
- Mailchimp’s API identifies list members with a hash of the lowercase email address; WebinarStack computes this internally.
- Standard upsert actions set the Mailchimp member status to
subscribedwhen creating or updating the member. - WebinarStack does not send passwords, API keys, attendee tokens, or private internal credentials to Mailchimp.
- WebinarStack does not overwrite every Mailchimp field. Only fields included by the selected Mailchimp action are sent.
Supported Mailchimp Actions
Section titled “Supported Mailchimp Actions”Mailchimp supports five provider actions in WebinarStack.
| Action In WebinarStack | Action ID | What It Does |
|---|---|---|
| Add/update member | add_member |
Upserts the attendee into the default audience with subscribed status and FNAME from the registration name. |
| Apply tag | tag_member |
Upserts the attendee, then marks selected Mailchimp tags as active. |
| Remove tag | remove_tag |
Upserts the attendee, then marks selected Mailchimp tags as inactive. |
| Add to audience | add_to_list |
Upserts the attendee into an audience. Dashboard-created rules use the connected default audience. API-created rules can pass an explicit audienceId. |
| Set merge field | set_merge_field |
Upserts the attendee with Mailchimp merge fields supplied in the action config. For exact merge-field automation, use a test registration before relying on the rule. |
Mailchimp uses a subscriber hash based on the lowercased email address. WebinarStack computes that internally; users do not need to provide it.
Choosing The Right Action
Section titled “Choosing The Right Action”| If You Want To… | Use This Action | Notes |
|---|---|---|
| Add every registrant with basic name and email data | Add/update member | Best when you do not need tags. |
| Add the registrant and classify why they entered the audience | Apply tag | This action already upserts the member before applying tags. |
| Mark a behavior such as no-show, watched 75 percent, or clicked offer | Apply tag | Pair it with the right trigger and conditions. |
| Remove a lifecycle tag after a later behavior | Remove tag | This is not an unsubscribe action. It only marks selected tags inactive. |
| Put the attendee into the connected default audience | Add to audience | Useful when you want the action label to describe the audience membership step. |
| Write a segmentation value such as lead type or source | Set merge field | Make sure the merge field exists in the selected Mailchimp audience and accepts the value you send. |
Use separate automation rules when one attendee event needs multiple independent actions. For example, one Registered trigger can apply a registration tag, while another Registered trigger can set a merge field.
Create A Mailchimp Automation
Section titled “Create A Mailchimp Automation”After Mailchimp is connected, create an automation rule from a webinar.
- Open the webinar.
- Go to Automations.
- Click Add Automation.
- Name the rule clearly.
- Choose the trigger.
- Add conditions if the action should only run for some attendees.
- Set Action Type to Integration.
- Set Provider to MailChimp.
- Choose the Mailchimp action.
- Complete any action parameters, such as tags or fields.
- Save the automation.
- Test the rule with an internal registration.
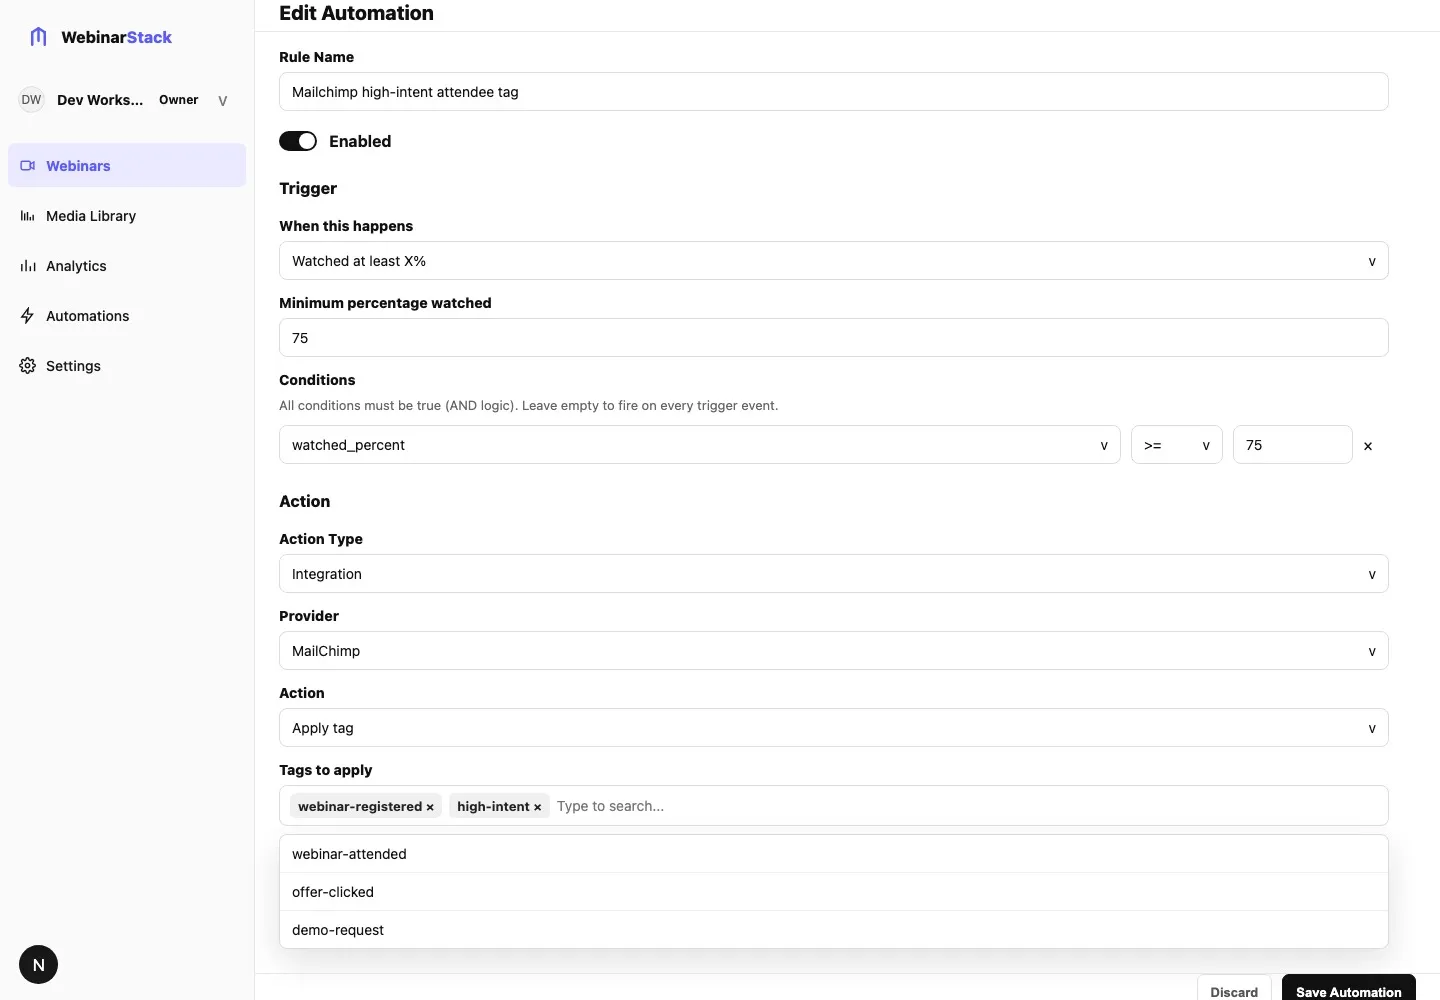
If no providers are connected, the Provider field shows an empty state and links back to Settings > Integrations.
Automation Fields That Matter
Section titled “Automation Fields That Matter”| Field | What It Means | Mailchimp-Specific Guidance |
|---|---|---|
| Rule Name | Internal name for the automation. | Use a clear name such as Mailchimp - tag high intent viewers. |
| Enabled | Whether the rule can fire. | Leave enabled only after testing the trigger and action. |
| Trigger | The event that starts evaluation. | Pick the attendee behavior you want Mailchimp to remember. |
| Conditions | Additional filters that must all pass. | Use conditions to avoid noisy tags, such as requiring a watch percentage threshold. |
| Action Type | The kind of action the rule performs. | Choose Integration for Mailchimp. |
| Provider | The connected external provider. | Choose MailChimp. It appears only when connected. |
| Action | The specific Mailchimp operation. | Choose add/update, apply tag, remove tag, add to audience, or set merge field. |
| Parameters | Action-specific tags, lists, or fields. | Search values that already exist in the connected Mailchimp audience. |
Choose The Right Trigger
Section titled “Choose The Right Trigger”Mailchimp is most useful when it records meaningful lifecycle and engagement states.
| Goal | Trigger | Recommended Mailchimp Action |
|---|---|---|
| Add every registrant | Registered | Add/update member and apply a webinar-registered tag. |
| Mark attendees | Attended | Apply an attended-webinar tag. |
| Segment no-shows | Did not attend | Apply a webinar-no-show tag. |
| Identify high intent | Watched percentage | Apply a high-intent tag when watch percentage is at least 75. |
| Track offer interest | Clicked offer | Apply an offer-clicked or product-specific tag. |
| Segment by poll answer | Responded to poll | Apply a tag based on the selected answer. |
| Route chat interest | Sent chat message | Apply a sales or support tag when the message contains a keyword. |
| Clean up nurture state | Attended or clicked offer | Remove a low-intent or generic nurture tag. |
Use conditions to keep Mailchimp clean. For example, a watched-percentage rule should usually include a threshold condition instead of tagging every viewer.
Plan Your Mailchimp Data Model
Section titled “Plan Your Mailchimp Data Model”Before creating a large set of rules, decide what should live in Mailchimp as tags and what should live as merge fields.
Use tags for lifecycle states and behavioral flags:
webinar-registeredwebinar-attendedwebinar-no-showwebinar-high-intentoffer-clickeddemo-requestedreplay-engaged
Use merge fields for structured values you may want to merge into campaigns or segment by later:
WEBINARfor the webinar name or campaign family.LEADTYPEfor a value such asHigh Intent,No Show, orReplay.SOURCEfor a static source label such asWebinarStack.PRODUCTfor the product, topic, or offer category.
Use one consistent naming style. For example, choose either lowercase hyphenated tags (webinar-high-intent) or title-case tags (Webinar High Intent) and use that format everywhere. Typos create messy segmentation and make troubleshooting harder.
For most teams, the simplest structure is:
- One primary Mailchimp audience for WebinarStack leads.
- Tags for behaviors.
- Merge fields for stable properties.
- Webhooks or Zapier for rich event payloads that do not fit Mailchimp fields.
Action Parameters
Section titled “Action Parameters”Different actions expose different parameter inputs.
| Parameter Area | When You See It | How It Works |
|---|---|---|
| Tags to apply | Apply tag. | Search Mailchimp tags from the connected default audience and select one or more. |
| Tags to remove | Remove tag. | Search Mailchimp tags from the connected default audience and select one or more. |
| Lists to add to | Add to audience. | Searches Mailchimp audiences. Dashboard delivery is centered on the connected default audience; API-created rules can pass audienceId for a specific audience. |
| Fields to set | Set merge field. | Searches Mailchimp merge fields from the default audience. For API-created rules, send a mergeFields object keyed by Mailchimp merge tag, not by display label. |
| No parameters | Add/update member. | Uses the attendee’s name and email from the registration. |
If the search dropdown says no tags or fields were found, create the tag or merge field in Mailchimp first, then return to WebinarStack.
Mailchimp validates merge-field values by field type. A text field accepts a simple string, a number field expects a number, a date field expects a supported date format, and dropdown or radio fields need values that match the configured Mailchimp options.
Consent, Compliance, And Subscription State
Section titled “Consent, Compliance, And Subscription State”Mailchimp is a marketing system, so subscription state matters.
WebinarStack’s Mailchimp member upsert actions use subscribed status when creating or updating a member. That means you should only use Mailchimp actions in workflows where you have the right permission to add the attendee to that audience.
Do not use WebinarStack automations to work around an unsubscribe, bounce, abuse, or privacy deletion state. Mailchimp may reject those updates. WebinarStack treats many recipient-level compliance failures as delivery failures for that attendee, not as a broken integration credential for the whole workspace.
Practical guidance:
- Make sure your webinar registration flow collects the consent you need.
- Keep your privacy policy and consent language aligned with how you use Mailchimp.
- Use Mailchimp’s own unsubscribe and suppression handling as the source of truth for email permission.
- Test with real internal addresses, not fake addresses that may be rejected.
- Do not repeatedly retry a contact that Mailchimp has placed in a compliance state.
API-Created Mailchimp Automations
Section titled “API-Created Mailchimp Automations”The dashboard is the normal setup path. Advanced teams can also create integration automation rules through the WebinarStack API.
The action config shape is:
{ "actionType": "integration", "actionConfig": { "provider": "mailchimp", "action": "tag_member", "params": { "tags": ["High Intent"] } }}Examples:
Apply tags:
{ "provider": "mailchimp", "action": "tag_member", "params": { "tags": ["Registered", "Q4 Webinar"] }}Remove tags:
{ "provider": "mailchimp", "action": "remove_tag", "params": { "tags": ["Cold Lead"] }}Target a specific audience ID:
{ "provider": "mailchimp", "action": "add_to_list", "params": { "audienceId": "a83afc85e6" }}Set merge fields:
{ "provider": "mailchimp", "action": "set_merge_field", "params": { "mergeFields": { "MMERGE5": "Webinar", "LEADTYPE": "High Intent" } }}For merge-field writes, the object keys must be Mailchimp merge tags such as FNAME, LNAME, COMPANY, LEADTYPE, or MMERGE5. Do not include the *| and |* delimiters used inside Mailchimp email templates.
API-created rules still require the Mailchimp provider to be connected first. WebinarStack will reject an integration automation rule when the provider is not connected for the workspace.
Before calling automation endpoints, create a WebinarStack API key from Settings > API Keys with REST API access and the automation scopes required by the operation.
Delivery And Reliability
Section titled “Delivery And Reliability”Mailchimp automation actions run asynchronously.
When a rule fires:
- WebinarStack records that the automation matched the attendee.
- WebinarStack sends an integration action event to the background worker.
- The worker loads the rule, registration, and Mailchimp credential.
- The worker decrypts the Mailchimp key inside the delivery step.
- The worker calls Mailchimp.
- WebinarStack records success or failure in the integration delivery ledger.
- The attendee experience continues independently of the Mailchimp response.
Operational behavior:
| Behavior | What Happens |
|---|---|
| Async delivery | Attendees do not wait for Mailchimp to respond. |
| Retries | Transient failures are retried by the background worker. |
| Rate limiting | WebinarStack throttles integration dispatch per provider and account. |
| Concurrency | Integration execution is limited per provider and account to avoid overwhelming providers. |
| Idempotency | If a retry already has a successful delivery record for the same execution, WebinarStack does not call Mailchimp again. |
| Credential auth failures | True credential failures mark the provider connection as error so the account can reconnect. |
| Recipient-level failures | Mailchimp compliance states for a single email are treated as delivery failures, not as a broken account credential. |
Mailchimp can reject individual recipients for compliance reasons, such as unsubscribe, bounce, compliance review, or a forgotten email address. WebinarStack treats those as attendee-level problems so one blocked recipient does not break the whole Mailchimp integration.
What Happens If Mailchimp Is Slow Or Unavailable
Section titled “What Happens If Mailchimp Is Slow Or Unavailable”The attendee-facing webinar flow does not wait for Mailchimp to respond. If Mailchimp is temporarily slow, rate limited, or unavailable, WebinarStack’s background worker can retry the delivery. If the final retry still fails, WebinarStack records the failure so the issue can be diagnosed.
If Mailchimp rejects the API key itself, WebinarStack marks the integration as errored. The next fix is to reconnect Mailchimp with a valid key.
If Mailchimp rejects one attendee because of that attendee’s subscription or privacy state, WebinarStack does not mark the entire Mailchimp credential as broken.
Disconnect Or Reconnect Mailchimp
Section titled “Disconnect Or Reconnect Mailchimp”To disconnect Mailchimp:
- Open Settings.
- Select Integrations.
- Find the MailChimp card.
- Click Disconnect.
- Confirm the disconnect dialog.
Disconnecting Mailchimp:
- Deletes the stored Mailchimp credential from WebinarStack.
- Disables automation rules that use Mailchimp.
- Adds a disabled reason to those rules.
- Stops future Mailchimp automation deliveries until you reconnect and re-enable rules.
Only account owners can disconnect providers. Members can connect providers, but disconnect is owner-only because it removes credentials and changes automation behavior for the whole workspace.
If the Mailchimp connection is in an error or disconnected state, the card shows Reconnect. Reconnecting replaces the stale or broken credential with a new validated key.
If Mailchimp is already connected and healthy, disconnect it first before connecting a different Mailchimp key.
After reconnecting, review any rules that were disabled because of the disconnect. Re-enable only the rules that should continue to run with the new Mailchimp credential and audience.
Testing Checklist
Section titled “Testing Checklist”Use this checklist before relying on Mailchimp automations for a launch.
- Confirm the MailChimp card is connected in Settings > Integrations.
- Confirm the connected card shows the expected data center and default audience.
- Confirm the tags and merge fields you need already exist in Mailchimp.
- Create a simple internal automation, such as Registered > Integration > MailChimp > Apply tag.
- Register with an internal test email.
- Wait for the background delivery to run.
- Open Mailchimp and search for the test email.
- Confirm the member exists in the expected audience.
- Confirm the expected tag or field was applied.
- Re-enable or adjust the production rule only after the test succeeds.
Use a real internal email address for the test. Mailchimp may reject fake or previously unsubscribed addresses depending on the audience state.
For higher-risk launches, test each important behavior separately:
- Registered attendee creates or updates the member.
- Registered attendee receives the correct registration tag.
- Attendee receives the correct watched-percentage tag only after meeting the threshold.
- No-show receives the no-show tag after the session logic completes.
- Offer click applies the correct offer-interest tag.
- Poll or chat conditions do not tag unrelated attendees.
- Merge-field values appear in Mailchimp exactly as expected.
Troubleshooting
Section titled “Troubleshooting”API Key Must Include A Data Center Suffix
Section titled “API Key Must Include A Data Center Suffix”The Mailchimp API key must end with a suffix like -us6 or -us19.
Fix:
- Copy the full API key from Mailchimp.
- Make sure the pasted value includes the suffix after the final dash.
- Try Validate key again.
API Key Rejected
Section titled “API Key Rejected”This means Mailchimp rejected the credential during validation or delivery.
Check:
- The key is copied from the correct Mailchimp account.
- The key has not been revoked in Mailchimp.
- The key includes the data center suffix.
- The Mailchimp account has permission to access the audiences you expect.
- You did not paste an API key from another provider.
If a previously working connection becomes invalid, create a new Mailchimp API key and reconnect Mailchimp in WebinarStack.
No Audiences Found
Section titled “No Audiences Found”WebinarStack cannot complete the Mailchimp connection if the key returns zero audiences.
Fix:
- Create an audience in Mailchimp.
- Confirm the API key belongs to the account that owns that audience.
- Reopen the Mailchimp connection dialog in WebinarStack.
- Validate the key again.
Tags Do Not Appear In The Automation Editor
Section titled “Tags Do Not Appear In The Automation Editor”Tag search reads tags from the connected default audience.
Check:
- The Mailchimp card is connected.
- The default audience is the audience where the tags exist.
- The tag exists in Mailchimp before you search for it.
- The connection is not in an error state.
If you created the tag moments ago, close and reopen the automation editor or search again.
Merge Fields Do Not Appear
Section titled “Merge Fields Do Not Appear”Merge-field search reads merge fields from the connected default audience.
Check:
- The merge field exists in Mailchimp.
- It belongs to the default audience selected during connection.
- The Mailchimp connection is still healthy.
For exact merge-field writes, test with an internal registration before relying on a live rule.
A Mailchimp Automation Did Not Update The Member
Section titled “A Mailchimp Automation Did Not Update The Member”Check:
- The automation rule is enabled.
- The trigger actually happened for that attendee.
- The rule conditions passed.
- Action Type is Integration.
- Provider is MailChimp.
- The Mailchimp connection is connected, not error or disconnected.
- The attendee has a valid email address.
- The member is not in a Mailchimp compliance state that prevents subscription updates.
- Provider rate limits or temporary Mailchimp issues may delay delivery.
- You are checking the correct Mailchimp audience. The default audience selected during connection is the normal dashboard target.
- The tag or merge field name in the rule matches the Mailchimp value you expected.
Mailchimp Shows The Member In A Compliance State
Section titled “Mailchimp Shows The Member In A Compliance State”Mailchimp can block updates for recipients who unsubscribed, bounced, were archived in a restricted state, or were permanently deleted under privacy rules.
In that case, WebinarStack treats the issue as a recipient-level failure. The account credential should stay connected, but that specific attendee may not be updated.
Do not try to bypass Mailchimp compliance states from WebinarStack. Resolve the subscriber state in Mailchimp according to your consent and compliance process.
Disconnecting Mailchimp Disabled Rules
Section titled “Disconnecting Mailchimp Disabled Rules”This is expected.
Disconnecting deletes the provider credential and disables automation rules that depend on that provider. Reconnect Mailchimp, review each disabled rule, and re-enable only the rules you still want to run.
Best Practices
Section titled “Best Practices”- Use one main Mailchimp audience for WebinarStack unless you have a strong reason to split audiences.
- Segment with tags and merge fields instead of creating many audiences.
- Use clear tag names, such as
webinar-registered,webinar-attended,webinar-no-show, andwebinar-high-intent. - Keep trigger conditions strict enough to avoid noisy tags.
- Test every Mailchimp automation with an internal registration before launch.
- Do not use Mailchimp as the source of truth for WebinarStack registration state.
- Do not paste real API keys into AI prompts, support tickets, screenshots, or issue trackers.
- Reconnect immediately if the provider card shows an error.
- Disconnect Mailchimp when the workspace should no longer update that Mailchimp account.
Official Mailchimp Resources
Section titled “Official Mailchimp Resources”These Mailchimp resources are useful when you are setting up the WebinarStack integration:
- About API Keys
- Marketing API methods and parameters
- Create your first audience
- Organize contacts with tags
- Merge fields
What To Ask Your Favorite AI
Section titled “What To Ask Your Favorite AI”AI can help you plan Mailchimp tags, merge fields, and automation rules. Do not paste real Mailchimp API keys, attendee lists, or private customer data into AI tools.
Use placeholders such as:
MAILCHIMP_API_KEY_REDACTEDMAILCHIMP_AUDIENCE_ID_REDACTEDattendee@example.comWEBINAR_ID_REDACTED
Prompt: Plan Mailchimp Tags
Section titled “Prompt: Plan Mailchimp Tags”I am setting up WebinarStack to update Mailchimp after webinar activity.
My webinar funnel is:[describe registration, attendance, offer, and follow-up flow]
I want to use one Mailchimp audience and segment with tags.
Please recommend:- Tags for registered, attended, no-show, high-intent, offer-clicked, and replay-engaged contacts- Which WebinarStack trigger should apply each tag- Any conditions I should add so tags stay clean- Tags I should avoid because they are too vague or redundant
Do not ask me for a real Mailchimp API key or attendee list.Prompt: Design A Mailchimp Automation Rule
Section titled “Prompt: Design A Mailchimp Automation Rule”Help me design a WebinarStack automation rule that updates Mailchimp.
Goal:[describe the outcome]
Available WebinarStack triggers:- Registered- Attended- Did not attend- Watched percentage- Clicked offer- Responded to poll- Sent chat message
Available Mailchimp actions:- Add/update member- Apply tag- Remove tag- Add to audience- Set merge field
Please recommend the trigger, conditions, Mailchimp action, tag or field names, and a test plan.Do not ask for real API keys or private attendee data.Prompt: Create API Action Config
Section titled “Prompt: Create API Action Config”Help me write the actionConfig JSON for a WebinarStack automation that updates Mailchimp.
Goal:[describe the behavior]
Provider:mailchimp
Available action IDs:- add_member- tag_member- remove_tag- add_to_list- set_merge_field
Known Mailchimp values:- Audience ID, if needed: MAILCHIMP_AUDIENCE_ID_REDACTED- Tags: [list tag names]- Merge tags: [list merge tag keys, such as LEADTYPE or MMERGE5]
Please produce only the actionConfig JSON object and explain which values are placeholders.Do not ask me for an API key.Prompt: Troubleshoot Mailchimp Delivery
Section titled “Prompt: Troubleshoot Mailchimp Delivery”I am troubleshooting a WebinarStack to Mailchimp automation.
What I know:- Trigger: [trigger]- Conditions: [conditions]- Mailchimp action: [action]- Expected result: [expected tag/member/field update]- Observed result: [what happened]- Error message, if any: [redacted message]
Please give me a checklist that covers WebinarStack rule setup, Mailchimp audience/tag/merge-field setup, API key connection state, and Mailchimp recipient compliance states.Do not ask me to paste a real API key.