
Webinar Registration Tab
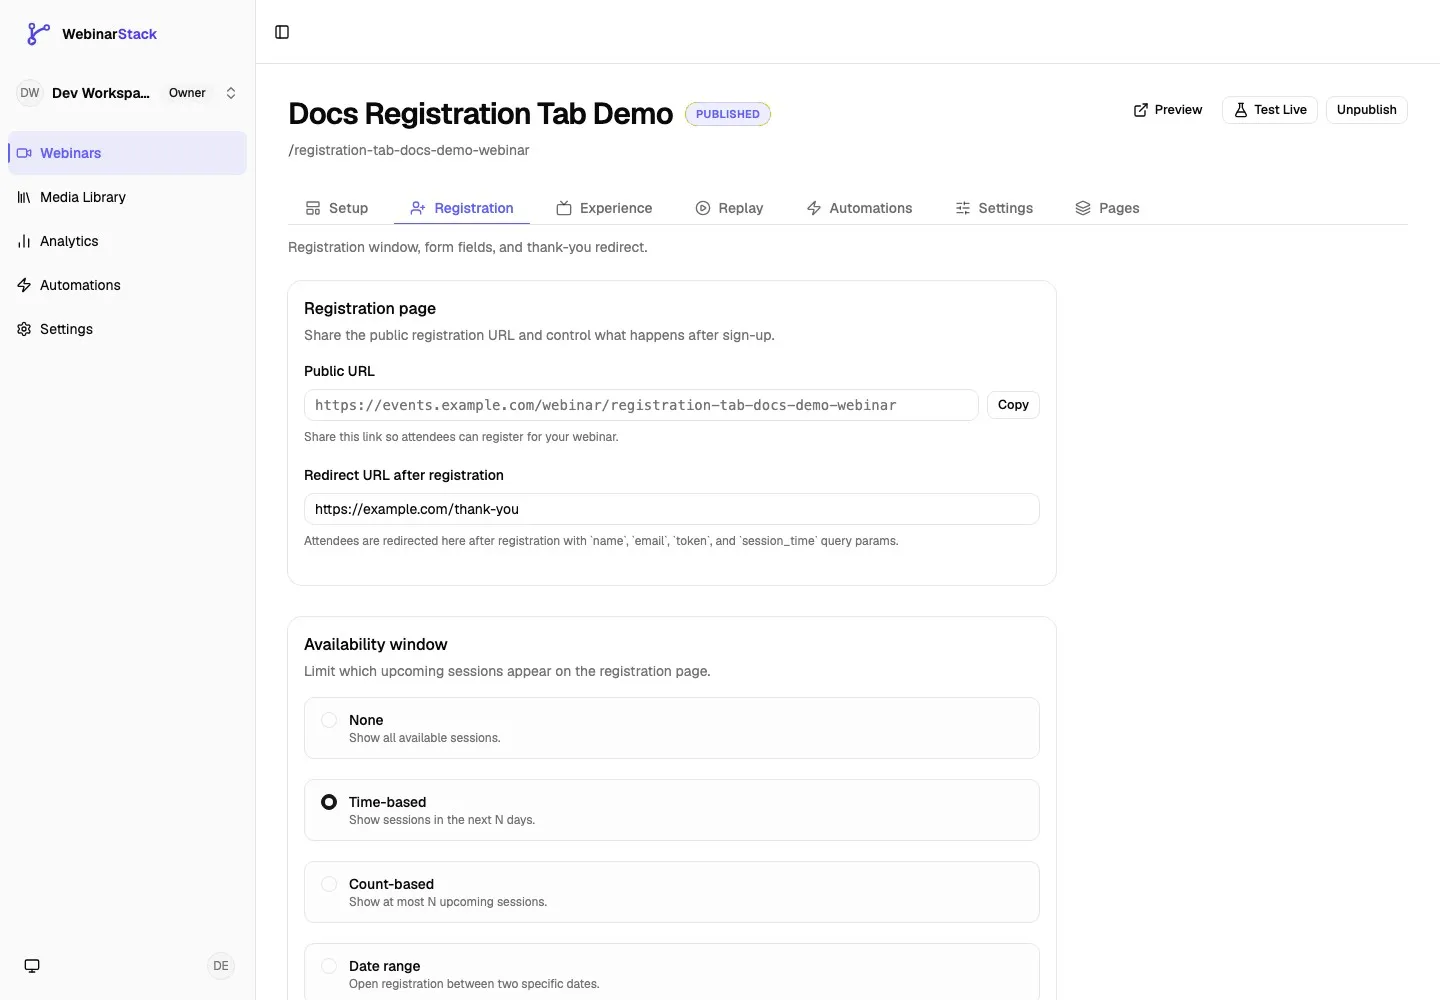
The Registration tab controls how attendees reach the registration page, where they go after signing up, which sessions they can choose, and how the webinar registration widget is embedded on another site.
Open it from Dashboard -> Webinars -> select a webinar -> Registration.
Previous tab: Webinar Setup Tab.
What The Registration Tab Controls
Section titled “What The Registration Tab Controls”The Registration tab is organized into four cards.
| Registration Section | What You Control | Save Behavior |
|---|---|---|
| Registration page | Public registration URL and redirect URL after registration. | Public URL is read-only. Redirect URL uses Save changes. |
| Availability window | Which upcoming sessions appear to registrants. | Uses Save changes. |
| Embed widget | Inline or modal registration widget snippet for external pages. | Auto-saves after a short delay. |
| Registrations | Current total registration count. | Read-only. |
The Registration tab does not edit the page layout itself. Visual page design, registration-page copy blocks, and registration form block settings live under the Pages tab. The Registration tab is focused on sharing, redirect behavior, session filtering, embed setup, and registration volume.
Save Behavior
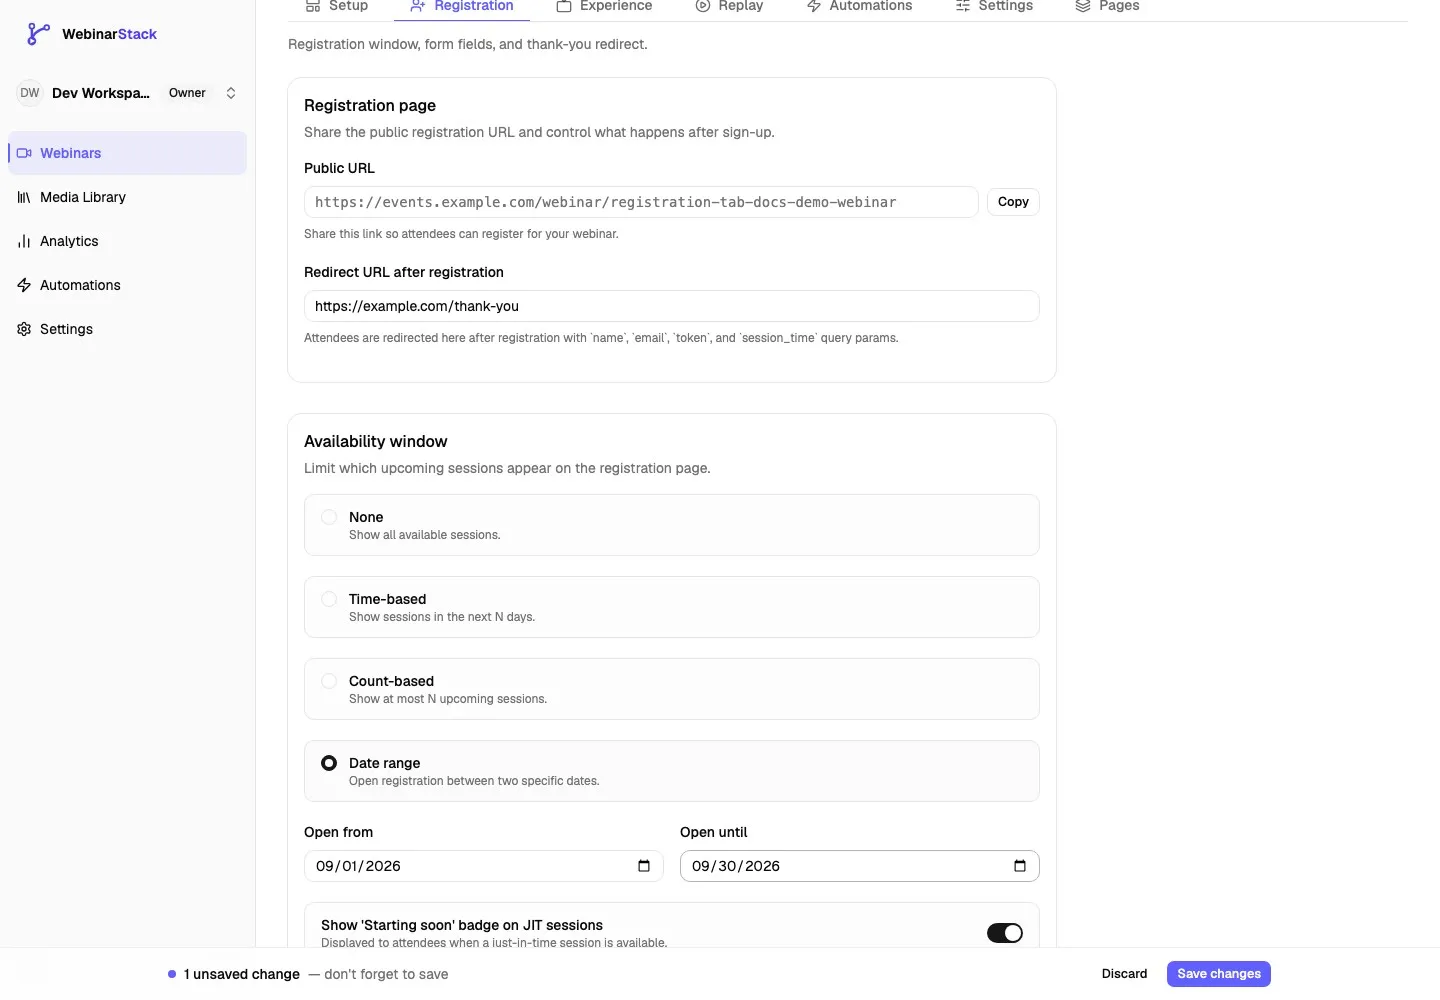
Section titled “Save Behavior”Registration tab settings use two different save patterns.
| Change Type | How It Saves |
|---|---|
| Redirect URL after registration | Use the sticky Save changes bar. |
| Availability mode | Use the sticky Save changes bar. |
| Days ahead or maximum sessions | Use the sticky Save changes bar. |
| Open from and Open until dates | Use the sticky Save changes bar. |
| Show “Starting soon” badge | Use the sticky Save changes bar. |
| Embed widget mode, button text, button color, and modal width | Auto-saves after a short debounce. |
| Copy buttons | Do not save anything. They only copy the current value. |
| Registrations count | Read-only. |
If the sticky save bar is visible, save before leaving the editor or click Discard to return to the last saved values.
Registration Page
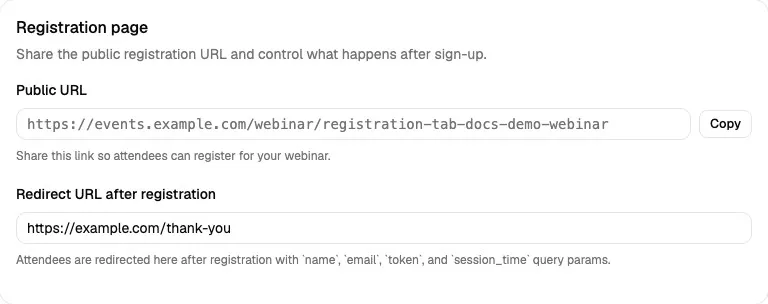
Section titled “Registration Page”The Registration page card gives you the attendee-facing URL and the redirect destination used after a successful registration.
Public URL
Section titled “Public URL”The Public URL is the link attendees use to register for the webinar.
Field behavior:
| Detail | Behavior |
|---|---|
| Editable | No. |
| Source | Built from the webinar slug and the account’s active tenant URL. |
| Custom domains | If the account has a live custom domain, that domain is used. |
| Fallback | If no live custom domain exists, WebinarStack uses the configured app URL. |
| Copy button | Copies the public registration URL to the clipboard. |
Use this link in emails, ads, social posts, partner pages, calendar invites, and internal QA checklists.
The URL format is:
{tenant-url}/webinar/{webinar-slug}Examples:
https://events.example.com/webinar/product-demohttps://app.webinarstack.com/webinar/product-demoIf the URL is not what you expect, check the webinar slug and any custom domain configured for the account.
Redirect URL After Registration
Section titled “Redirect URL After Registration”The Redirect URL after registration is where attendees are sent after they successfully register.
Field behavior:
| Detail | Behavior |
|---|---|
| Editable | Yes. |
| Required | Yes. |
| Validation | Must be a valid URL. |
| Save behavior | Uses the sticky Save changes bar. |
| Good use | A thank-you page, confirmation page, next-step page, offer page, or custom onboarding page. |
After registration, WebinarStack appends these query parameters to the redirect URL:
| Query Parameter | Meaning |
|---|---|
name |
Attendee name submitted in the registration form. |
email |
Attendee email submitted in the registration form. |
token |
Attendee access token used for the watch experience. |
session_time |
The selected session start time as an ISO timestamp. |
Example redirect:
https://example.com/thank-you?name=Avery%20Stone&email=avery%40example.com&token=abc123&session_time=2026-09-04T17%3A00%3A00.000ZUse those query parameters carefully. They are helpful when your thank-you page needs to personalize copy, pass the attendee into another system, or render the correct next step. The attendee token should be treated as sensitive because it grants access to the watch URL.
UTM values are captured from the registration URL and stored on the registration record. They are not part of the redirect URL query string generated by this setting.
Availability Window
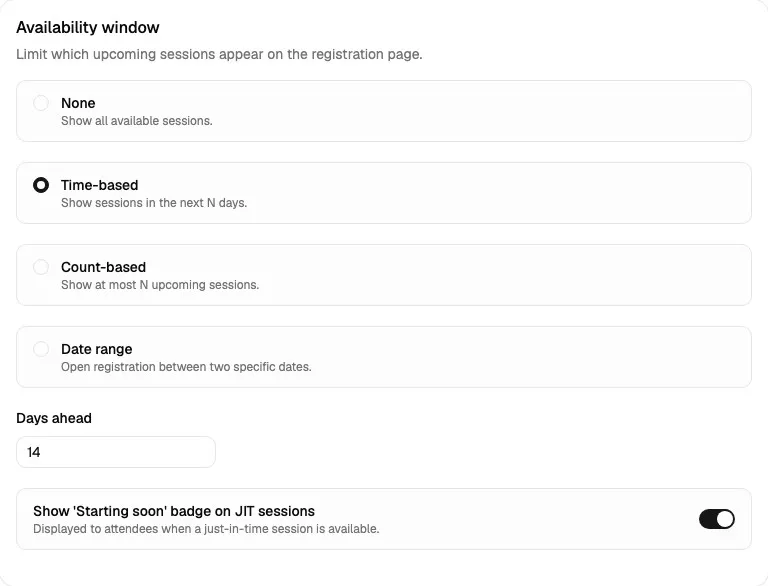
Section titled “Availability Window”The Availability window controls which upcoming sessions appear on the public registration page and embed widget.
This setting filters the sessions produced by the Setup tab schedule. Setup decides what sessions exist; Registration decides how much of that availability is shown to registrants.
How Availability Filtering Works
Section titled “How Availability Filtering Works”WebinarStack first builds available sessions from the Setup tab schedule:
- Fixed sessions.
- Recurring sessions.
- Just-in-time sessions.
- Blackout date filtering.
- Session deduplication and sorting.
Then the Registration tab availability window filters that merged list before attendees see it.
Use this section when you want to reduce choice overload, run registration only during a campaign window, or keep just-in-time availability from crowding out planned sessions.
Choose None to show all available sessions returned by the webinar schedule.
Use this when:
- The webinar has only a few session choices.
- You want the registration page to expose the full schedule.
- You are testing whether the Setup tab schedule is producing the sessions you expect.
If the schedule creates many future slots, None can make the registration page harder to scan.
Time-Based
Section titled “Time-Based”Choose Time-based to show sessions in the next N days.
Fields:
| Field | Meaning |
|---|---|
| Days ahead | Number of days into the future to show sessions. |
Rules:
| Detail | Behavior |
|---|---|
| Minimum | 1 day. |
| Maximum | 365 days. |
| Empty value | No additional time filter is applied. |
Use Time-based availability when the registration experience should feel current and focused. For example, 14 days means attendees see sessions starting within the next two weeks.
Good uses:
- Evergreen webinars with frequent sessions.
- Campaigns where near-term attendance matters.
- Registration pages where too many future sessions hurt conversion.
Count-Based
Section titled “Count-Based”Choose Count-based to show only the first N upcoming sessions.
Fields:
| Field | Meaning |
|---|---|
| Maximum sessions | Maximum number of upcoming sessions to show. |
Rules:
| Detail | Behavior |
|---|---|
| Minimum | 1 session. |
| UI maximum | 50 sessions. |
| Scheduling filter behavior | The merged session list is sliced to the first N sessions. |
| Empty value | No additional count filter is applied. |
Use Count-based availability when the page should always show a compact number of options regardless of how many future sessions exist.
Example:
If Setup produces 20 upcoming sessions and Maximum sessions is 3, the registration page shows the first three upcoming sessions after all schedule merging and blackout filtering has already happened.
Date Range
Section titled “Date Range”Choose Date range to show sessions between two specific dates.
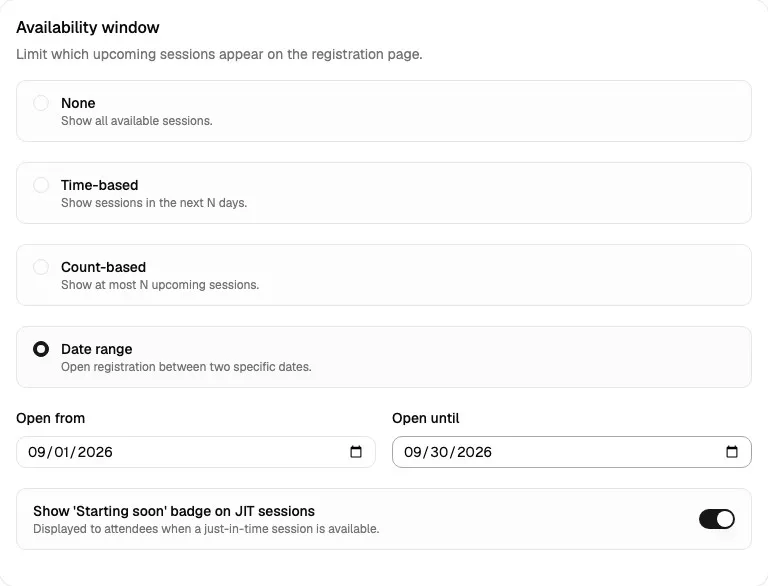
Fields:
| Field | Meaning |
|---|---|
| Open from | Earliest eligible session date/time. |
| Open until | Latest eligible session date/time. |
Date range behavior:
| Setup | Behavior |
|---|---|
| Only Open from set | Shows sessions at or after that date. |
| Only Open until set | Shows sessions at or before that date. |
| Both set | Shows sessions inside the date range. |
| Neither set | No additional date filter is applied. |
Use Date range when the webinar is part of a launch, cohort, partner event, limited promotion, or campaign with clear start and end dates.
Starting Soon Badge For JIT Sessions
Section titled “Starting Soon Badge For JIT Sessions”The Show “Starting soon” badge on JIT sessions toggle controls whether just-in-time sessions get a visible urgency badge for attendees.
Field behavior:
| Detail | Behavior |
|---|---|
| Applies to | Just-in-time sessions. |
| Default | On. |
| Save behavior | Uses the sticky Save changes bar. |
| Attendee impact | Helps call attention to sessions that are available soon. |
Turn it on when just-in-time availability is part of your conversion strategy. Turn it off if the registration page should feel more neutral or if you do not want urgency language in the session picker.
Embed Widget
Section titled “Embed Widget”The Embed widget card generates HTML you can paste into another web page to render the webinar registration widget.
The widget uses the same registration and availability settings as the public registration page. If you change the redirect URL, availability window, or JIT badge setting, the embedded registration experience follows those saved settings.
Inline Mode
Section titled “Inline Mode”Choose Inline when the registration widget should load directly inside the host page where the snippet is pasted.
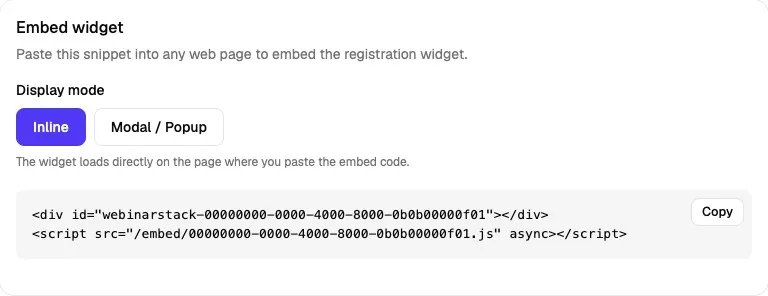
Inline mode generates:
| Snippet Part | Meaning |
|---|---|
div with id="webinarstack-{webinarId}" |
Mount point where the widget renders. |
Async script tag |
Loads the WebinarStack embed loader. |
Use Inline mode when the page layout already has a clear registration section and you want the form to appear in the flow of the page.
Good uses:
- Landing pages with a dedicated registration section.
- Long-form sales pages.
- Partner pages where the form should be visible without a click.
- Internal test pages where you want to inspect the full widget immediately.
Modal / Popup Mode
Section titled “Modal / Popup Mode”Choose Modal / Popup when the host page should show a button first, then open the registration widget in a centered overlay after the visitor clicks.
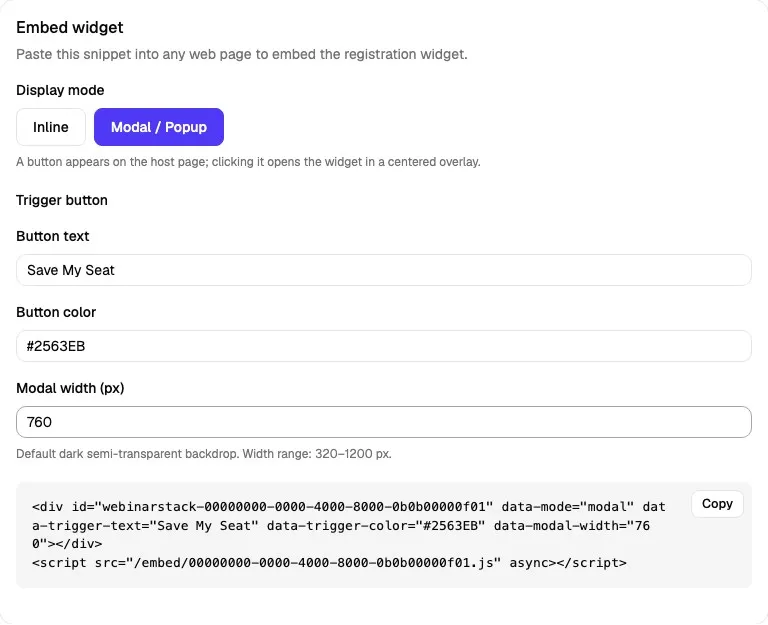
Modal fields:
| Field | Meaning | Limit |
|---|---|---|
| Button text | Text shown on the trigger button. | Up to 120 characters when saved. |
| Button color | Background color for the trigger button. | Stored as text; use a valid hex color such as #4F46E5. |
| Modal width (px) | Width of the modal overlay. | 320 to 1200 pixels. |
Modal defaults:
| Setting | Default |
|---|---|
| Button text | Watch the Webinar |
| Button color | #4F46E5 |
| Modal width | 640 |
Modal snippets include additional data-* attributes:
| Attribute | Meaning |
|---|---|
data-mode="modal" |
Tells the loader to render a trigger button and modal overlay. |
data-trigger-text |
Sets the trigger button copy. |
data-trigger-color |
Sets the trigger button color. |
data-modal-width |
Sets the modal width. |
Use Modal / Popup mode when the host page already has its own layout or CTA section and you do not want the full registration widget visible immediately.
Embed Auto-Save
Section titled “Embed Auto-Save”Embed widget settings auto-save after a short delay.
That means:
- The sticky Save changes bar does not appear for embed widget mode or modal button settings.
- The generated snippet updates as you change settings.
- If the auto-save request fails, WebinarStack shows an error toast.
- You should copy the snippet after the fields show the final values you want.
If the snippet does not look current, wait a moment or reload the editor and check the persisted values.
Where To Paste The Snippet
Section titled “Where To Paste The Snippet”Paste the embed snippet into the HTML of the page where the registration widget should appear.
Common destinations:
- Webflow custom embed block.
- WordPress HTML block.
- Framer custom code block.
- Shopify custom liquid/HTML section.
- A custom marketing site template.
- A landing-page builder that allows script tags.
Some no-code builders restrict scripts in previews. If the widget does not appear in the builder preview, publish the page to a test URL and verify it there.
Registrations
Section titled “Registrations”The Registrations card shows the current total number of registrations for the webinar.

Use this as a quick sanity check after:
- Publishing a registration page.
- Embedding the widget on another page.
- Launching an email campaign.
- Running paid traffic.
- Testing a registration flow.
The count is read-only in this tab. Detailed registration and attendee analysis lives in Analytics and attendee-level reporting.
How This Tab Connects To Other Tabs
Section titled “How This Tab Connects To Other Tabs”Registration settings work with several other editor areas.
| Area | Connection |
|---|---|
| Setup tab | Creates the fixed, recurring, and just-in-time sessions that Registration filters. |
| Pages tab | Controls the registration page layout and registration form block settings. |
| Automations tab | Uses registration events to trigger emails, SMS, webhooks, and integrations. |
| Settings tab | Controls date, time, language, and timezone behavior that can affect attendee-facing session display. |
| Analytics | Shows registration, attendance, attribution, and funnel performance after people sign up. |
If a session is missing from the public registration page, check the Setup tab schedule first, then the Registration tab availability window, then any registration page/form configuration in Pages.
Registration Tab Checklist
Section titled “Registration Tab Checklist”Before sending traffic to a webinar, review this checklist:
- Public URL opens the correct webinar registration page.
- Redirect URL after registration points to the intended thank-you or next-step page.
- The redirect destination can safely receive
name,email,token, andsession_time. - Availability mode matches the campaign strategy.
- Days ahead, maximum sessions, or date range values are filled when their mode is selected.
- The JIT starting-soon badge is enabled or disabled intentionally.
- Embed mode matches the host page design.
- Modal button text, color, and width are final before copying the snippet.
- Sticky Save changes bar is cleared.
- A test registration increments the registration count.
Troubleshooting
Section titled “Troubleshooting”| Issue | Likely Cause | What To Do |
|---|---|---|
| Public URL uses the wrong domain | The account does not have the expected live custom domain, or the domain cache has not refreshed. | Check Settings for the custom domain status and retry after the domain is live. |
| Redirect URL will not save | The value is not a valid URL. | Use a full URL such as https://example.com/thank-you. |
| Thank-you page is missing attendee data | The page is not reading the appended query parameters. | Read name, email, token, and session_time from the URL query string. |
| Too many sessions appear | Availability mode is set to None or the filter is too broad. | Use Time-based, Count-based, or Date range filtering. |
| No sessions appear | Setup schedule is empty, all sessions are outside the availability window, or blackout dates remove them. | Check Setup schedule, Registration availability, blackout dates, and registration page visibility. |
| JIT sessions do not show a starting-soon badge | The JIT badge toggle is off. | Turn on Show “Starting soon” badge on JIT sessions and save. |
| Embed widget changes do not show in the snippet | The auto-save/update debounce has not finished. | Wait a moment, then copy the snippet again. |
| Modal width is ignored | The width is outside the supported range. | Use a value between 320 and 1200 pixels. |
| Widget does not render on an external site | The host page blocks scripts or strips custom HTML. | Use a page area that supports script tags and test on a published page. |
| Registration count stays at zero after testing | The registration may not have completed, the webinar may be unpublished, or duplicate registration was blocked. | Test with a new email address and confirm the redirect completes. |
Next tab: Webinar Experience Tab.