
Kit Integration
The Kit integration lets WebinarStack update your Kit account when webinar automation rules fire. Use it to add registrants as subscribers, apply tags when someone registers or engages, remove tags when a behavior should change their segment, and set custom fields that help you personalize follow-up inside Kit.
This guide explains what the Kit integration does, how to connect it, how each action works, what data is sent, how to plan tags and fields, how delivery behaves in the background, and how to troubleshoot common setup issues.
Kit was previously known as ConvertKit. WebinarStack uses the current Kit name in the app, but you may still see ConvertKit mentioned in older help content, URLs, API examples, or internal team notes.
Quick Reference
Section titled “Quick Reference”| Item | Details |
|---|---|
| Integration type | Native email service provider integration. |
| Direction | WebinarStack updates Kit. Kit does not push subscribers into WebinarStack through this integration. |
| Where to connect it | Settings > Integrations > Email Service Providers > Kit. |
| Credential | Kit V4 API key. |
| Authentication method | X-Kit-Api-Key header against the Kit API. |
| Main workflow | Create a webinar automation with Action Type set to Integration, Provider set to Kit, and a Kit action selected. |
| Supported actions | Add/upsert subscriber, apply tag, remove tag, set custom field. |
| Default attendee data | WebinarStack sends the attendee email address and, when available, the attendee name as the Kit first name. |
| Tags and fields | Tags and custom fields must already exist in Kit before most rules can use them. |
| Delivery model | Kit actions run asynchronously after the automation trigger and conditions pass. |
| Disconnect behavior | Disconnecting Kit deletes the stored credential and disables Kit automation rules. |
The main difference between Kit and some list-based email platforms is that Kit keeps subscribers in one account-level subscriber list. You organize that list with tags, segments, and custom fields. That means WebinarStack does not ask you to choose an audience or list during Kit setup.
What You Can Do With Kit
Section titled “What You Can Do With Kit”Kit is useful when webinar behavior should become segmentation or personalization data in your email marketing system.
| Capability | Available? | How It Works |
|---|---|---|
| Connect a Kit account | Yes. | Paste a Kit V4 API key in Settings > Integrations. |
| Add or update a subscriber | Yes. | Use an automation action that upserts the attendee by email address. |
| Apply tags | Yes. | Select one or more existing Kit tags. WebinarStack applies them when the automation fires. |
| Remove tags | Yes. | Select one or more existing Kit tags. WebinarStack removes only those tag associations. |
| Set custom fields | Yes. | Select or specify Kit custom field keys and values. WebinarStack writes them to the subscriber. |
| Trigger from webinar behavior | Yes. | Pair Kit actions with registration, join, no-show, watch-time, completion, offer-click, poll, chat, time-based, or adaptive webinar triggers. |
| Use conditions | Yes. | Add automation conditions so only matching attendees update Kit. |
| Run multiple Kit updates | Yes. | Create multiple rules for the same trigger, such as one rule to apply a tag and another to set fields. |
| Retry temporary provider failures | Yes. | WebinarStack retries transient failures in the background. |
Common use cases:
- Tag every new webinar registrant in Kit.
- Tag people who attended live.
- Tag no-shows differently from attendees.
- Tag high-intent viewers who watched most of the webinar.
- Tag people who clicked an offer.
- Remove an early-stage tag after someone becomes a high-intent lead.
- Set a
lead_sourcecustom field toWebinarStack. - Set a
last_webinarcustom field to the webinar title or campaign name. - Use Kit segments later to combine tags and fields into email follow-up groups.
What Kit Does In WebinarStack
Section titled “What Kit Does In WebinarStack”Kit is part of WebinarStack’s Email Service Providers integration section. It is not the same thing as Email Delivery.
| System | Purpose |
|---|---|
| Email Delivery | Sends WebinarStack emails through providers such as SendGrid or Postmark. |
| Kit integration | Updates Kit subscribers, tags, and custom fields through automation rules. |
| Webhooks and Zapier | Send richer event payloads to custom systems or no-code workflows. |
Use Kit when you want WebinarStack to update your Kit marketing list.
Use Email Delivery when you want WebinarStack to send its own confirmation, reminder, and follow-up emails through a sending provider.
Use Webhooks or Zapier when you need a custom payload, a CRM workflow, data enrichment, or routing beyond the built-in Kit actions.
Connecting Kit does not make Kit the sender for WebinarStack emails. If you want WebinarStack email automations to send from your own verified domain, set up Email Delivery.
What Kit Does Not Do
Section titled “What Kit Does Not Do”The Kit integration is intentionally focused on WebinarStack-to-Kit automation updates.
| Not Included | Use This Instead |
|---|---|
| Sending WebinarStack emails through Kit | Use Email Delivery with SendGrid or Postmark. |
| Importing Kit subscribers into WebinarStack | Register attendees through WebinarStack, the REST API, an embed, Zapier, or your own registration flow. |
| Creating Kit broadcasts, newsletters, forms, sequences, or products | Build and manage those inside Kit. |
| Creating tags from the automation picker | Create the tag in Kit first, then select it in WebinarStack. |
| Creating custom fields from the automation picker | Create the custom field in Kit first, then select or use its key in WebinarStack. |
| Bidirectional contact sync | Use API, webhooks, or a dedicated sync process if you need bidirectional state. |
| Replacing Kit’s consent and unsubscribe handling | Respect Kit’s subscriber state and your own consent process. |
| Showing a stored API key after setup | Create or reset the key in Kit, then reconnect WebinarStack. |
How The Pieces Fit Together
Section titled “How The Pieces Fit Together”The Kit integration has three layers.
| Layer | What It Stores Or Does | Why It Matters |
|---|---|---|
| Account connection | A Kit API key for the current WebinarStack workspace. | Gives WebinarStack permission to call Kit. |
| Webinar automation rule | Trigger, conditions, Integration action type, Kit provider, Kit action, and parameters. | Decides when WebinarStack should update Kit. |
| Background delivery | Worker decrypts the credential, calls Kit, records the result, and retries transient failures. | Keeps the attendee experience fast and gives you an audit trail. |
The normal flow is:
- You create a Kit V4 API key.
- You connect Kit in WebinarStack Settings.
- WebinarStack validates and stores the key.
- You create one or more automation rules for a webinar.
- An attendee registers, joins, watches, clicks, responds, or otherwise matches a trigger.
- WebinarStack checks the rule conditions.
- If the rule matches, WebinarStack sends the Kit action to a background worker.
- The worker updates Kit and records success or failure.
Before You Start
Section titled “Before You Start”Prepare these items before connecting Kit.
| Requirement | Why It Matters |
|---|---|
| Kit account with API access | WebinarStack uses the Kit API to update subscribers. |
| Kit V4 API key | This is the credential WebinarStack stores and uses. |
| Existing Kit tags | Tag actions search and apply tags that already exist in Kit. |
| Existing Kit custom fields | Field actions set values for custom fields that already exist in Kit. |
| Clear consent model | Adding or updating subscribers should match the permission you collected from attendees. |
| WebinarStack account access | You need access to Settings > Integrations and the webinar editor. |
Treat the Kit API key like a password. Do not paste it into public docs, support tickets, screenshots, issue trackers, browser recordings, or AI chats.
Step 1: Create A Kit V4 API Key
Section titled “Step 1: Create A Kit V4 API Key”In Kit, create a V4 API key from the Developer tab in your account settings. Kit’s own authentication docs say API keys are intended for simple tools and integrations for your own account, while OAuth is intended for public apps and broader third-party app flows.
Recommended key setup:
- Open Kit.
- Go to the account settings area.
- Open the Developer settings tab.
- Add a new V4 API key.
- Give the key a clear internal name, such as
WebinarStack Production. - Copy the key immediately and store it in your password manager.
- Paste it into WebinarStack only when you are ready to connect.
Kit notes that you will not be able to view the full key again after leaving the key creation screen. If you lose it, reset or create a new key in Kit and reconnect WebinarStack.
Kit API keys are currently limited by Kit to 120 requests per rolling 60 seconds per key. WebinarStack sends integration actions in the background and throttles provider delivery so normal webinar activity does not block the attendee experience.
Step 2: Connect Kit In WebinarStack
Section titled “Step 2: Connect Kit In WebinarStack”Connect Kit from the account settings area.
- Open WebinarStack.
- Go to Settings.
- Select Integrations.
- Scroll to Email Service Providers.
- Find the Kit card.
- Click Connect.
- Paste your Kit V4 API key.
- Click Connect.
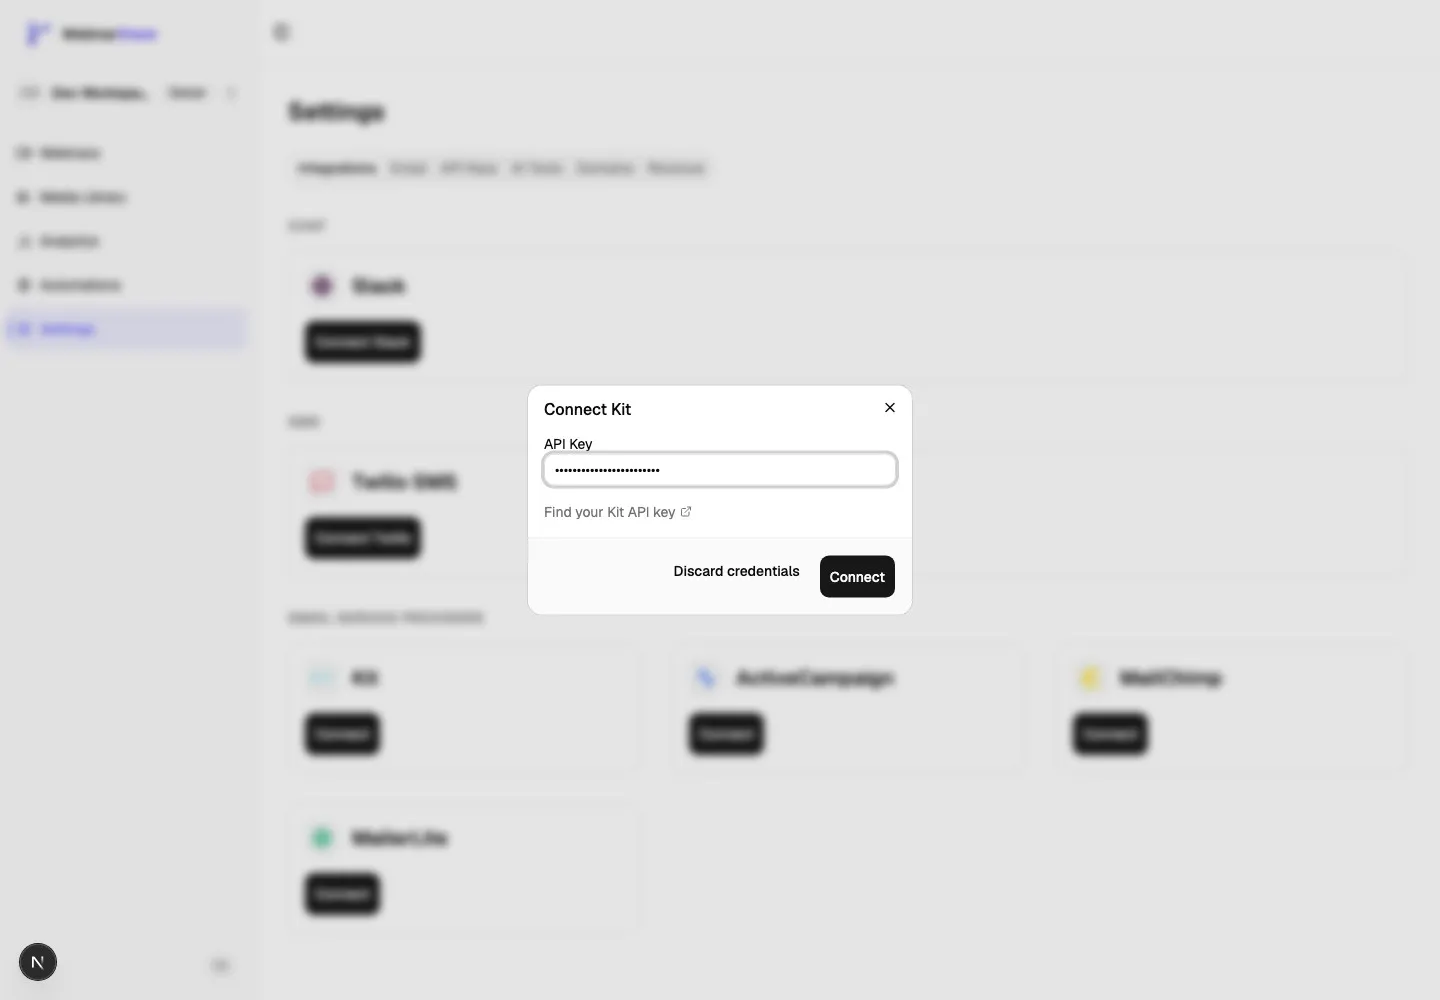
Unlike Mailchimp, Kit does not ask you to choose an audience during setup. Kit subscribers live in one account-wide subscriber list, and you organize that list with tags, segments, and fields.
Connection Fields
Section titled “Connection Fields”The Kit connection dialog is intentionally short.
| Field Or Control | What It Means | How To Use It |
|---|---|---|
| API Key | The Kit V4 API key WebinarStack will use for this workspace. | Paste the full key from Kit Developer settings. |
| Find your Kit API key | Opens Kit’s Developer settings page. | Use this if you need to create or locate a V4 API key. |
| Discard credentials | Closes the dialog without saving anything. | Use it if you pasted the wrong key or are not ready to connect. |
| Connect | Validates the key and stores the encrypted credential. | Click after pasting the key. If validation fails, check the key in Kit and try again. |
There is no account URL, region, audience picker, or default list selector for Kit.
Step 3: Confirm Kit Is Connected
Section titled “Step 3: Confirm Kit Is Connected”After connection, the Kit card shows a Connected badge and a Disconnect button.
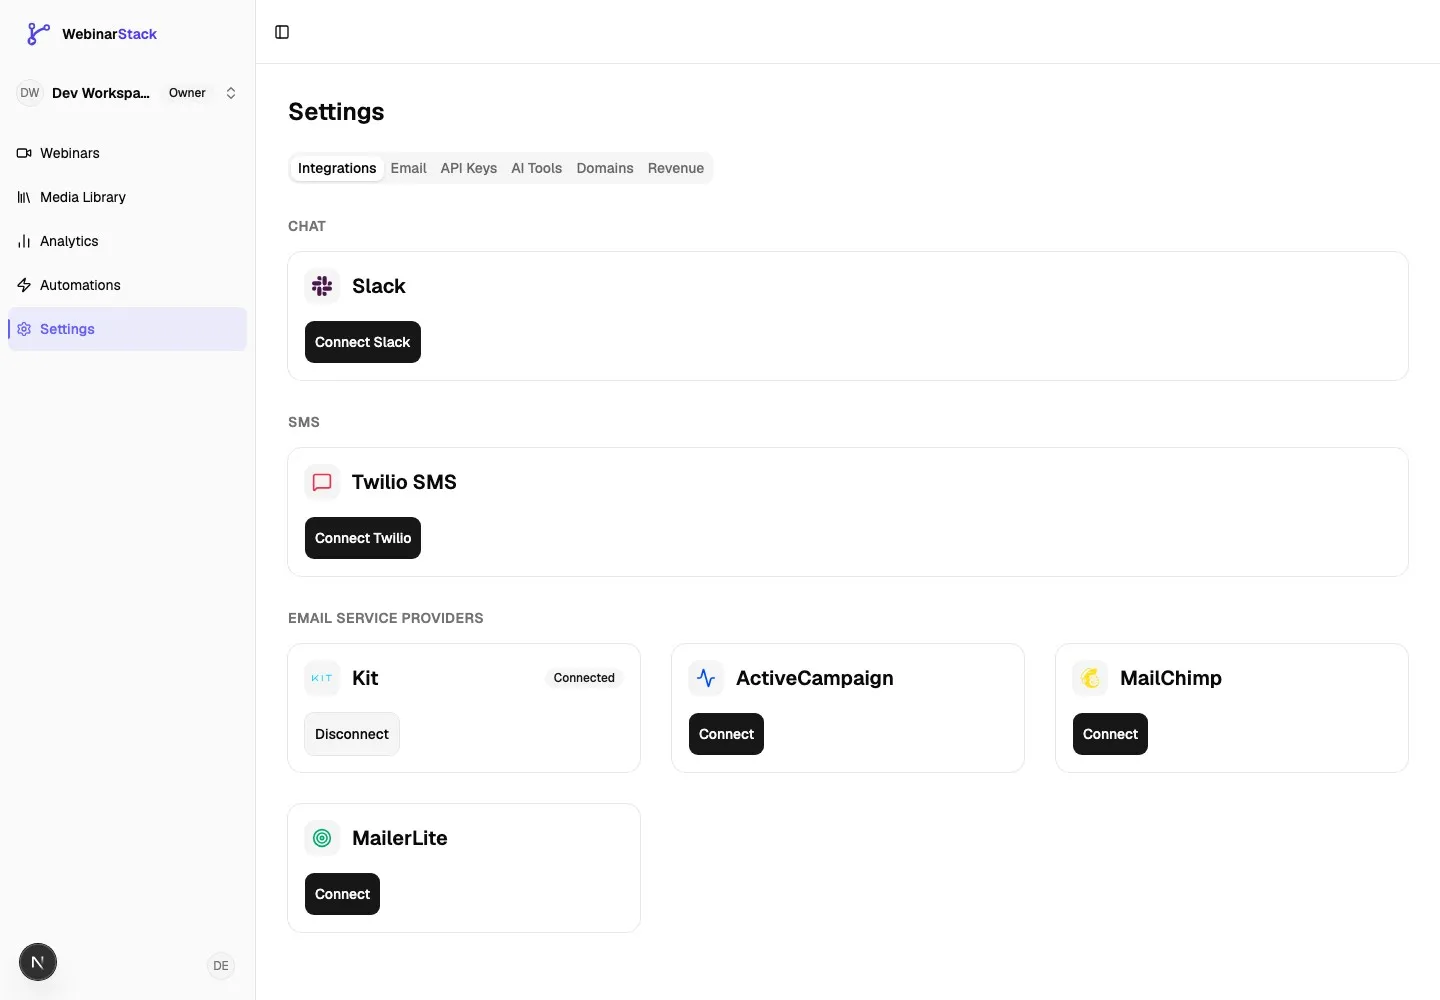
The connected card does not show the plaintext API key. If you lose the key, reset or create a new one in Kit and reconnect WebinarStack.
Connection states:
| State | Meaning | What To Do |
|---|---|---|
| Not connected | No usable Kit credential is stored. | Click Connect and paste a Kit V4 API key. |
| Connected | WebinarStack has a validated Kit key. | Create automation rules that use Kit. |
| Error | Kit rejected the key during validation or delivery. | Reconnect with a valid key. |
| Disconnected | The credential is absent or unusable. | Reconnect if future Kit updates should continue. |
Kit Subscribers, Tags, Segments, And Fields
Section titled “Kit Subscribers, Tags, Segments, And Fields”Understanding Kit’s data model helps you build cleaner automations.
Subscribers
Section titled “Subscribers”A subscriber is a person in Kit, identified primarily by email address. WebinarStack uses the attendee email address as the primary value when updating Kit.
For add/upsert actions, WebinarStack sends:
| Kit Field | WebinarStack Source |
|---|---|
email_address |
Attendee email address. |
first_name |
Attendee name when available. |
Kit’s create-subscriber endpoint behaves as an upsert: if the email does not exist, Kit creates a subscriber; if it already exists, Kit updates the first name.
Tags are labels in Kit. WebinarStack uses tags for behavior and lifecycle markers.
Good tag names are specific, consistent, and action-oriented:
| Tag | Meaning |
|---|---|
webinar-registered |
Contact registered for a webinar. |
webinar-attended-live |
Contact joined the webinar. |
webinar-no-show |
Contact registered but did not attend. |
webinar-watched-75 |
Contact watched at least 75 percent. |
offer-clicked-demo |
Contact clicked a demo or offer CTA. |
webinar-replay-viewed |
Contact watched the replay. |
Tags are best for yes/no states or segment membership. They answer questions like “Did this person do the thing?”
Segments
Section titled “Segments”Segments are built inside Kit from tags, fields, subscriber state, and other Kit conditions. WebinarStack does not directly create Kit segments. Instead, it writes tags and fields that Kit segments can use.
Example segment ideas:
| Segment | Possible Kit Rules |
|---|---|
| Hot webinar leads | Has webinar-watched-75 OR has offer-clicked-demo. |
| No-show nurture | Has webinar-registered AND has webinar-no-show. |
| Product demo follow-up | Has offer-clicked-demo AND custom field last_webinar is the product demo campaign. |
Custom Fields
Section titled “Custom Fields”Custom fields store values on a subscriber.
Use fields for data that has a value:
| Field Key | Example Value | Why It Is A Field |
|---|---|---|
lead_source |
WebinarStack |
Source is a value, not just a yes/no marker. |
last_webinar |
Product Demo Webinar |
The value can change over time. |
webinar_offer |
Annual plan demo |
Useful for personalization and segmentation. |
engagement_score |
High |
More descriptive than many overlapping tags. |
Kit custom fields have both human labels and API keys. For API-created automation rules, use the field key returned by Kit’s custom fields API, such as lead_source, not a display-only label.
Supported Kit Actions
Section titled “Supported Kit Actions”Kit supports four provider actions in WebinarStack.
| Dashboard Action | Internal Action | What It Does | Parameters |
|---|---|---|---|
| Add/upsert subscriber | add_subscriber |
Creates or updates the Kit subscriber by attendee email. | None. |
| Apply tag | tag_subscriber |
Applies one or more selected Kit tags to the attendee. | tags string array. |
| Remove tag | remove_tag |
Removes one or more selected Kit tags from the attendee. | tags string array. |
| Set custom field | set_field |
Sets one or more Kit custom fields on the subscriber. | fields array with key and value. |
Choose the smallest action that expresses what you want:
| Goal | Recommended Action |
|---|---|
| Make sure every registrant exists in Kit | Add/upsert subscriber. |
| Mark behavior or lifecycle stage | Apply tag. |
| Remove an outdated lifecycle marker | Remove tag. |
| Store campaign, source, preference, or score values | Set custom field. |
Create A Kit Automation
Section titled “Create A Kit Automation”After Kit is connected, create an automation rule from a webinar.
- Open the webinar.
- Select the Automations tab.
- Click Add automation.
- Give the rule a clear name.
- Choose the trigger.
- Add conditions if only some attendees should update Kit.
- Set Action Type to Integration.
- Set Provider to Kit.
- Choose the Kit action.
- Fill in the action parameters.
- Save the automation.
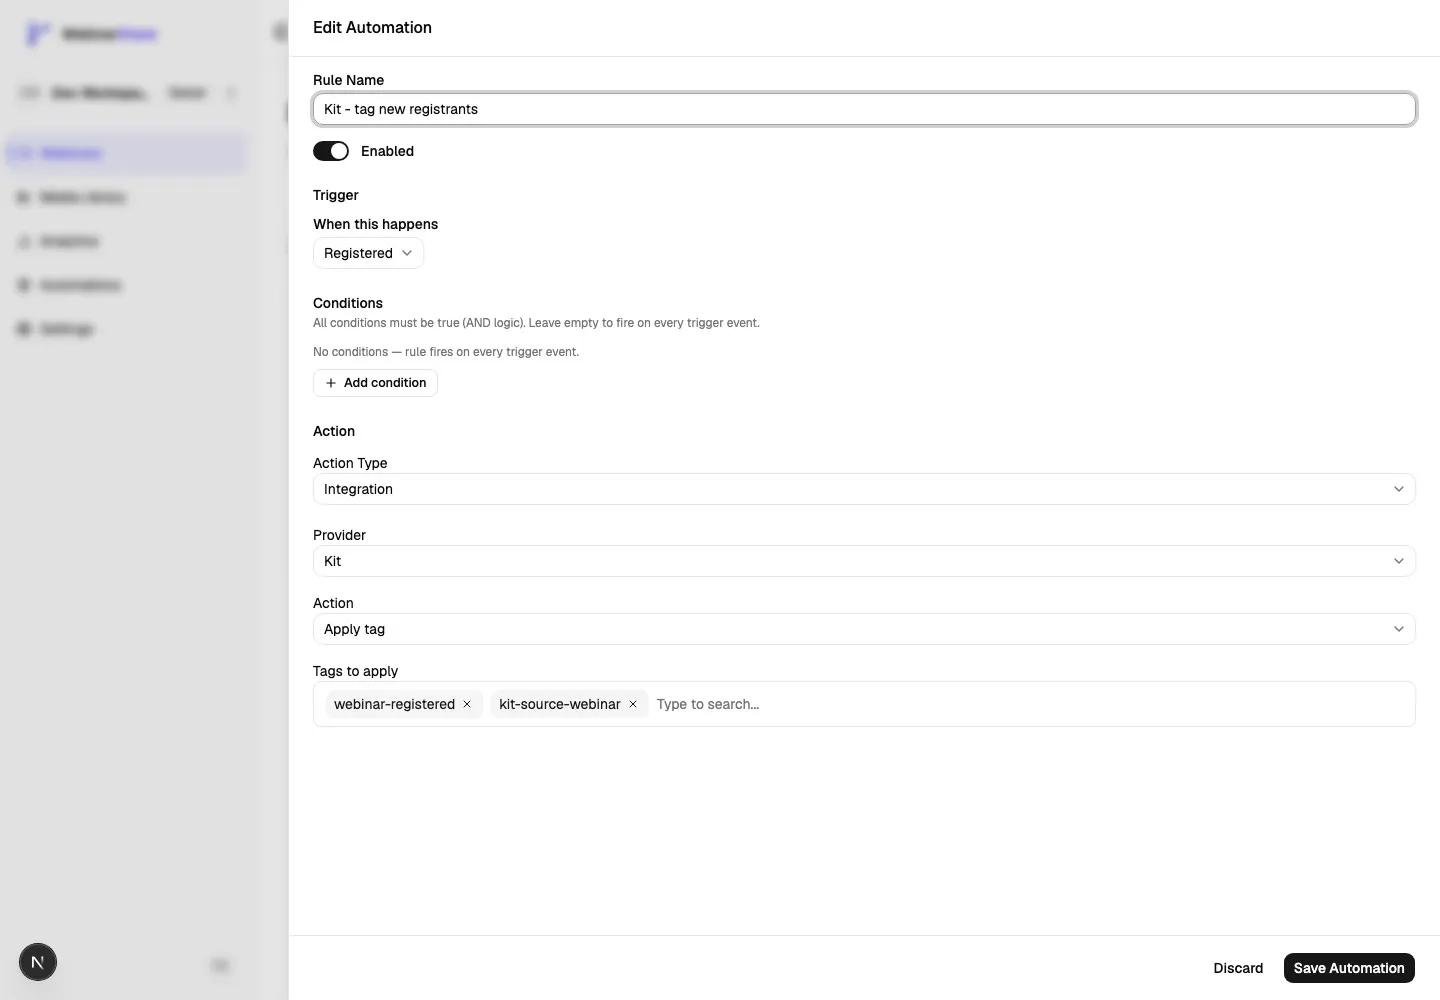
If no providers are connected, the Provider field shows an empty state and links back to Settings > Integrations.
Automation Fields
Section titled “Automation Fields”| Field | What It Means | Kit Guidance |
|---|---|---|
| Rule Name | Internal name for the automation rule. | Use a name such as Kit - tag new registrants or Kit - set post webinar source. |
| Enabled | Whether the rule can run. | Keep disabled while drafting a complex setup, then enable after testing. |
| Trigger | The event that starts rule evaluation. | Pick the attendee behavior you want Kit to remember. |
| Conditions | Optional filters that must all pass. | Use conditions to avoid over-tagging subscribers. |
| Action Type | The kind of action the rule performs. | Choose Integration for Kit. |
| Provider | The connected external provider. | Choose Kit. |
| Action | The specific Kit operation. | Choose add/upsert, apply tag, remove tag, or set custom field. |
| Parameters | Action-specific tags or fields. | Tags and fields must exist in Kit before reliable use. |
Kit Trigger Examples
Section titled “Kit Trigger Examples”| Webinar Goal | Trigger | Conditions | Kit Action |
|---|---|---|---|
| Add every registrant to Kit | Registered | None | Add/upsert subscriber. |
| Tag live attendees | Joined webinar | None | Apply webinar-attended-live. |
| Tag no-shows | Did not show up | None | Apply webinar-no-show. |
| Tag high-intent viewers | Watched at least X% | Minimum percentage watched is 75. | Apply webinar-watched-75. |
| Tag offer interest | Clicked an offer | Optional offer selector. | Apply offer-clicked-demo. |
| Store campaign source | Registered | None | Set lead_source to WebinarStack. |
| Store last webinar | Completed the video | None | Set last_webinar to the webinar name. |
| Remove generic nurture tag | Clicked an offer | None | Remove webinar-nurture. |
You can create several rules from the same trigger. For example, a Registered trigger can add the subscriber, apply a webinar registration tag, and set a lead-source field.
Apply Tags
Section titled “Apply Tags”Use Apply tag when a webinar event should add a label to the subscriber.
In the dashboard:
- Set Action Type to Integration.
- Set Provider to Kit.
- Set Action to Apply tag.
- Search for an existing Kit tag.
- Select one or more tags.
- Save the rule.
Behavior details:
- WebinarStack looks up the selected tag names in Kit.
- Tag names must exist in Kit.
- Tag matching is exact when the action runs.
- WebinarStack applies each selected tag to the attendee email.
- Kit expects the subscriber to already exist when applying tags by email.
- If Kit rejects a tag or the tag cannot be found, that delivery fails for that attendee.
If the attendee may not already exist in Kit, create a separate Add/upsert subscriber rule before relying on tag-only rules for that webinar.
Good tag hygiene:
- Use a consistent prefix, such as
webinar-. - Avoid tags that differ only by capitalization or punctuation.
- Do not create a new tag for every tiny event if a field would be clearer.
- Keep launch-specific tags separate from evergreen lifecycle tags.
Remove Tags
Section titled “Remove Tags”Use Remove tag when a subscriber should leave a stage or segment after a webinar behavior.
Examples:
| Trigger | Remove Tag | Why |
|---|---|---|
| Joined webinar | webinar-no-show |
The attendee is no longer a no-show. |
| Clicked an offer | cold-lead |
The attendee has shown higher intent. |
| Completed the video | needs-replay-reminder |
They no longer need replay nudges. |
Behavior details:
- WebinarStack resolves the selected tag names to Kit tag IDs.
- WebinarStack finds the Kit subscriber by attendee email.
- If the subscriber is not found, the remove-tag action is skipped for that attendee.
- Removing a tag does not remove the subscriber from Kit.
- Removing one tag does not remove other tags.
Add Or Upsert A Subscriber
Section titled “Add Or Upsert A Subscriber”Use Add/upsert subscriber when the main goal is to make sure the attendee exists in Kit.
This action has no parameters. It sends the attendee email address and attendee name when available.
Recommended uses:
- Add every new registrant to Kit.
- Add replay viewers to Kit.
- Make sure a subscriber exists before other workflows rely on them.
For many workflows, Apply tag is more useful than a bare add/upsert because the tag gives you segmentation data. If your rule applies a tag, the subscriber must exist in Kit first. Create a matching add/upsert rule when you need WebinarStack to create the subscriber, then test the full workflow with a real internal email before launch.
Set Custom Fields
Section titled “Set Custom Fields”Use Set custom field when you need to write values onto the Kit subscriber.
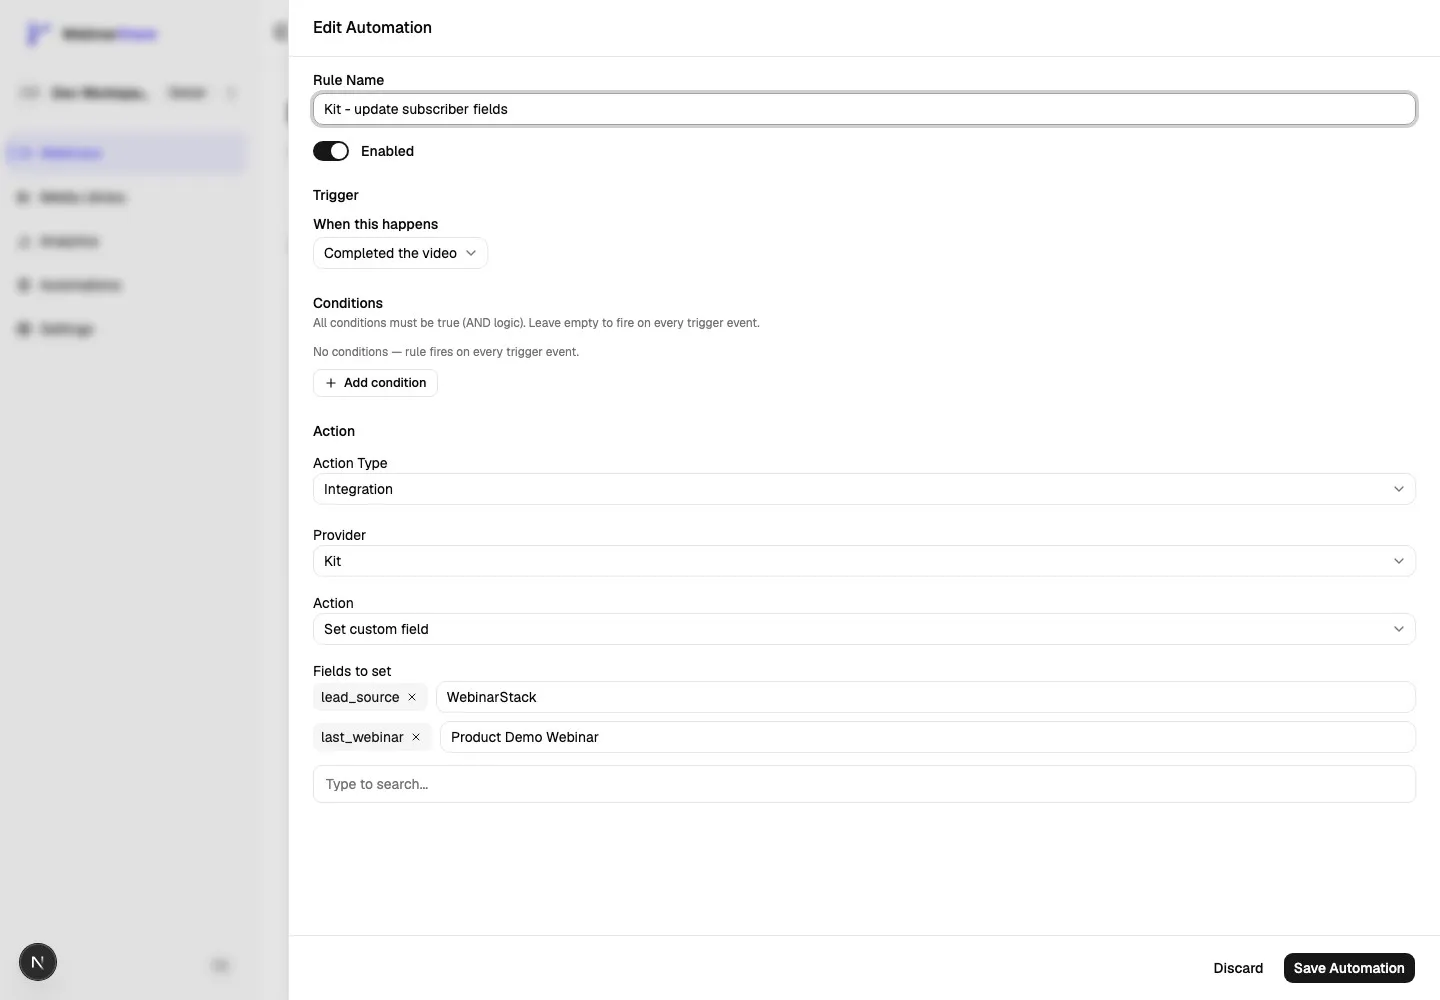
In the dashboard:
- Set Action Type to Integration.
- Set Provider to Kit.
- Set Action to Set custom field.
- Add the field to set.
- Enter the value.
- Save the rule.
Field behavior:
- Kit custom fields must already exist in Kit.
- Kit requires the API key for the field when writing through the API.
- WebinarStack sends the attendee email address plus a
fieldsobject. - Kit can reject the request if a field key does not exist.
- Kit currently limits create/update subscriber requests to 140 custom fields at a time.
Examples:
| Field Key | Value | When To Set It |
|---|---|---|
lead_source |
WebinarStack |
On registration. |
last_webinar |
Product Demo Webinar |
On registration or video completion. |
engagement_score |
High |
After a high watch percentage or offer click. |
preferred_topic |
Automation |
After a poll response or branch choice. |
Plan Your Kit Data Model
Section titled “Plan Your Kit Data Model”Before creating many automations, decide what belongs in tags and what belongs in fields.
Use tags for:
- Yes/no membership.
- Lifecycle states.
- Campaign participation.
- Event completion.
- Triggering Kit visual automations or sequences.
Use fields for:
- Values that can change.
- Source, topic, product, webinar, or campaign names.
- Scores or classifications.
- Values you want to merge into Kit email copy.
- Data where many tag variants would become messy.
Good starting structure:
| Type | Examples |
|---|---|
| Registration tags | webinar-registered, webinar-demo-registered. |
| Attendance tags | webinar-attended-live, webinar-no-show, webinar-replay-viewed. |
| Engagement tags | webinar-watched-50, webinar-watched-75, offer-clicked-demo. |
| Source fields | lead_source, last_webinar, webinar_campaign. |
| Preference fields | preferred_topic, product_interest, persona. |
Avoid creating too many overlapping tags. For example, instead of creating tags for every webinar title forever, use a stable webinar-registered tag plus a last_webinar custom field.
API-Created Kit Automations
Section titled “API-Created Kit Automations”If you create automation rules through the WebinarStack REST API, MCP tools, or another internal process, use the Kit provider slug and action IDs shown below.
Provider slug:
"kit"Add Or Upsert Subscriber
Section titled “Add Or Upsert Subscriber”{ "actionType": "integration", "actionConfig": { "provider": "kit", "action": "add_subscriber", "params": {} }}Apply Tags
Section titled “Apply Tags”{ "actionType": "integration", "actionConfig": { "provider": "kit", "action": "tag_subscriber", "params": { "tags": ["webinar-registered", "webinar-watched-75"] } }}Remove Tags
Section titled “Remove Tags”{ "actionType": "integration", "actionConfig": { "provider": "kit", "action": "remove_tag", "params": { "tags": ["webinar-no-show"] } }}Set Custom Fields
Section titled “Set Custom Fields”{ "actionType": "integration", "actionConfig": { "provider": "kit", "action": "set_field", "params": { "fields": [ { "key": "lead_source", "value": "WebinarStack" }, { "key": "last_webinar", "value": "Product Demo Webinar" } ] } }}For API-created rules, the field key values should match Kit custom field keys. You can retrieve them from Kit’s List custom fields API.
Delivery And Reliability
Section titled “Delivery And Reliability”Kit actions run in the background.
- A webinar event happens.
- WebinarStack evaluates matching automation rules.
- If a Kit rule matches, WebinarStack creates or updates an automation execution record.
- The integration worker loads the rule, registration, and Kit credential.
- The worker decrypts the Kit key only for the delivery step.
- The worker calls Kit.
- WebinarStack records success or failure.
- Temporary failures can be retried.
Important delivery behavior:
| Behavior | Meaning |
|---|---|
| Async delivery | Attendees do not wait for Kit to respond. |
| Encrypted credential storage | Kit API keys are encrypted at rest. |
| Scoped decryption | The key is decrypted only inside the background dispatch step. |
| Provider throttling | WebinarStack throttles integration delivery per provider and account. |
| Retries | Temporary provider failures can be retried. |
| Idempotency | Duplicate delivery attempts are guarded by the automation execution and delivery ledger. |
| Credential errors | If Kit rejects the API key, WebinarStack marks the integration as errored so it can be reconnected. |
| Recipient-level issues | A problem with one subscriber does not automatically mean the whole Kit connection is broken. |
If Kit is slow or temporarily unavailable, the attendee-facing webinar flow continues. The Kit update may complete later or fail after retries.
Disconnect Or Reconnect Kit
Section titled “Disconnect Or Reconnect Kit”To disconnect Kit:
- Open Settings.
- Select Integrations.
- Find the Kit card.
- Click Disconnect.
- Confirm the disconnect.
Disconnecting Kit:
- Deletes the stored Kit credential from WebinarStack.
- Disables automation rules that use Kit.
- Adds a disabled reason to affected rules.
- Stops future Kit deliveries until Kit is reconnected and rules are reviewed.
Reconnect Kit when:
- The API key was reset in Kit.
- The key was deleted in Kit.
- WebinarStack shows the Kit card in an error state.
- You want WebinarStack to use a different Kit key.
After reconnecting, review disabled Kit rules before turning them back on.
Testing Checklist
Section titled “Testing Checklist”Use this checklist before relying on Kit automations for a launch.
- Confirm the Kit card is connected in Settings > Integrations.
- Confirm the tags you need already exist in Kit.
- Confirm the custom fields you need already exist in Kit.
- Create a simple internal automation, such as Registered > Integration > Kit > Apply tag.
- Register for the webinar with a real internal email address.
- Wait for background delivery.
- Open Kit and search for the subscriber.
- Confirm the subscriber exists.
- Confirm the expected tags were applied or removed.
- Confirm custom field values were written exactly as expected.
- Test no-show, watch-time, offer-click, or replay rules separately if you use them.
- Disable or remove test-only tags after testing.
Use a real internal email address for testing. Fake domains, previously unsubscribed subscribers, or unusual recipient states can make provider behavior harder to interpret.
Troubleshooting
Section titled “Troubleshooting”Kit Says The API Key Is Invalid
Section titled “Kit Says The API Key Is Invalid”Check:
- The key is a Kit V4 API key.
- The full key was pasted.
- The key was not reset or deleted in Kit.
- The key belongs to the Kit account you expect.
- The Kit account plan is eligible for API use.
If the key was lost, reset or create a new key in Kit and reconnect WebinarStack.
Kit Connects, But Tags Do Not Appear
Section titled “Kit Connects, But Tags Do Not Appear”Check:
- The Kit card is connected.
- The tag exists in Kit.
- The tag name is spelled the way you expect.
- You are searching for the tag name, not a segment name.
- The Kit account does not have an unusually large tag catalog that requires support assistance.
Create missing tags in Kit first, then return to WebinarStack.
A Tag Automation Failed
Section titled “A Tag Automation Failed”Check:
- The automation rule is enabled.
- The provider is Kit.
- The action is Apply tag or Remove tag.
- The selected tags still exist in Kit.
- The attendee email address is valid.
- The attendee actually matched the trigger and conditions.
- Kit did not reject the API key or rate limit the request.
For remove-tag actions, if the subscriber does not exist in Kit, WebinarStack skips the removal for that attendee.
A Custom Field Was Not Updated
Section titled “A Custom Field Was Not Updated”Check:
- The custom field exists in Kit.
- You are using the custom field key, not only the display label.
- The attendee email address is valid.
- The value fits the field’s intended format.
- The Kit connection is still healthy.
- The automation trigger and conditions actually matched.
If you are creating rules through API or MCP, retrieve field keys from Kit’s List custom fields endpoint and use those exact keys in params.fields.
The Provider Field Says No Providers Connected
Section titled “The Provider Field Says No Providers Connected”This means the automation editor cannot see a connected email service provider.
Check:
- Open Settings > Integrations.
- Confirm Kit shows Connected.
- If Kit is disconnected or in error, reconnect it.
- Return to the webinar editor and reopen the automation rule.
Disconnecting Kit Disabled Rules
Section titled “Disconnecting Kit Disabled Rules”Disconnecting a provider disables dependent automation rules so they do not silently fail later. Reconnect Kit, review each disabled rule, and re-enable only the rules you still want to run.
Best Practices
Section titled “Best Practices”- Create tags and fields in Kit before building WebinarStack rules.
- Use tags for lifecycle and behavior states.
- Use fields for values that can change or personalize email copy.
- Keep tag names consistent and readable.
- Test every Kit automation with an internal registration before launch.
- Do not paste real Kit API keys into AI tools or public tickets.
- Reconnect Kit after resetting the API key in Kit.
- Review Kit automations after changing your webinar offer, funnel, or follow-up strategy.
- Use Webhooks or Zapier for payloads that are richer than Kit tags and fields.
- Keep Email Delivery separate from Kit list updates in your mental model.
Prompts You Can Ask An AI
Section titled “Prompts You Can Ask An AI”AI can help you plan Kit tags, fields, and automation rules. Do not paste real API keys, private attendee data, or customer lists into AI tools.
Prompt: Plan Kit Tags And Fields
Section titled “Prompt: Plan Kit Tags And Fields”I am using WebinarStack with Kit.
My webinar goal is:[describe the webinar and offer]
Attendee behaviors I care about:- Registered- Attended live- No-show- Watched at least 75 percent- Clicked offer- Completed replay
Help me design a clean Kit data model.Recommend which values should be Kit tags and which should be Kit custom fields.Use simple tag names, avoid duplication, and include a testing checklist.Do not ask me for real API keys or attendee data.Prompt: Design A Kit Automation Rule
Section titled “Prompt: Design A Kit Automation Rule”Help me design a WebinarStack automation rule that updates Kit.
Goal:[example: tag high-intent leads who clicked the webinar offer]
Available WebinarStack triggers:- Registered- Joined webinar- No-show- Watched at least X minutes- Watched at least X percent- Completed video- Clicked offer- Responded to poll- Sent chat message- Time elapsed
Available Kit actions:- Add/upsert subscriber- Apply tag- Remove tag- Set custom field
Please recommend:- Trigger- Conditions- Kit action- Tags or custom fields to use- Rule name- Test steps before launchPrompt: Write API Action Config JSON
Section titled “Prompt: Write API Action Config JSON”Help me write the actionConfig JSON for a WebinarStack automation that updates Kit.
Provider slug must be "kit".
I want to:[apply tags / remove tags / add subscriber / set custom fields]
Known Kit tag names:[list tags]
Known Kit custom field keys:[list field keys, not labels]
Return only valid JSON for actionConfig and explain any assumptions after the JSON.Do not include API keys or private attendee data.Prompt: Troubleshoot Kit Delivery
Section titled “Prompt: Troubleshoot Kit Delivery”I am troubleshooting a WebinarStack to Kit automation.
Automation:- Trigger: [trigger]- Conditions: [conditions]- Kit action: [action]- Tags or fields: [values]- Expected result: [what should happen]- Actual result: [what happened]
Give me a checklist that covers WebinarStack rule setup, Kit connection state, Kit tags, Kit custom fields, subscriber email validity, API key validity, and provider rate limits.Do not ask me for real API keys.Official Kit Resources
Section titled “Official Kit Resources”These Kit resources are useful when you are setting up or troubleshooting the WebinarStack integration:
- Kit API Overview
- Kit API Authentication
- Create a subscriber
- List tags
- Tag a subscriber by email address
- Remove tag from subscriber by email address
- List custom fields
- Tags and Segments in Kit